
Mold in an HVAC system is a different problem than mold on a bathroom wall. Once it takes hold inside your ductwork, every time the system runs it carries spores into every room in the house. The source is hidden, the spread is continuous, and many homeowners spend months treating symptoms without realizing the air they are breathing is the problem.
HVAC mold refers to fungal growth inside heating, ventilation, and air conditioning components, including ductwork, evaporator coils, drain pans, and air handlers. Remediation is governed by the ANSI/IICRC S520 Standard for Professional Mold Remediation, which directs contractors to also follow ACR, the NADCA Standard for Assessment, Cleaning and Restoration of HVAC Systems, whenever the HVAC system is involved. What follows covers how to identify HVAC mold, what causes it, when ductwork must be replaced rather than cleaned, what professional remediation involves, and what it costs.
Key insights
- HVAC mold spreads continuously. Unlike mold in a single room, mold inside ductwork disperses spores throughout every room each time the system cycles.
- Fiberglass liner cannot be cleaned. The EPA, NADCA, and NAIMA all state that wet or moldy fiberglass duct material must be replaced, not cleaned. No EPA-registered biocide exists for porous duct materials.
- Shut the system off immediately. Running an HVAC system with active mold growth accelerates spore distribution. Turn it off until a professional inspection is completed.
- The moisture source must be fixed first. Cleaning mold without correcting the underlying moisture problem produces only a temporary result.
- HVAC remediation follows two standards. Per IICRC S520, when mold involves HVAC systems, contractors must also follow the NADCA ACR standard for assessment, cleaning, and restoration.
- Cost ranges from $2,000 to $10,000. Central air conditioning systems cost the most to remediate because of the volume of ductwork and moisture inherent in the cooling process.
Signs you have mold in your HVAC system
The most reliable early indicator of HVAC mold is a musty or earthy odor that appears specifically when the system turns on and fades after it shuts off. Mold releases microbial volatile organic compounds (mVOCs) that travel directly into living spaces through the air supply, which is why the odor tracks with system operation rather than appearing constantly.
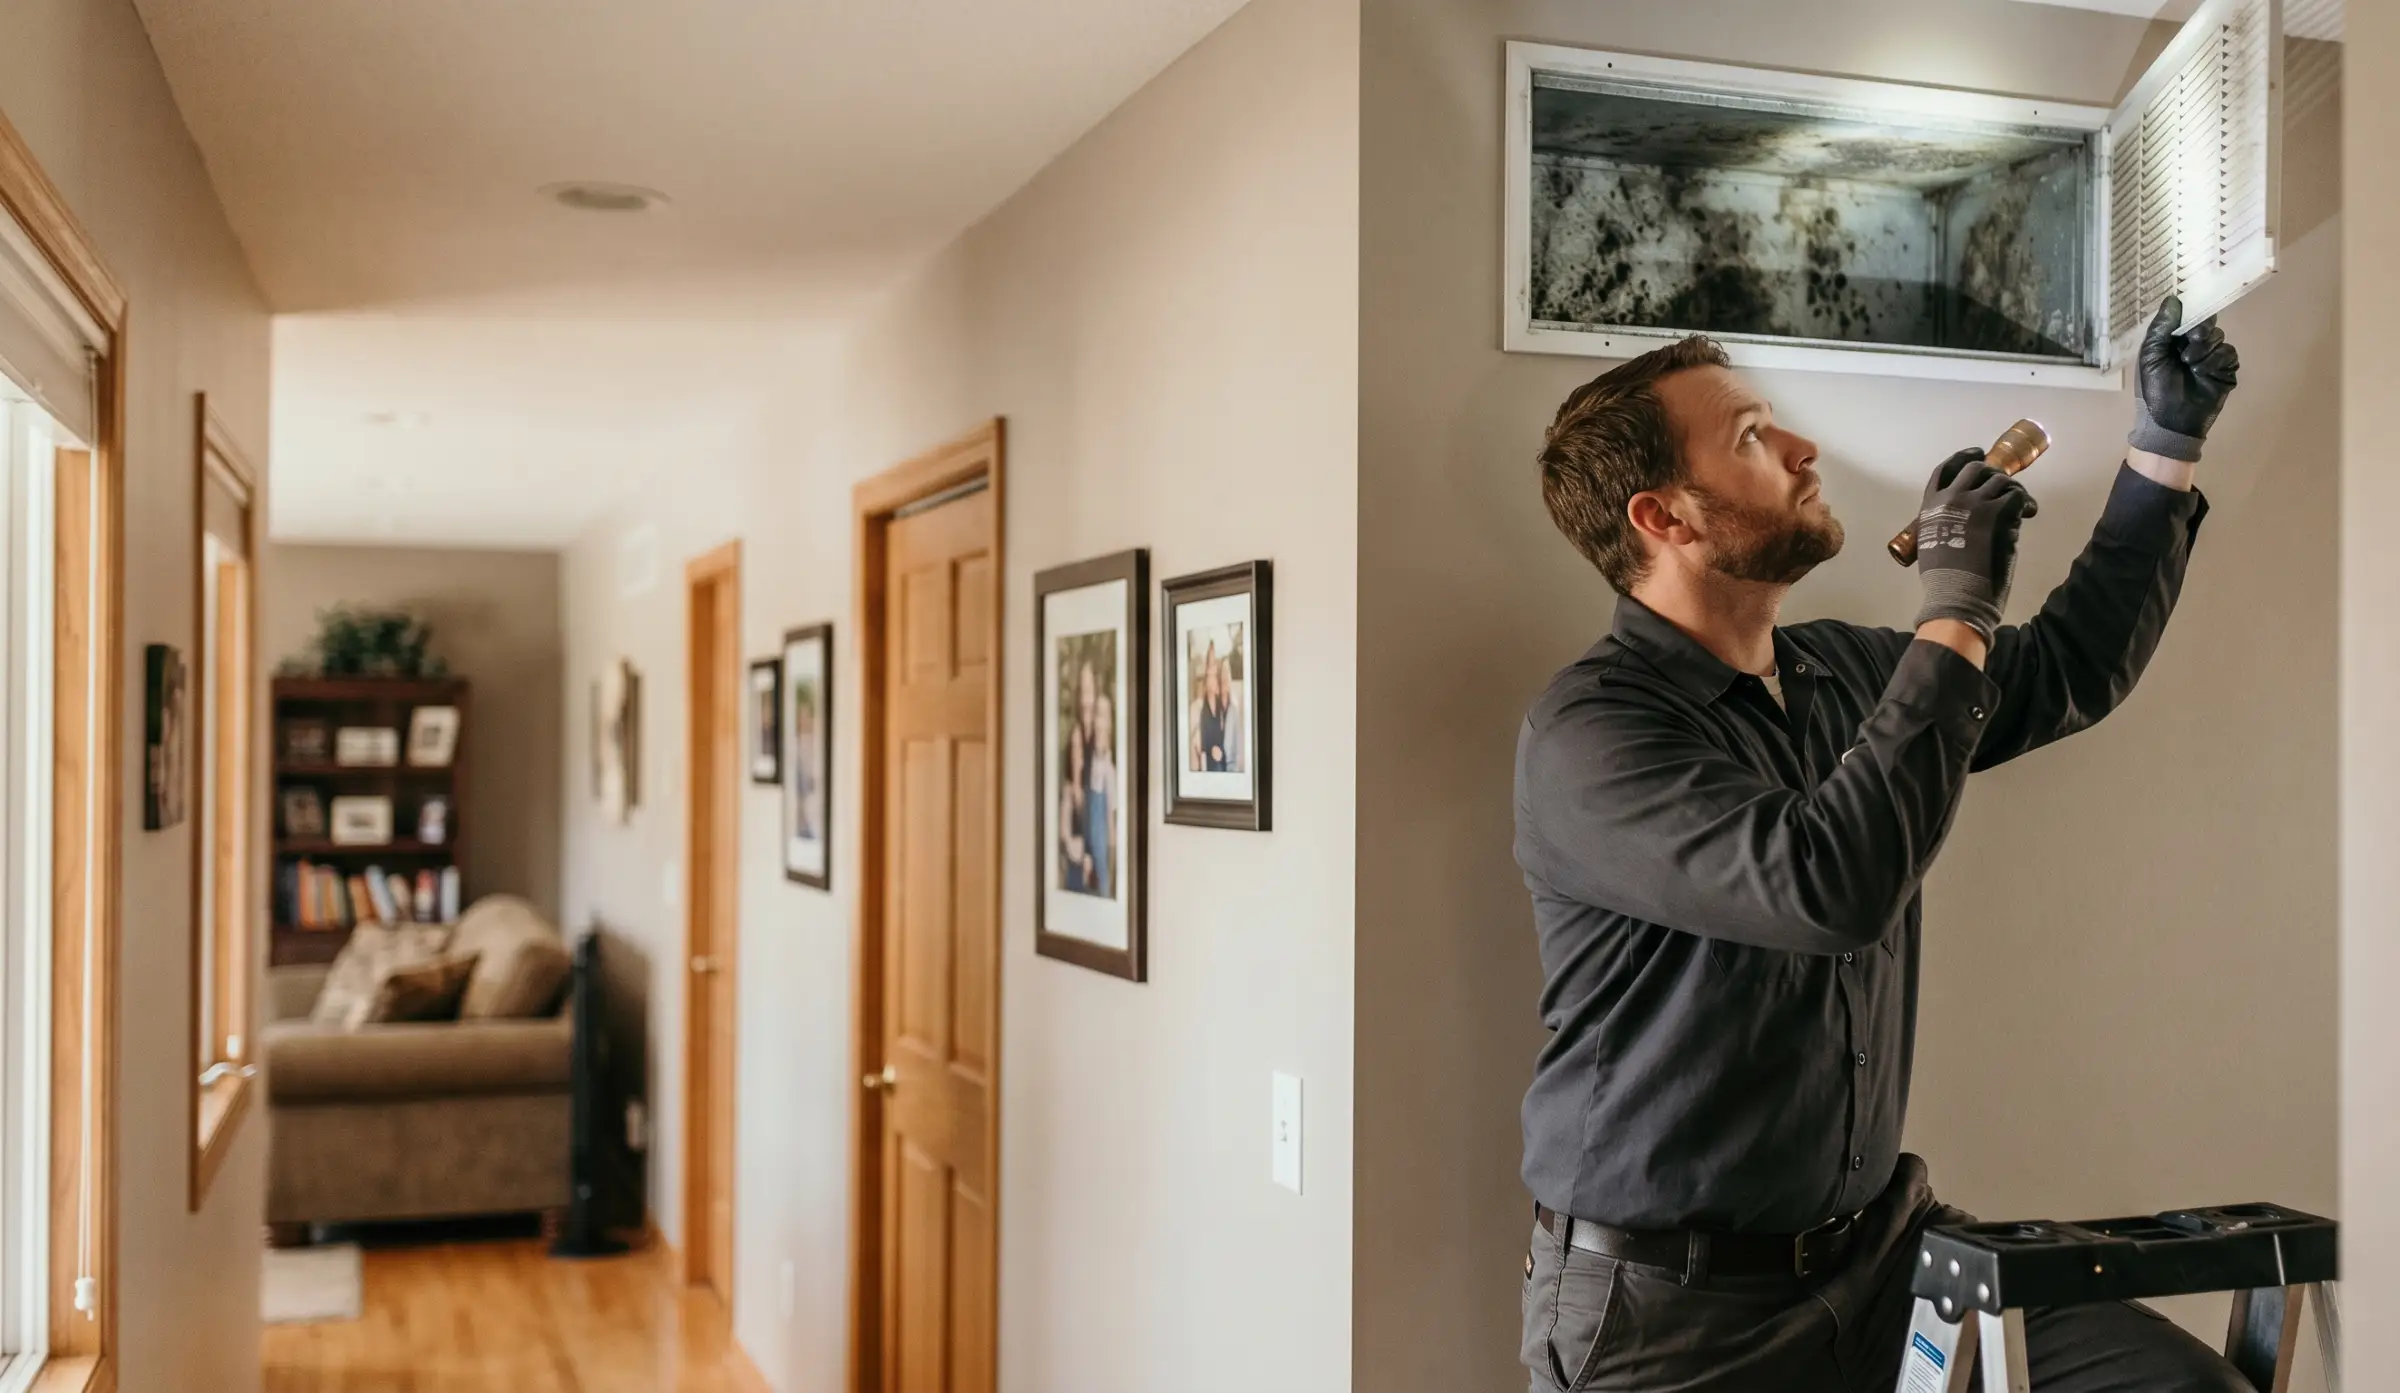
Visible growth around the register face like this is a late-stage signal. By the time mold reaches the grille, it has typically been colonizing the ductwork and air handler components upstream for weeks or months. The signs below range from early indicators you can detect without opening the system to visible evidence that confirms active growth.
Additional signs to check:
| Sign | What it indicates |
|---|---|
| Musty odor when system runs, gone when off | Active mold growth inside the system or ductwork |
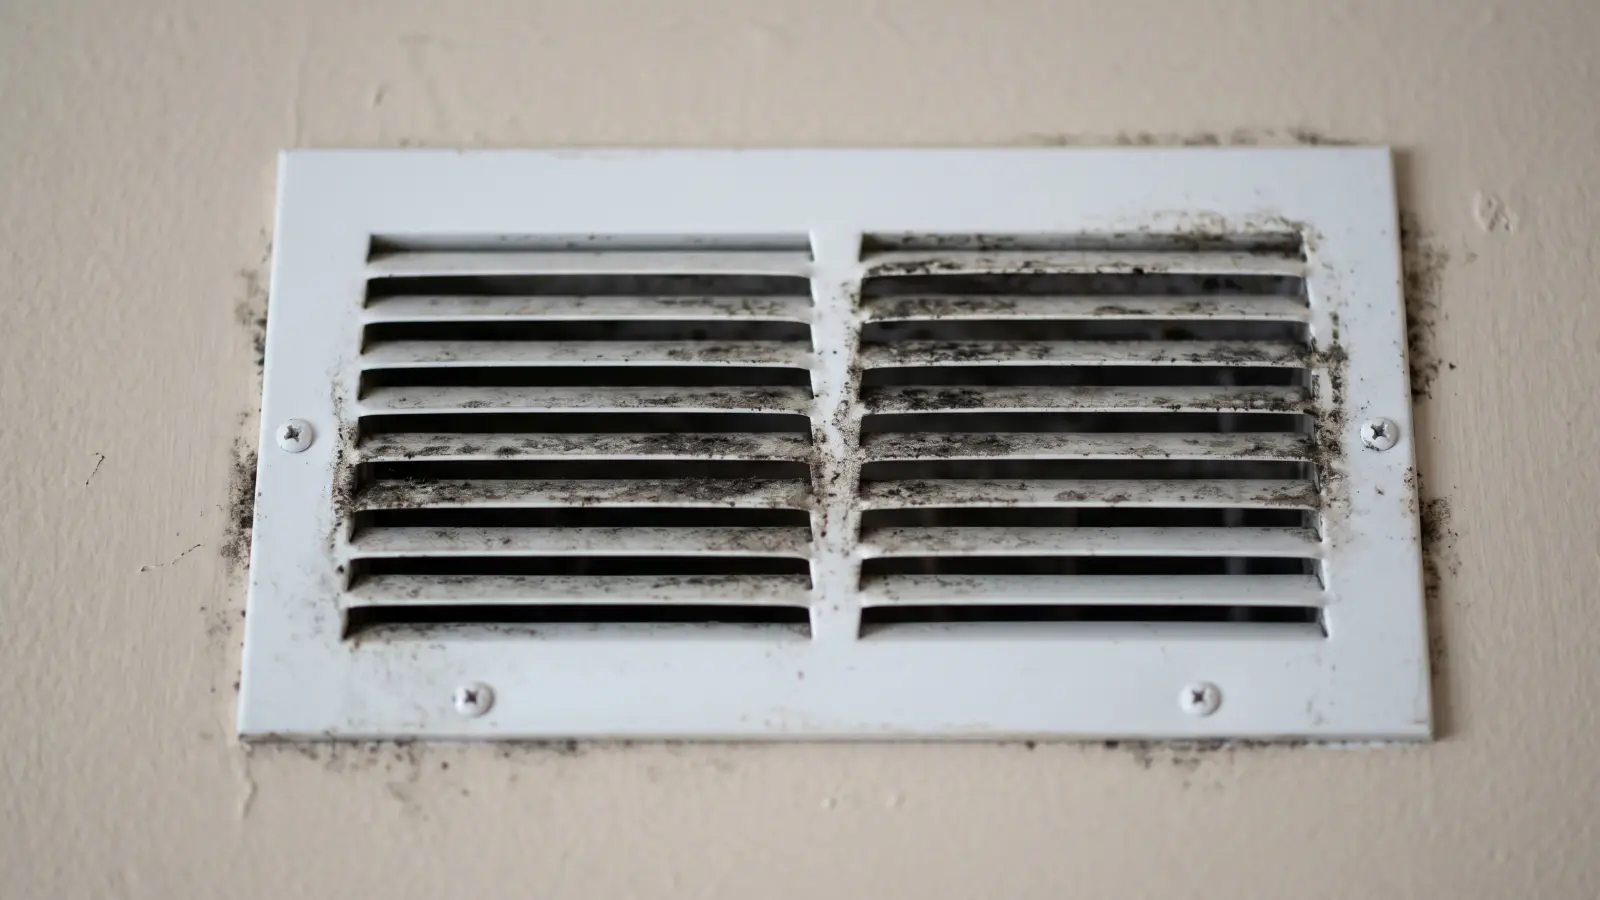
| Dark streaks or discoloration around registers | Mold growing on or near supply vents, spores depositing on grille edges |
| Allergy symptoms at home, better when away | Airborne spore exposure correlating with time in the house |
| Symptoms flare within minutes of system turning on | Spores entering the air supply immediately at startup |
| Headaches, fatigue, or dizziness only indoors | Possible mycotoxin exposure from heavier contamination |
| Visible moisture or standing water in drain pan | Condensate drain failure, primary cause of evaporator coil mold |
| Condensation on duct exteriors | Inadequate insulation or humidity entering through duct leaks |
If you notice any combination of these, the correct first step is to turn off the system and schedule a professional camera inspection rather than running the HVAC while you investigate further. For a broader look at mold warning signs throughout the home, signs of mold covers indicators by location and severity.
Why HVAC systems are prone to mold
HVAC systems are among the highest-risk environments in a home for mold growth because they combine three conditions that mold requires: moisture, darkness, and an organic food source in the form of accumulated dust, dead skin cells, and debris. The cooling process is the primary driver: when warm, humid air passes over cold evaporator coils, condensation forms. If that condensate does not drain properly, standing moisture remains inside the air handler.
Specific causes by frequency:
| Cause | How it creates mold conditions |
|---|---|
| Condensate drain clogs | Standing water in drain pan feeds evaporator coil mold |
| High indoor humidity | Moisture condenses on duct surfaces when cold air passes through |
| Duct leaks | Humid unconditioned air infiltrates ductwork and condenses |
| Infrequent filter changes | Dust and debris accumulate, providing mold's food source |
| Oversized HVAC unit | Short-cycling fails to dehumidify air adequately between cycles |
| Water intrusion near air handler | Flooding, roof leaks, or plumbing failures introducing moisture |
| Fiberglass duct liner degradation | Damaged liner holds moisture and cannot be effectively cleaned |
When moisture inside your HVAC system originated from a flooding event or water damage, mold after water damage covers the broader remediation timeline for those situations.
Where mold grows in HVAC systems
Mold in an HVAC system concentrates at six specific components: evaporator coils, condensate drain pans, air handlers and blower wheels, supply ductwork, return ductwork, and registers and grilles. Each location has different cleaning or replacement requirements depending on the material and extent of contamination.
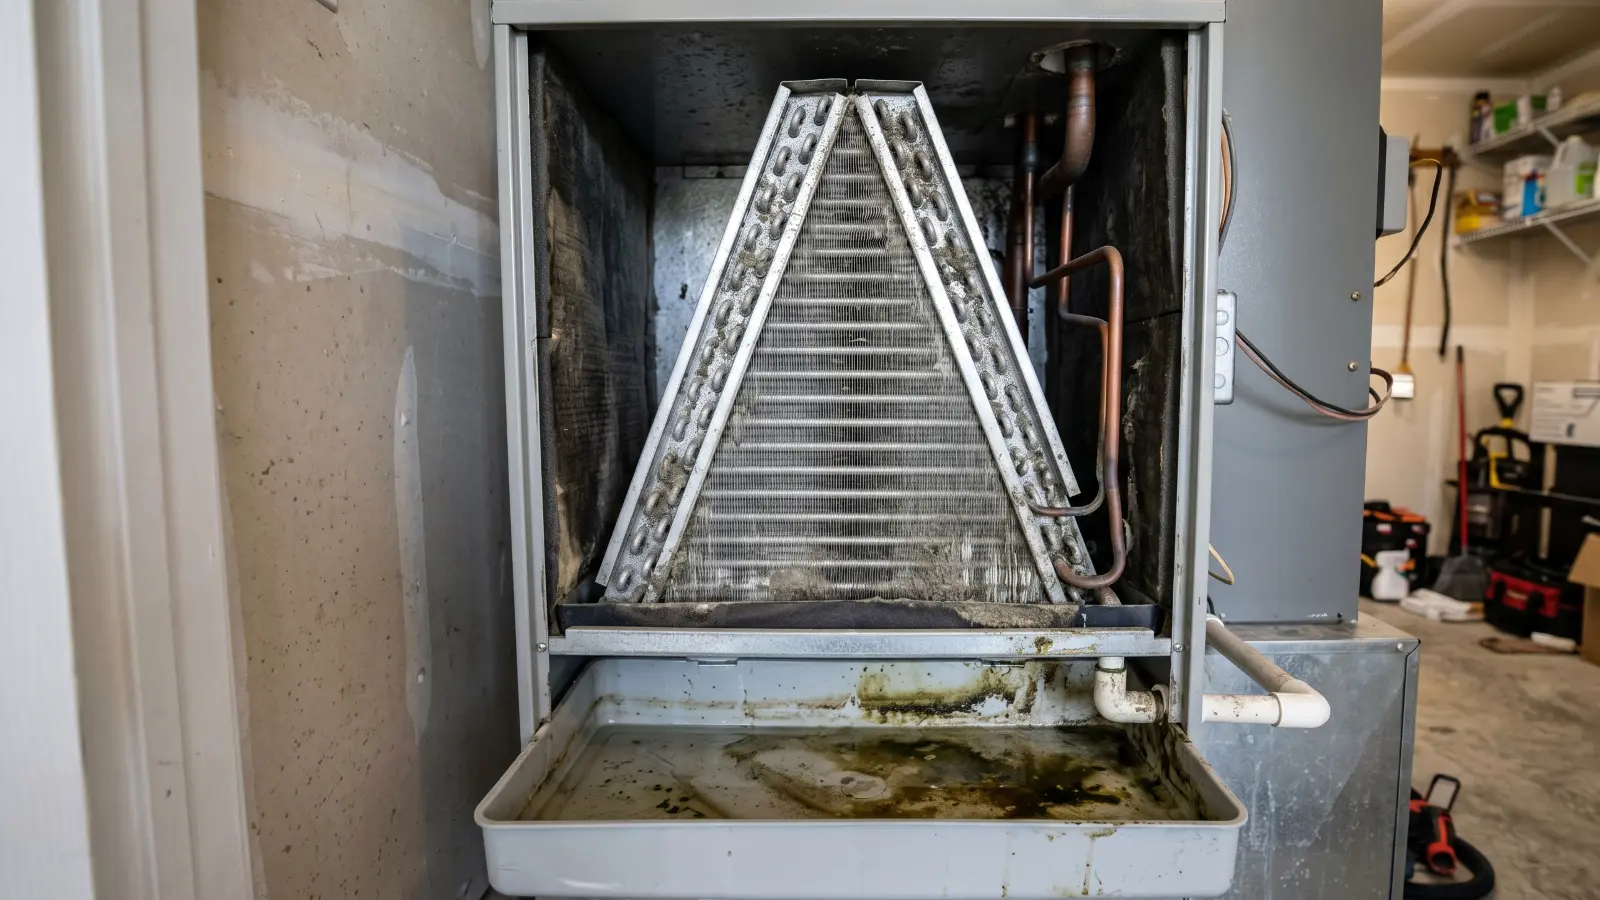
Evaporator coils
The evaporator coil is the most common location for HVAC mold. Cold refrigerant passing through the coil causes humid air to condense on the coil surface. When the condensate drain is partially or fully clogged, moisture remains in contact with the coil and surrounding components. Coils can be cleaned with appropriate biocides if the substrate is metal and the contamination has not spread into the air handler cabinet insulation.
Condensate drain pan
The drain pan sits directly below the evaporator coil and collects condensation during operation. Partial clogs allow water to sit rather than drain, creating a standing moisture reservoir. Algae and mold growth in the drain pan is extremely common and is often the source of musty odors even when ductwork contamination is minimal.
Air handler and blower
The air handler cabinet and blower motor housing are in the direct path of both moisture and biological growth from upstream components. Mold on the blower wheel is particularly problematic because the spinning wheel actively disperses spores into the supply air stream with each rotation.
Supply ductwork
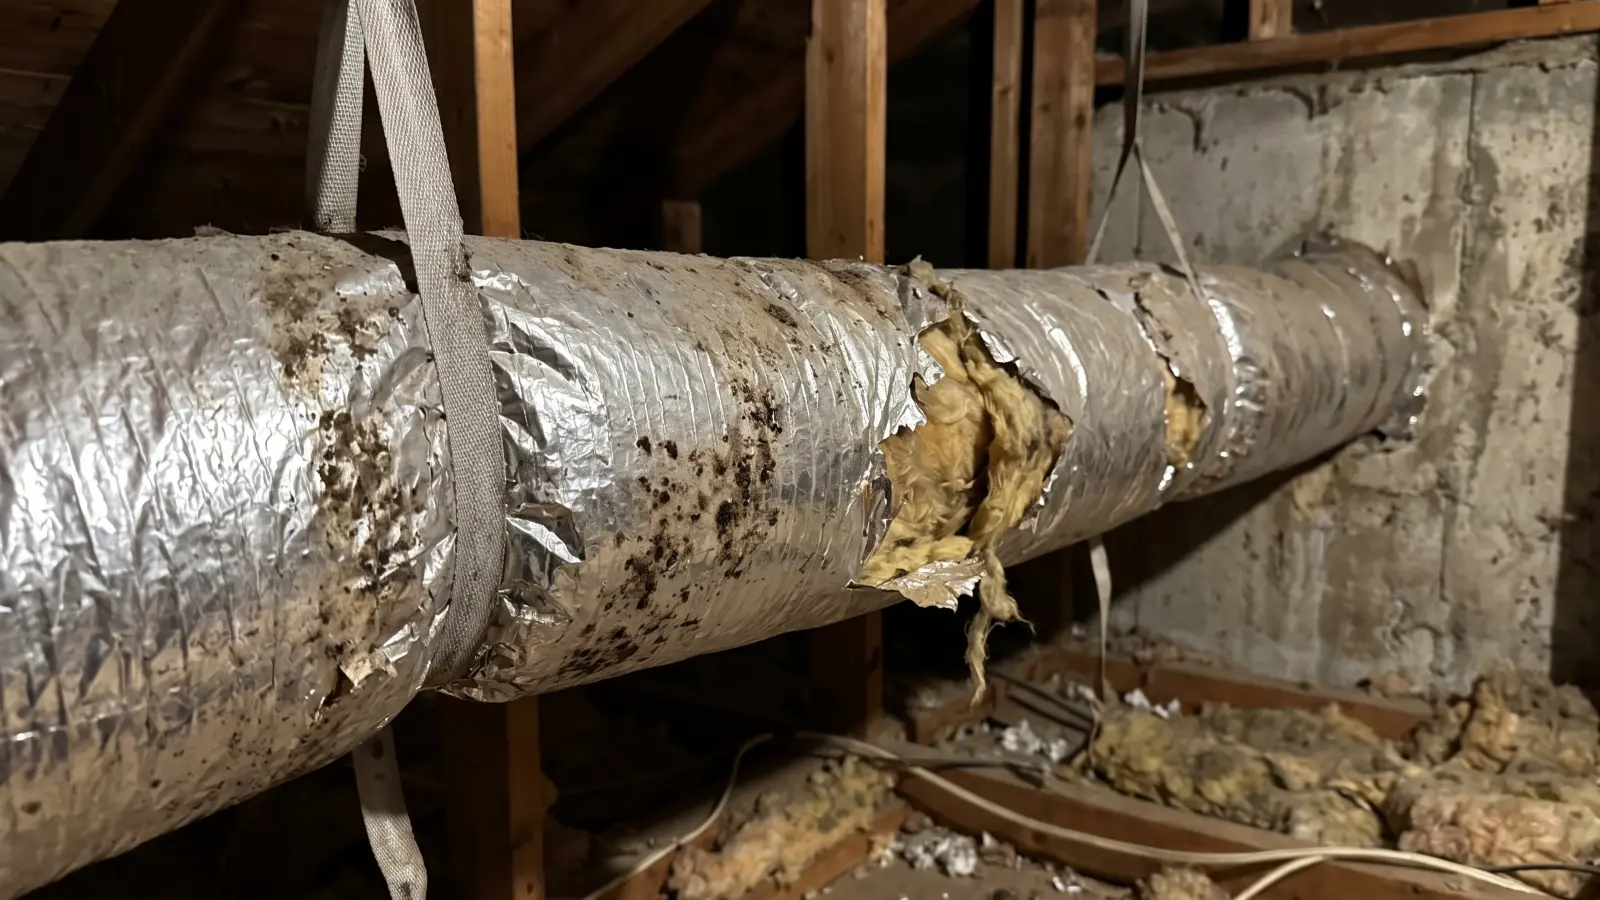
Supply ducts carry conditioned air away from the air handler. Cold air moving through warm duct sections in unconditioned spaces causes condensation on duct interiors. Sheet metal supply ducts can be mechanically cleaned. Flex ducts with fiberglass inner liners, fiberglass duct board, or internally lined metal ducts with fiberglass insulation follow the replacement rule described in the next section.
Return ductwork and registers
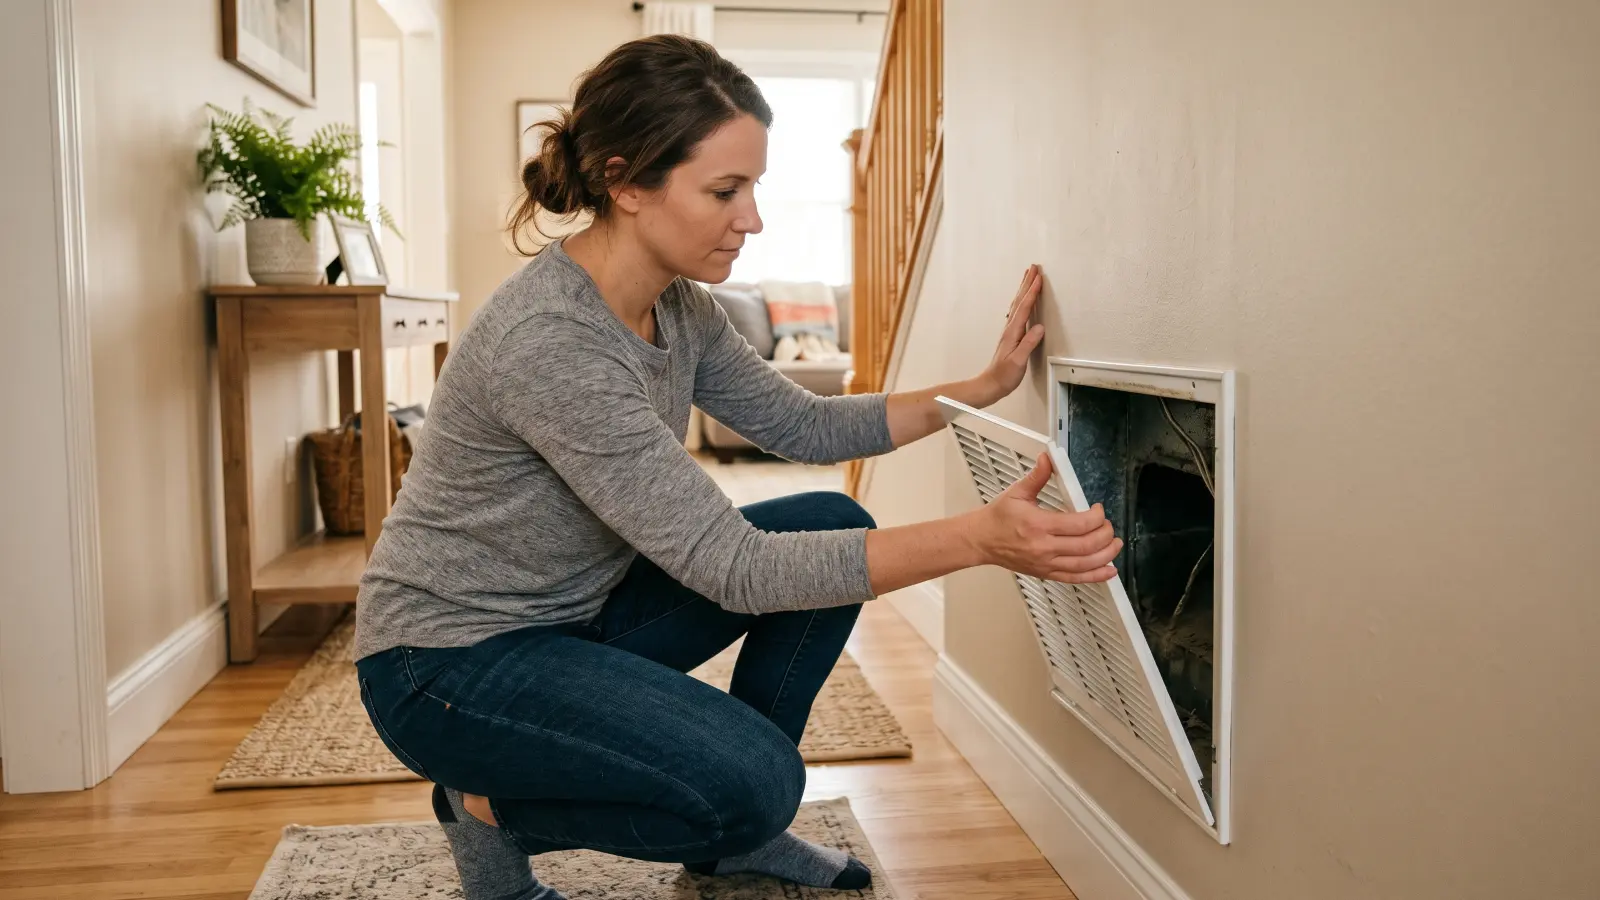
Return ducts draw air back to the air handler and carry any spores present in the home back into the system. Mold in return ducts is typically lighter than in supply ducts but contributes to overall contamination load. Surface mold on register faces and grille edges is the only component homeowners can safely address themselves; dark streaks at register edges are often the first visible sign of contamination inside the duct behind them.
When to clean vs. when to replace ductwork
The single most important variable in HVAC mold remediation is duct material. Cleaning is possible on hard, non-porous surfaces. Replacement is required for any porous duct material contaminated with mold.
Duct material is the variable that determines whether cleaning is even possible. A contractor who quotes cleaning on flex duct or fiberglass duct board without flagging replacement is either unaware of EPA guidance or ignoring it. The table below shows the correct treatment for each material type and why porous duct contaminated with mold has only one defensible answer.
| Duct material | Mold treatment |
|---|---|
| Bare sheet metal | Can be mechanically cleaned and treated with an EPA-registered biocide |
| Galvanized metal with surface contamination | Can be cleaned; replace if corrosion or structural damage is present |
| Flex duct (fiberglass inner liner) | Must be replaced; cannot be effectively cleaned |
| Fiberglass duct board | Must be replaced; no EPA-registered biocide exists for porous duct materials |
| Metal duct with fiberglass internal liner | Must be replaced; the liner must be removed and ductwork relined or replaced |
| Internally insulated flexible duct | Must be replaced |
The EPA's duct cleaning guidance, NADCA, and the North American Insulation Manufacturers Association (NAIMA) are aligned on this point: once fiberglass duct liner or duct board is wet or visibly contaminated with mold, cleaning is not sufficient to prevent regrowth. Mold spores penetrate the fibrous material and cannot be fully removed by any currently available biocide or mechanical method. Any contractor who offers to "treat" fiberglass liner in place rather than replace it is not following recognized standards.
Sealants and encapsulants are not an approved substitute for cleaning or replacement. The EPA's guidance explicitly states that sealants should not be applied over actively growing mold, wet duct liner, or debris. Encapsulants are not approved as a mold remediation method for ductwork.
Professional HVAC mold removal process
Professional HVAC mold remediation follows both the IICRC S520 Standard for Professional Mold Remediation and the NADCA ACR standard for HVAC assessment, cleaning, and restoration. When an HVAC system is involved in a mold remediation project, IICRC S520 specifically directs contractors to follow the NADCA ACR standard.
Phase 1: Inspection and scoping. A borescope or camera system is used to inspect supply and return ducts, air handler cabinet, coils, drain pan, and blower. Moisture readings are taken at access points. A written scope of work documents contaminated components, duct material type, and replacement requirements before any cleaning begins.
Phase 2: Moisture source correction. The underlying moisture problem is identified and corrected before remediation begins. A clogged condensate drain is cleared, a leaking supply line is repaired, or duct leaks allowing humid air infiltration are sealed. Skipping this step guarantees recurrence.
Phase 3: Containment. Negative air pressure is established in the work zone using high-CFM HEPA-filtered negative air machines. Supply and return registers in the home are sealed to prevent spore migration into living spaces during work.
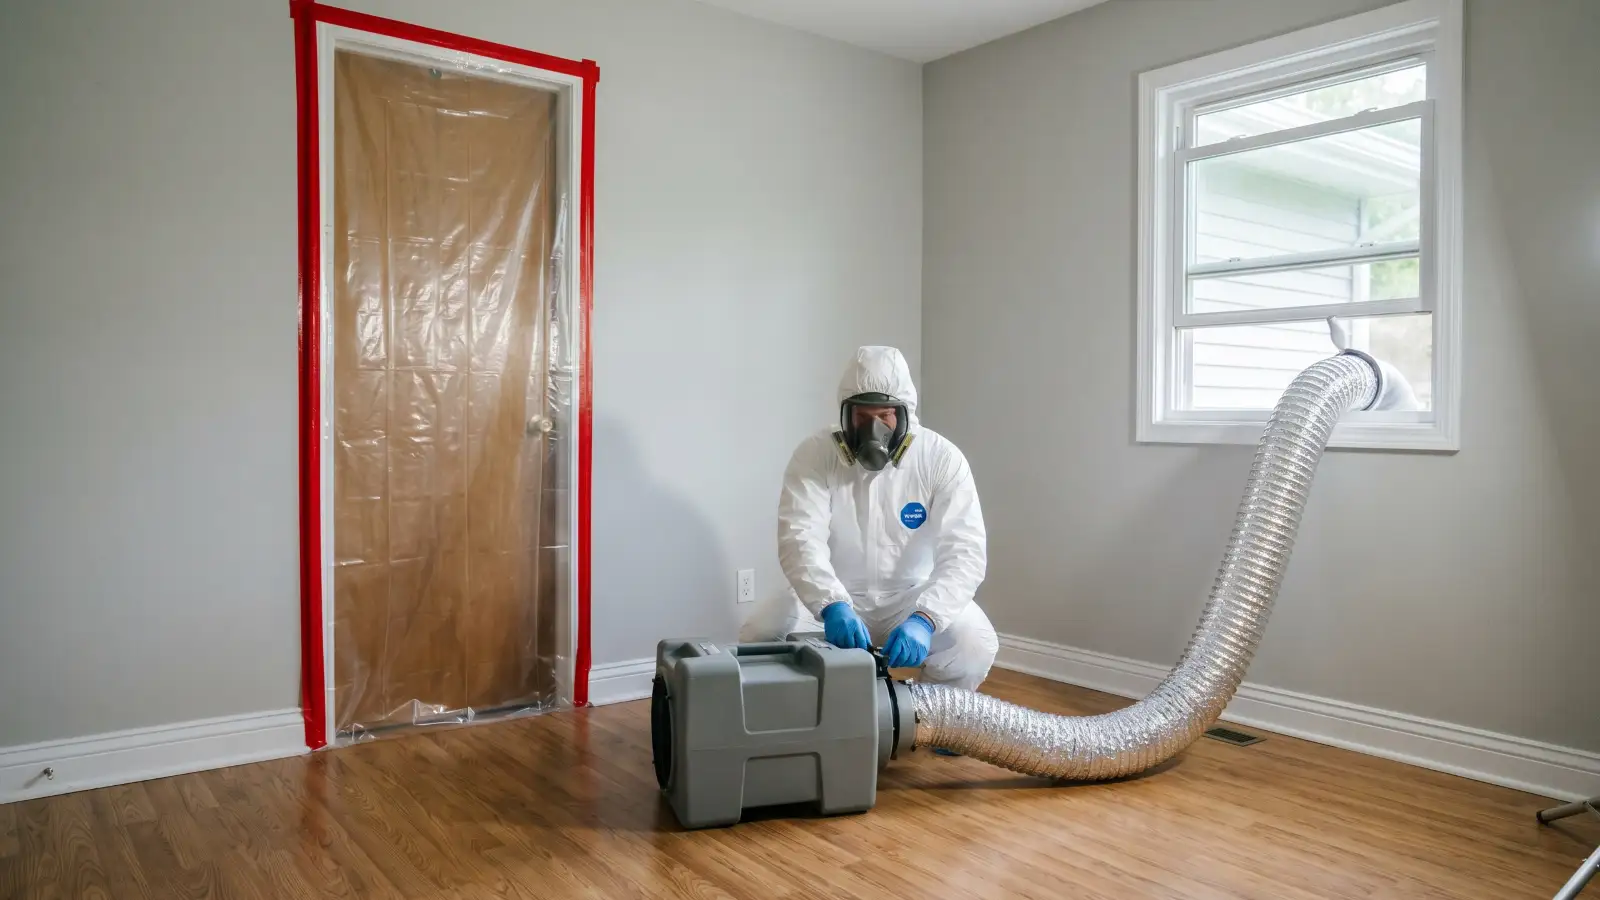
Phase 4: Component cleaning and removal. Technicians work through each contaminated component. The evaporator coil, drain pan, blower wheel, and accessible metal duct surfaces are cleaned with appropriate mechanical tools and HEPA vacuuming. Moldy fiberglass liner, duct board, or flex duct sections are carefully removed and bagged for disposal.
Phase 5: EPA-registered biocide application. For bare metal surfaces confirmed to be free of visible mold, an EPA-registered biocide is applied per label directions. The EPA guidance is explicit: biocide application may only occur after physical cleaning, never as a substitute for it. No biocide is applied to porous or replacement materials.
Phase 6: Replacement and restoration. Removed duct sections are replaced with properly insulated and sealed metal ductwork or approved duct board. Access panels created during cleaning are sealed. New air filters are installed.
Phase 7: Clearance testing and documentation. Post-remediation mold testing confirms that spore counts have returned to normal background levels before the system is restarted. Clearance documentation becomes part of the project record.
The mold remediation process covers the broader step-by-step framework beyond HVAC-specific work.
What homeowners can and cannot do themselves
Homeowners can safely clean removable vent covers and register faces, replace air filters, and clear surface algae from an accessible drain pan. Any work inside ductwork, on coils, on blower wheels, or involving fiberglass duct materials requires a licensed professional following IICRC S520 and NADCA ACR protocols.
What you can do:
- Remove vent register covers and wash them with detergent and water, then dry completely before reinstalling
- Replace air filters immediately upon suspecting mold (wear a respirator and dispose of the filter in a sealed bag)
- Clear visible algae from an accessible drain pan using a wet-dry vacuum and diluted bleach solution, if the contamination is surface-level in the pan only
- Install a condensate drain pan treatment tablet to slow biological growth between professional cleanings
What requires a professional:
- Any cleaning inside ductwork beyond the immediate register opening
- Cleaning or treatment of evaporator coils, blower wheels, or internal air handler components
- Any work on fiberglass duct board or flex duct liner
- Remediation of contamination covering more than superficial surfaces
The EPA's guidance on when to call a professional for mold applies here as well: any visible mold growth covering more than 10 square feet, or any mold involving the HVAC system beyond surface-level register contamination, should be handled by trained professionals using containment and HEPA filtration.
Attempting to clean inside ducts without proper containment and negative pressure is one of the most common mistakes homeowners make. Compressed air, shop vacuums, fogging, and chemical sprays pushed into ductwork agitate mold colonies and spread spores rather than remove them.
For the question of when mold remediation is required versus what can be addressed at home, that page covers the EPA's contamination thresholds and professional escalation criteria.
HVAC mold removal cost
HVAC mold remediation typically costs $2,000 to $10,000 for a central air conditioning system, and $600 to $2,000 for air duct cleaning when contamination is limited. It is among the more expensive mold removal projects because the system is difficult to access, contamination can span hundreds of linear feet of ductwork, and fiberglass component replacement adds material cost on top of labor.
| Scope | Typical cost | Notes |
|---|---|---|
| Air duct mold removal | $600–$2,000 | Cleaning of metal duct sections, registers, and accessible surfaces |
| Radiant heat system | $1,500–$5,000 | Mostly enclosed, limited duct surface area |
| Furnace and air handler | $3,000–$5,000 | More extensive ductwork and component cleaning |
| Central air conditioning | $3,000–$10,000 | Highest cost due to moisture load, volume of ductwork, and condensate system |
| Whole-house HVAC contamination | $5,000–$10,000+ | Extensive system-wide contamination with significant fiberglass replacement |
These ranges cover labor and standard cleaning of accessible metal duct surfaces. What drives a project toward the higher end of any range is almost always one of two things: fiberglass duct material that must be replaced rather than cleaned, or component damage discovered during the inspection that was not visible beforehand. A clogged condensate drain that has been standing for months, for example, often leads to evaporator coil corrosion that requires full coil replacement rather than cleaning. Getting a written scope of work before any work begins is the only way to understand exactly what is and is not included in a quoted price.
Additional cost factors that affect the total:
| Factor | Cost impact |
|---|---|
| Fiberglass duct liner or board replacement | Added per linear foot of ductwork replaced |
| Low clearance or difficult duct access | Labor premium for confined work areas |
| Evaporator coil replacement (if damaged) | $400–$2,000 depending on system size |
| Post-remediation clearance testing | $150–$500 |
| Air handler cabinet insulation replacement | $200–$600 |
| Duct sealing after remediation | $300–$1,000 depending on extent |
For broader mold remediation cost context across other areas of the home, mold remediation cost has the complete national cost tables by project type and scope.

The HVAC mold inspection itself is typically performed as part of a general mold inspection and adds cost through any add-on camera inspection of ductwork. Standalone HVAC inspections by an NADCA-certified Air Systems Cleaning Specialist generally run $150–$400.
Does insurance cover HVAC mold?
Homeowners insurance generally does not cover HVAC mold unless the mold resulted from a sudden, covered water event such as a burst pipe. Mold caused by condensation buildup, deferred maintenance, or gradual humidity accumulation is typically excluded from standard policies.
| Cause of HVAC mold | Insurance coverage |
|---|---|
| Burst pipe soaking air handler | Likely covered under dwelling damage if reported promptly |
| Sudden appliance leak near HVAC unit | Potentially covered if the leak was sudden and accidental |
| Condensate drain clog (gradual buildup) | Typically excluded as a maintenance issue |
| High humidity accumulation over time | Typically excluded |
| Flood or storm water intrusion | Covered only under separate flood insurance (NFIP or private) |
| Deferred HVAC maintenance | Excluded |
Document the moisture source carefully before filing any claim. If the mold resulted from a covered water event, photograph all affected components before any work begins. Insurers typically require evidence that the moisture cause was sudden and accidental rather than a gradual maintenance failure. Claims documentation requirements and policy sublimits are covered in detail at mold insurance coverage.
Preventing mold in your HVAC system
The most effective way to prevent mold in an HVAC system is to maintain indoor relative humidity below 50%, replace air filters every 1 to 3 months, and clear the condensate drain line annually before the cooling season. These three steps eliminate the moisture, debris accumulation, and drainage failure that together cause the majority of HVAC mold problems.
Prevention actions, in order of impact:
| Prevention action | Frequency | Why it works |
|---|---|---|
| Change air filters | Every 1–3 months | Reduces dust accumulation that serves as mold's food source; maintains proper airflow |
| Inspect and clear condensate drain line | Annually (spring before cooling season) | Prevents standing water in drain pan that feeds evaporator coil mold |
| Check drain pan for standing water | Monthly during cooling season | Catches drain clogs before mold establishes |
| Maintain indoor humidity below 50% | Continuous with hygrometer monitoring | Eliminates the primary moisture condition mold requires |
| Inspect duct connections and seals | Every 2–3 years | Prevents humid unconditioned air from infiltrating ductwork |
| Use MERV 8 or higher air filters | Replace on schedule | Reduces particulate buildup inside ducts; does not prevent mold but reduces food source |
| Have HVAC serviced by a technician | Annually | Catches coil contamination, drain issues, and duct leaks before mold establishes |
| Consider UV-C light installation in air handler | One-time installation | UV-C light positioned at the coil continuously inhibits biological growth on coil surfaces |
The CDC and NIOSH advise drying wet materials quickly and controlling moisture as the primary prevention strategy. A digital hygrometer in the main living area costs under $20 and is the most practical monitoring tool available. If relative humidity consistently exceeds 55–60%, the system is not dehumidifying adequately and the moisture source should be identified before mold growth begins.
Hiring an HVAC mold contractor
For HVAC mold remediation, the right contractor holds two credentials: IICRC AMRT (Applied Microbial Remediation Technician) certification for the mold remediation work, and NADCA ASCS (Air Systems Cleaning Specialist) certification for the duct cleaning component. Standard duct cleaning companies are not qualified for mold remediation work, and the two scopes require different credentials, equipment, and protocols.
Verifying mold remediation certifications through the IICRC Global Locator before signing a contract takes under two minutes.
Also verify IICRC Certified Firm status, which is searchable separately from individual technician credentials and confirms the company meets insurance and continuing education requirements. For professional mold remediation involving HVAC systems, the scope of work should reference both IICRC S520 and the NADCA ACR standard by name.

Red flags that indicate a contractor is not following recognized standards:
- Offers to "encapsulate" or "seal" mold in place as a remediation method
- Proposes treating fiberglass duct liner with biocide rather than replacing it
- Does not establish negative air pressure and containment before work begins
- Cannot provide a written scope of work before starting
- Recommends duct cleaning without identifying and correcting the moisture source first
- Advertises suspiciously low flat rates with no site inspection
The NADCA ACR standard requires that the system reach a "visibly clean" condition as defined by the standard before a job is considered complete. A reputable contractor will document pre- and post-work conditions and offer clearance verification. Credential verification, bid comparison, and red flags in detail are at how to choose a mold remediation company.
For suspected black mold removal involving the HVAC system, Stachybotrys chartarum requires additional containment protocols and is never appropriate for DIY intervention.
Frequently asked questions
Can mold in HVAC make you sick?
Yes. When mold grows inside an HVAC system, the blower sends spores into the air supply with every cycle. Exposure commonly causes nasal congestion, coughing, sneezing, eye irritation, and headaches. Symptoms that improve when you leave home and return when you come back are a reliable indicator that your HVAC system is the source. People with asthma, allergies, or compromised immune systems are at higher risk, and is mold dangerous covers health effects by population and exposure level.
How do I confirm mold in my HVAC without opening the ducts?
Air quality sampling with the system running is the most reliable non-invasive confirmation method. A certified inspector collects an air sample from a supply register and compares spore species and counts to an outdoor baseline; elevated counts of specific mold species relative to outdoors is strong evidence of internal contamination. A professional inspection can also include a borescope camera inspection of ductwork to provide visual confirmation.
Does a musty smell always mean mold in the ducts?
Not always. A musty odor from the HVAC system could indicate a dirty evaporator coil, algae in the drain pan, a clogged condensate drain line, or mold in the air handler cabinet insulation rather than inside the ductwork itself. The origin matters because each component has different cleaning requirements. A camera inspection identifies exactly where the contamination is located.
How long does HVAC mold remediation take?
One to three days is the typical timeframe for a residential HVAC mold remediation project, depending on system size and the extent of contamination. Projects involving extensive fiberglass duct replacement or whole-system contamination may take longer. The system should not be returned to service until post-remediation clearance testing confirms acceptable spore levels.
Can I just replace the air filter to fix the mold problem?
No. Replacing the filter removes particulate from the airstream but does not address mold colonies growing on coils, in the drain pan, or inside ductwork. Filters are the correct response to preventing mold, not to treating it once established. A new filter installed in a contaminated system will simply circulate spore-laden air through a cleaner filter.
- EPA: Should You Have the Air Ducts in Your Home Cleaned?
- IICRC S520 Standard for Professional Mold Remediation
- NADCA: Assessment, Cleaning and Restoration of HVAC Systems (ACR Standard)
- NADCA: Duct Cleaning and Indoor Air Quality
- NAIMA: Recommended Practice for Cleaning Fiber Glass Insulated Air Duct Systems
- CDC: Basic Facts About Mold
- NIOSH: Dampness and Mold in Buildings
- NIH/DOHS: Fact Sheet on HVAC Duct Cleaning
Sam Hickerson is the founder of RestoreAdvisor and writes consumer guides on mold remediation, inspection, testing, and home recovery. His work focuses on helping homeowners understand costs, risks, and when to call a professional. He draws on guidance from the EPA, CDC, IICRC, and other authoritative sources to make complex home issues easier to navigate.