
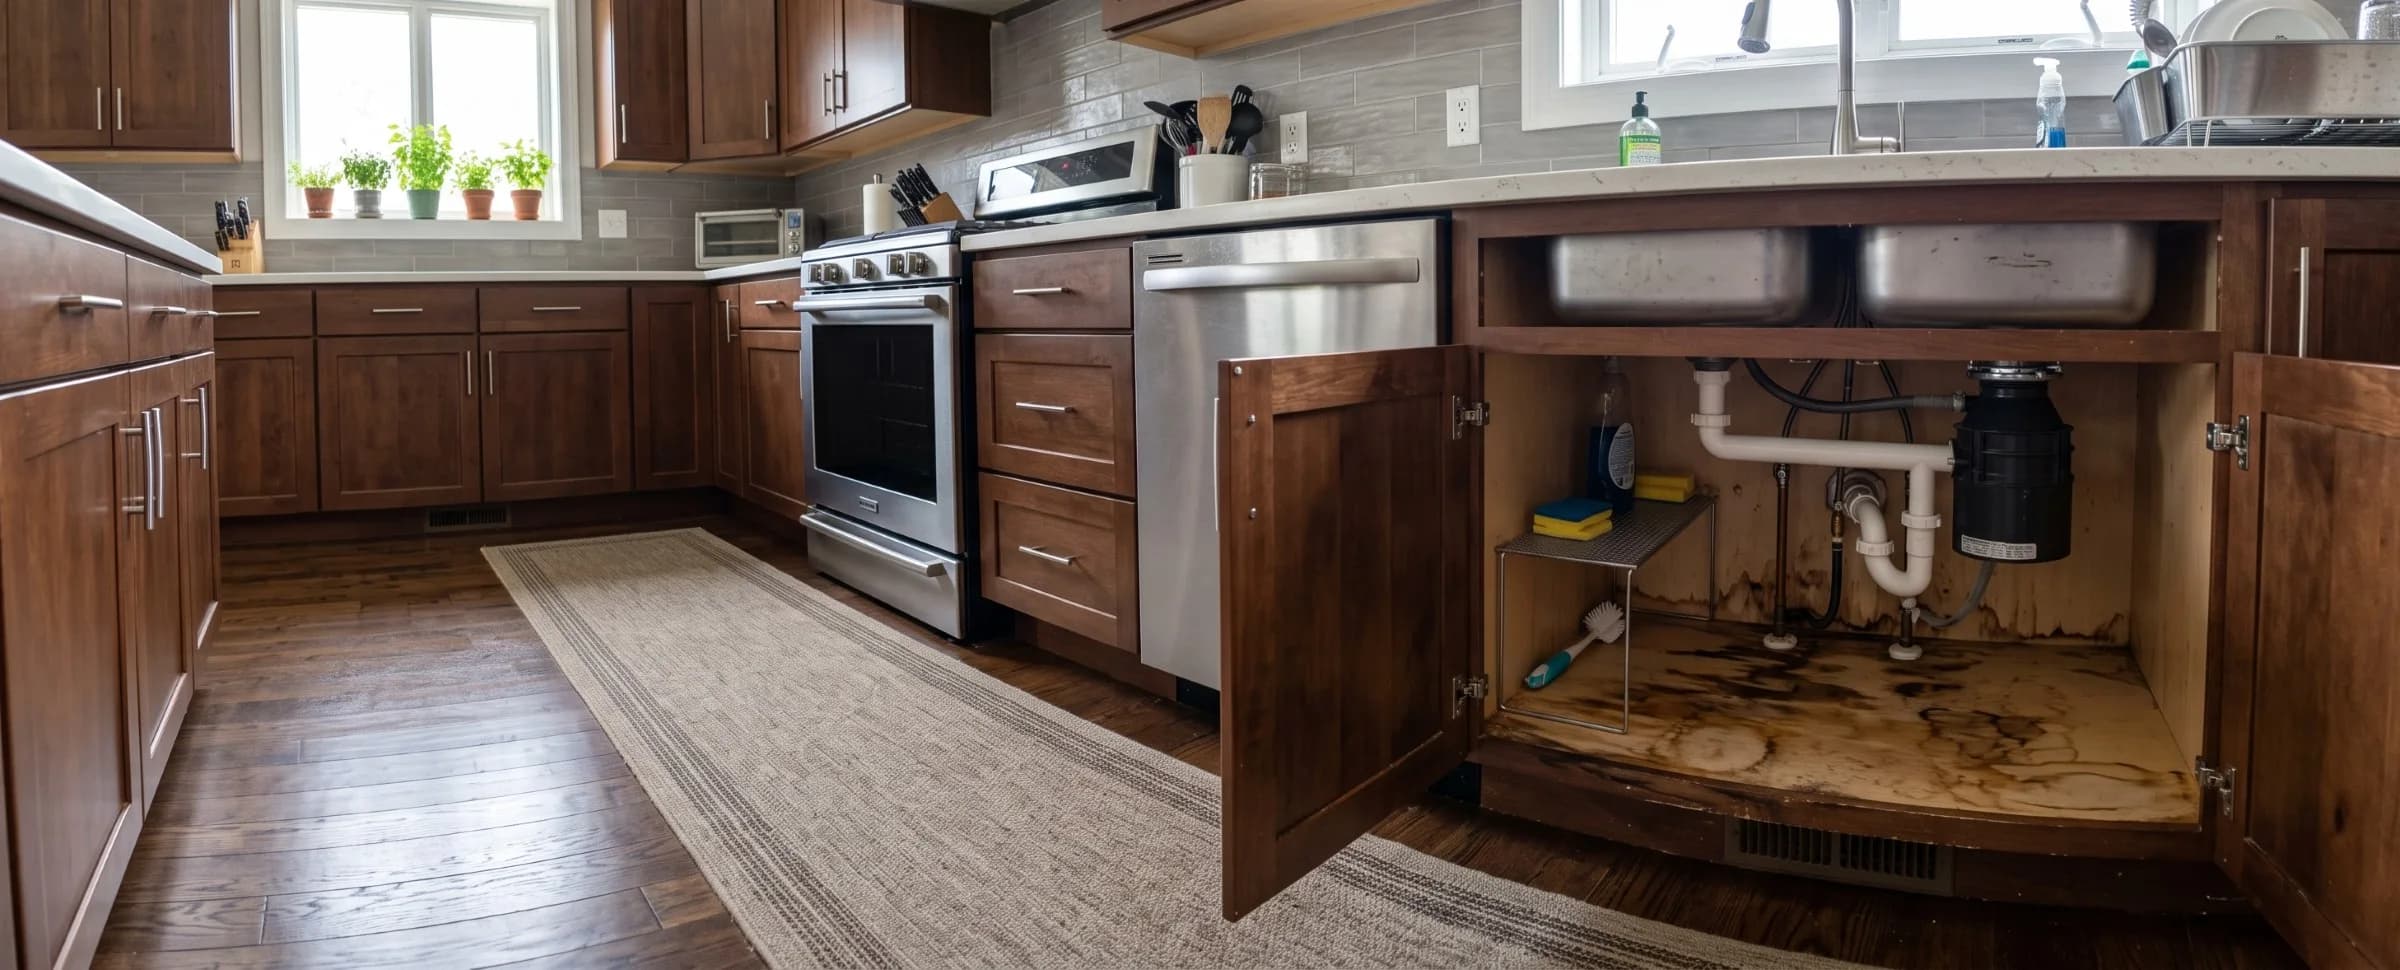

Water pooling under a sink or against a cabinet toe kick rarely stays cosmetic for long. Water damage to a cabinet is the saturation of its core material, typically particleboard, MDF, plywood, or solid wood, by standing or absorbed water, and it's assessed under the same ANSI/IICRC S500 water damage restoration standard used to classify a water loss anywhere else in a home. Cabinet boxes are built primarily from engineered wood, and engineered wood absorbs standing water fast, which is why a stain that looks minor on day one can mean a swollen, structurally compromised base by day three.
Drying and saving the base in the first hour, instead of letting it sit, is often the difference between a $200 refinishing job and a $2,000 cabinet swap. That decision usually can't wait for a contractor's schedule, since the drying window closes long before most water damage restoration companies can send someone out.
Key insights
- Timing matters more than appearance. A cabinet base that's still firm after 24 to 48 hours of drying usually survives; one that's already spongy or swollen at that point won't recover further.
- Material determines the outcome. Plywood and solid wood tolerate a wet day far better than particleboard or MDF, which are the materials used in most stock cabinet bases.
- Most repairs are localized. The base panel and toe kick take the damage in the majority of cases; the cabinet sides, doors, and frame usually stay dry unless the water sat for days or rose above the base.
- Repair costs far less than replacement. Patching a stained or lightly swollen base typically runs $150 to $600, while replacing an affected cabinet box runs into the thousands.
- Insurance depends on how the water got there. A sudden supply line or appliance failure is typically covered; a slow drip that went unnoticed for weeks usually isn't.
- The 24 to 48 hour mold window applies inside the cabinet too. The EPA's timing guidance for mold growth after water exposure covers the enclosed, poorly ventilated space inside a cabinet just as much as an open room.
Signs of water damaged cabinets
Water damaged cabinets show up first at the base and along the toe kick, where standing water sits longest and soaks upward into the panel from below. The earliest signs are often felt rather than seen, since a cabinet finish can still look normal while the panel underneath has already started absorbing water.
 A gap this size along a swollen seam means the panel has already pushed past what sanding or refinishing can fix, since particleboard and MDF don't return to their original shape once soaked.
The signs also depend on where you're looking, not just how long the water has been there. A cabinet's exterior face can still look flawless while the interior back panel or the underside of a shelf is already staining, since those surfaces sit closer to where water actually pools and get less airflow than the visible cabinet front.
| Sign | What it looks like | What it means |
|---|---|---|
| Swelling or sagging base | Panel bulges downward or feels spongy underfoot | Water has fully saturated the core material |
| Discoloration or staining | Dark rings, water lines, or a lightened patch near the base | Water has reached the wood and started to break down the finish |
| Separating joints | A visible gap where the base meets the cabinet side or a door won't sit flush | Swelling has pushed the panel away from its original fastening |
| Peeling finish or bubbling laminate | Laminate lifting at a seam, paint bubbling near the floor | Moisture is trapped between the finish and the panel |
| Musty odor with no visible stain | Smell noticeable when the doors are opened, no obvious wet spot | Water reached the cavity behind a shelf or through a back panel |
| Rust on hinges or hardware | Orange staining on hinge screws or slide rails | Confirms sustained moisture exposure, not a one-time splash |
A cabinet that shows only one of these signs, and shows it faintly, is usually still in the drying window. Several signs appearing together, especially swelling paired with separating joints, means the base has already absorbed as much water as it's going to and won't improve with more drying time. Cabinets aren't the only place these indicators show up: the same signs of water damage appear across flooring, walls, and ceilings, just with different materials reacting at different speeds.
A musty smell with no visible staining or softness is worth pausing on separately, since it usually points toward mold rather than active water intrusion, conditions the CDC associates with prolonged dampness. Mold calls for remediation rather than drying and refinishing.
What to do right now
A cabinet that's actively wet or was just discovered soaked needs the same five steps regardless of what caused it: stop the source, cut power if water reached an outlet, clear and dry the cavity, document it, and get air moving through it. None of them require special training, just quick action before the base has a chance to swell.
 Shutting off the fixture's own angle stop, rather than the home's main valve, stops the leak without cutting water to the rest of the house while you assess the damage.
1. Stop the water source
Shut off the supply valve at the fixture or appliance feeding the leak. If the source isn't obvious right away, close the home's main shutoff rather than let water keep spreading while you investigate.
2. Cut power to nearby outlets if needed
If water has reached an outlet, a garbage disposal switch, or a dishwasher's electrical connection, cut power at the breaker before touching anything electrical, following OSHA's flood response guidance.
3. Empty the cabinet and remove standing water
Take everything out and soak up standing water with towels or a wet/dry vacuum before it spreads to the flooring or wicks into an adjoining cabinet.
4. Photograph the damage before drying
Document the stain, swelling, or standing water with photos and a timestamp. This is the record an adjuster will reference later if you file a claim, the same documentation habit that carries through the rest of a water damage restoration checklist.
5. Prop the doors open and start airflow
Leave the cabinet doors open and point a fan into the cavity. Add a dehumidifier in the room if humidity is high, since still, humid air inside a closed cabinet is what turns a wet base into a swollen one.
What not to do
What not to do matters just as much in the first hour. A few common instincts, closing the cabinet back up or wiping and repainting right away, actually make the damage worse.
Don't close the doors and wait
A closed cabinet traps humidity against the wet panel and speeds up swelling rather than letting it dry.
Don't paint or reseal over a stain before it's confirmed dry
Sealing in trapped moisture guarantees the finish will bubble later and gives mold a hidden place to establish inside the panel.
Don't sand a swollen base to "fix" it
Sanding removes material without restoring the panel's original density or flatness; it only makes a structurally compromised base thinner.
Don't assume a dry-looking surface means the panel underneath is dry
Laminate and painted finishes can look normal while the core material stays saturated underneath for days.
Can water damaged cabinets be saved?
Most water damaged cabinets can be saved if the damage is caught within a day or two and hasn't progressed past a stain or minor softness. Whether a specific cabinet survives comes down to three factors working together: how long the water sat, what the panel is made from, and how far up the cabinet the water reached.
 A base that stays firm under this kind of pressure and only shows surface staining can usually be dried and refinished, while a spongy or indented feel means the swelling is already permanent.
Fastener grip is a separate consideration from how the panel looks. Screws and cam locks holding the box together can lose their bite in swollen particleboard even before the panel itself looks obviously damaged, which is why an assessment often includes testing joint rigidity by hand rather than relying on a visual check alone.
| Condition | Usually salvageable | Usually needs replacement |
|---|---|---|
| Exposure time | Under 24 hours, caught and dried promptly | Multiple days, or discovered after returning from travel |
| Base condition | Firm with a visible stain or slight softness | Swollen, sagging, or spongy under light pressure |
| Material | Plywood or solid wood | Particleboard or standard MDF |
| Water source | Category 1 clean water | Category 2 or 3, contaminated or contact with sewage |
| Extent | Isolated to the base panel | Reached the cabinet sides, back panel, or shared a wall with drywall |
The water's classification under water damage categories also factors into the decision independent of how the wood itself held up. A cabinet soaked by a clean supply line leak can often be dried and kept even with some swelling, because the material itself is the only concern. The same swelling from a sewage backup or a Category 3 source usually means replacement regardless of how the panel looks, since porous engineered wood can't be reliably disinfected once contaminated water has soaked in.
Where the leak is coming from
The leak behind a water damaged cabinet almost always traces back to a nearby plumbing fixture or appliance, not the cabinet itself, and the specific location of the damage points to which one. Even without opening a single cabinet, the pattern of which locations are affected often narrows it down before you start checking supply lines by hand.
 A drip at the valve connection, rather than the supply line itself, is one of the most common and easiest to miss sources, since it sits behind the plumbing where a homeowner rarely looks.
Where the water shows up inside the cabinet is itself a clue. Dampness concentrated at the back panel or around a pipe penetration points to a source inside the cabinet cavity, while dampness that starts at the floor and wicks upward usually means the water arrived from the room itself rather than from anything connected to the cabinet.
| Cabinet location | Most likely source |
|---|---|
| Kitchen sink base | Supply line, drain P-trap, disposal seal |
| Dishwasher-adjacent cabinet | Door seal, water inlet valve, drain hose |
| Refrigerator or island cabinet | Water line to an ice maker or dispenser |
| Bathroom vanity | Supply line, drain, or a failed p-trap gasket |
| Water heater closet cabinet | Tank corrosion, T&P valve discharge |
| Cabinet under an upstairs bathroom or laundry room | Ceiling leak traveling down through the cabinet top |
A cabinet under a kitchen sink is the single most common location for this kind of damage, since kitchen water damage so often traces to the supply line, drain, and disposal seal packed into that same cavity. That concentration of plumbing in one small space is also why kitchen cabinets tend to show damage sooner than a cabinet with just a single supply line running through it.
If more than one cabinet is affected at once, or the water reached a cabinet with no plumbing running to it at all, the source is probably outside the room entirely, a roof leak, a pipe inside a wall, or an upstairs fixture rather than anything local to the cabinet. That means the job is a bigger repair than a simple cabinet fix, so it's worth tracking down the exact fixture responsible before repairing anything.
Condensation is worth ruling out separately, since it doesn't behave like an active leak. A cold supply line sweating in a humid kitchen, or a running dishwasher venting warm, moist air into the cabinet beside it, can dampen a base gradually over weeks with no single point of failure to find. It shows up as a diffuse dampness rather than a stain radiating from one spot, and because it develops slowly, it's also the cause most likely to get denied on an insurance claim.
Island and vanity cabinets fail differently from each other. An island or peninsula has no adjacent wall to wick moisture toward or make an early stain visible from the next room, and it often houses a dishwasher, wine fridge, or prep sink, so a leak can spread across a wider run of connected cabinetry before standing water shows at the base. A vanity is the opposite case: less airflow in a smaller room and plumbing concentrated in one narrow cavity mean water tends to pool in a single spot rather than spreading, which makes the damage easier to isolate but easier to miss if the cabinet isn't opened regularly.
How cabinet materials handle water
The material behind a cabinet's finish is the single biggest factor in whether it survives a soaking, more than how long the water sat or how it looks on the surface. Two cabinets that look identical on a showroom floor can behave completely differently once water gets involved, depending on what's under the laminate.
 The particleboard's crumbling edge shows why it can't be sanded back to a usable surface once soaked, while plywood's layered construction keeps its edge intact under the same exposure.
Edge sealing matters almost as much as the base material itself. A particleboard panel with intact laminate wrapped around every edge can resist a quick spill for an hour or more, while the same panel with even one chipped or exposed edge lets water wick straight into the core within minutes.
| Material | Water tolerance | Typical use | Salvage likelihood |
|---|---|---|---|
| Solid wood | Good if dried promptly; can warp | Higher-end cabinet frames and doors | High, if caught within a day |
| Plywood | Best of the engineered options | Cabinet boxes, especially in newer or higher-end builds | High |
| MDF | Moderate; swells with prolonged exposure | Cabinet doors, painted finishes | Moderate, depends on exposure time |
| Particleboard | Weakest; swells within hours of standing water | Budget and stock cabinet bases | Low once visibly swollen |
Most stock kitchen and bathroom cabinets use particleboard for the base panel specifically because it's inexpensive and takes a laminate finish well, not because it holds up to water. That's also why the base is almost always the first part to fail: it's both the material least tolerant of moisture and the part of the cabinet closest to where a leak actually pools. A water damaged drywall panel bordering the same cabinet run often survives longer than the cabinet base does, since drywall's paper facing sheds a quick splash better than particleboard's exposed edges absorb one.
DIY repair vs. professional restoration
A stained or lightly swollen cabinet base is realistic DIY territory. A structurally compromised base, a contaminated water source, or damage spreading into the surrounding wall is professional territory.
 A reading above roughly 17 percent on a wood cabinet base signals elevated moisture that hasn't finished drying, the threshold most professionals use to decide the panel isn't ready to seal or repaint yet.
The choice also affects documentation. A professional's written moisture readings and photos become part of the record if a claim is filed later, while a DIY repair leaves no equivalent paper trail if the same area needs attention again down the road.
| Factor | DIY-appropriate | Call a professional |
|---|---|---|
| Base condition | Stained, firm, or slightly soft | Swollen, sagging, or separated at a seam |
| Water source | Clean supply line, appliance overflow | Sewage backup, prolonged standing water, unknown source |
| Scope | One cabinet base | Multiple cabinets, or damage reaching the wall or floor |
| Skills on hand | Comfortable with basic carpentry and a jigsaw | Not equipped to cut, fit, and finish a replacement panel |
| Moisture confirmation | A moisture meter reads at or near dry | No way to confirm the cavity behind the cabinet is dry |
Where the two paths often overlap: a homeowner handles the cabinet base themselves while a restoration company or plumber addresses the source and dries the surrounding cavity. The same extraction and drying technique used in DIY water damage cleanup applies just as much to the space behind a cabinet as it does to an open room.
How to repair a cabinet yourself
Repairing a water damaged cabinet base yourself means confirming the panel is fully dry, removing the damaged section, and refinishing or replacing it to match the surrounding cabinet. This applies once the leak's source has already been fixed and the damage is limited to a stained or lightly swollen base rather than a structurally compromised one.
 A standard primer won't stop a water stain from bleeding back through fresh paint, which is why this step calls for a stain-blocking primer specifically rather than whatever's already on the shelf.
1. Confirm the area is fully dry
Press a moisture meter against the panel and compare it to a dry section of the same cabinet. Don't move to sanding or painting until the readings match; sealing in residual moisture is what causes a repair to fail later.
2. Remove the damaged section
For a stained but sound panel, this means light sanding down to clean wood. For a swollen or delaminated section, cut it out with a jigsaw along the nearest seam or support rail rather than trying to save material that's already lost its shape.
3. Treat any residual staining
A water-stained but structurally sound panel usually needs a stain-blocking primer before repainting, since standard primer alone won't stop the discoloration from bleeding back through a fresh coat.
4. Cut and fit a replacement panel if needed
Use exterior-grade or marine plywood rather than matching the original particleboard, since the replacement will sit in the same moisture-prone spot the original failed in. Cut it to size, dry-fit it against the opening, and adjust before fastening.
5. Secure the new panel
Fasten the replacement with screws rather than nails alone, and run a bead of paintable silicone along every seam and edge where the panel meets the cabinet frame to block future moisture entry at that joint.
6. Prime, paint, or finish to match
Match the sheen and color of the surrounding cabinet as closely as possible. A slight mismatch is far more visible on a cabinet base than it would be on a wall, since it sits at eye level when the doors are open.
Cost to repair or replace
Repairing a water damaged cabinet typically costs $150 to $600 for a single base panel, and runs $1,500 to $15,000 or more when a full cabinet box or an entire run has to be replaced. Which end of that range applies comes down to scope: a patched panel, a swapped box, or a full run after a major leak.
 A written estimate should separate the cabinet repair itself from any plumbing repair needed to fix the source, since combining the two into one number makes it harder to catch an inflated quote.
Labor makes up most of a cabinet repair bill, not materials. A replacement base panel itself often costs under $50, while the disassembly, fitting, and refinishing needed to match it to the surrounding cabinet account for the bulk of a typical invoice.
| Scenario | Typical cost | What drives it |
|---|---|---|
| Refinish a stained but sound base | $100–$300 | Sanding and resealing, no material replacement |
| Patch or replace a single base panel | $150–$600 | Cut-out panel, matching finish, minor labor |
| Replace one full cabinet box | $1,500–$3,500 | Custom-fit box, door and hardware matching |
| Replace a run of 3–5 cabinets | $3,000–$8,000+ | Multiple boxes, countertop disconnection and reset |
| Whole-kitchen cabinet replacement | $10,000–$15,000+ | Full demolition, custom or semi-custom cabinetry |
Matching an existing finish is often the biggest driver of cost on a partial repair, since discontinued cabinet lines or custom stains can make a single replacement panel cost more in finishing labor than the panel itself. A full cabinet box replacement under a granite, quartz, or solid-surface countertop adds its own line item too: the countertop has to be disconnected and braced rather than simply lifted off, which is a step easy to miss when estimating a repair yourself. Cabinet damage rarely shows up alone in a major loss: water damage restoration cost for the surrounding job typically runs $1,500 to $7,000 nationally, on top of whatever the cabinet itself needs.
Does insurance cover it?
Standard homeowners insurance treats cabinet damage the same as any other water loss on the property: covered if the cause was sudden and accidental, excluded if it developed gradually. A burst supply line or a dishwasher hose failure that soaks a cabinet base overnight is typically covered under the same sudden-and-accidental standard the rest of a claim falls under, citing NAIC's consumer guidance on how insurers draw that line.
 Photos taken at the moment damage is discovered, before anything is cleaned up or dried, are what an adjuster weighs most heavily when deciding whether a leak was sudden or something that went unnoticed for weeks.
A slow drip under a sink that went unnoticed for weeks tells a different story to an adjuster. If a cabinet's particleboard base shows signs of long-term saturation, layered staining, delamination, or rot rather than a single soak, that reads as a maintenance issue the homeowner should have caught, and most policies exclude it on those grounds. The distinction usually comes down to documentation: photos from the moment the leak was discovered, and confirmation from a plumber on when the failure actually started, both support a sudden-cause claim.
Once a claim is approved, a second dispute can come up over scope rather than cause. An adjuster may propose replacing only the damaged cabinet section, while the homeowner is left unable to match the surrounding run's stain, finish, or discontinued style exactly. Whether a mismatched partial repair is acceptable or the full run has to be replaced for a uniform result varies by policy language and state, so it's worth raising directly with the adjuster before repair work begins rather than after a spot repair leaves a visible seam.
In a rental, built-in cabinets belong to the landlord, and repair responsibility typically follows the same sudden-versus-gradual standard, covered by the landlord's policy if a fixture failed suddenly, disputed if the damage points to a leak the tenant should have reported sooner. A tenant who documents and reports a leak the day it's noticed is in a much stronger position than one who waited, since timing is usually what a landlord-tenant water damage dispute actually turns on. The same documentation and adjuster-timeline dynamics apply to homeowners insurance and water damage claims generally, not just cabinet-specific ones.
Preventing water damage to cabinets
Preventing water damage to cabinets means controlling moisture at the specific points most likely to leak or sweat: supply lines, drains, and appliance connections. A handful of consistent habits catch a failing part before it has a chance to soak a base panel.
 A liner like this catches a slow drip long before it reaches the particleboard underneath, buying time to catch a failing fitting before it becomes a repair instead of a wipe-down.
Install a moisture barrier liner in high-risk cabinets
A rubber or vinyl liner under the sink and around a water heater leak-prone closet catches small drips before they reach the base panel.
Check supply lines and P-traps annually
A five-minute visual check under every sink catches a corroding fitting or a loosening slip nut before it fails.
Replace appliance hoses on their recommended interval
Dishwasher and refrigerator water lines are a leading cause of cabinet damage precisely because they run for years without anyone looking at them.
Keep the cabinet floor clear enough to inspect
Stored items packed against the base hide an early leak until it's already soaked through.
Choose plywood over particleboard in a renovation
If you're replacing cabinets in a kitchen or bathroom, a plywood box costs more upfront but tolerates the inevitable spill or slow leak far better over the life of the cabinet.
Frequently asked questions
How do you know if a cabinet base is swollen or just wet?
Press the base with your palm and compare it to a dry section of the same cabinet. A wet but sound base flexes slightly and returns to shape. A swollen base feels spongy, stays indented, or shows a visible bulge along the seam where the panel meets the cabinet side.
Can a water damaged cabinet be repaired without removing it from the wall?
Yes, in most cases, if the damage is limited to the base panel. The base can be cut out and replaced in place with a jigsaw, without disconnecting the cabinet from the wall or the countertop above it; full removal is only necessary when the sides or frame are also compromised.
How long does a wet cabinet take to dry before you know if it's ruined?
24 to 48 hours with the doors open and airflow running, which lines up with the window the EPA cites for mold risk to begin. If the base is still soft or the swelling hasn't gone down after that window, it's not going to dry out further and the damaged section needs to come out.
Does a manufacturer's warranty cover water damaged cabinets?
No, most cabinet manufacturer warranties exclude water damage entirely, since they cover material or construction defects rather than damage from an external source like a leak. That gap is why the repair or replacement cost typically falls to a homeowners insurance claim instead, when the underlying cause qualifies as sudden and accidental.
Do you need to replace the whole cabinet, or just the bottom?
Usually just the base panel and, if it's affected, the toe kick, since the cabinet sides and doors are rarely wet unless the water sat for an extended period or reached a higher level. A full cabinet box replacement is typically reserved for cases where the sides have also swollen or the frame has lost structural rigidity.
Will a water damaged cabinet smell even after it's dried?
It can, if moisture stayed trapped long enough for microbial growth to start inside the particleboard or behind a laminate skin. A lingering musty smell after the cabinet tests dry with a moisture meter is a sign to have the interior checked for kitchen mold or a bathroom's equivalent, rather than assuming the odor will fade on its own.
How can you tell if cabinet water damage has reached the subfloor?
Press on the flooring directly in front of and under the cabinet base; a soft or spongy feel underfoot means the subfloor absorbed water too, not just the cabinet. A moisture meter reading taken through the flooring, or pulling the toe kick to check the subfloor directly, confirms it when the surface feel is ambiguous.
What's the most common appliance-caused source of cabinet water damage?
A dishwasher leak is the most common appliance-driven cause, since the door seal, supply line, and drain hose all run through the same cavity as the cabinet base. A refrigerator's water line causes a slower version of the same problem when it's built into a cabinet run.
Do bathroom vanities get water damaged the same way as kitchen cabinets?
Not exactly. A bathroom water damage source under a vanity is usually a supply line or drain rather than an appliance, and a vanity's smaller, less-ventilated cavity tends to concentrate water in one spot instead of spreading it the way a kitchen leak often does.
Can a refrigerator cause cabinet water damage without an active leak?
Yes. A refrigerator leak at the ice maker or water line connection can run behind the unit for weeks before it's noticed, since the failure point usually isn't visible without pulling the appliance out.
Sam Hickerson is the founder of RestoreAdvisor and writes consumer guides on mold remediation, water damage restoration, inspection, testing, and home recovery. His work focuses on helping homeowners understand costs, risks, and when to call a professional. He draws on guidance from the EPA, CDC, IICRC, and other authoritative sources to make complex home issues easier to navigate.