
Bathroom mold is fungal growth that colonizes grout, caulk, drywall, and ceiling surfaces in bathrooms where relative humidity exceeds 60% for sustained periods, governed by the remediation protocols in IICRC S520 and the removal guidance published by the EPA and CDC. It is the most common room-specific mold problem in U.S. homes because bathrooms concentrate every condition mold needs: persistent moisture, warmth, organic material on porous surfaces, and limited airflow.
If you have visible mold on tile, grout, or your ceiling, you are not alone and it is not automatically a major remediation project. This article covers what causes bathroom mold, the specific types you are likely to encounter, where it hides and why, how to remove it yourself when that is appropriate, and when the situation calls for a professional. You will also find a clear cost breakdown and a practical prevention plan.
Key insights
- Professional bathroom mold removal costs $500–$2,000, or $10–$25 per square foot. Surface work on tile and grout sits at the low end; jobs requiring drywall removal or tile replacement push toward the high end.
- The 10 sq ft rule applies here. The EPA sets 10 square feet as the DIY threshold for mold removal. Most bathroom grout and tile mold falls well under this limit. Mold behind walls or under flooring does not.
- Pink mold is not actually mold. The reddish-pink film common in showers is Serratia marcescens, a bacterium. It requires antibacterial disinfectants, not antifungals, and returns without humidity control.
- Ceiling mold almost always means a ventilation problem. Mold on the ceiling directly above the shower forms when exhaust airflow is too low to move shower steam out before it condenses on the cooler ceiling surface.
- Humidity, not just cleaning, is the real fix. Keeping bathroom relative humidity below 60% between uses prevents mold from returning. Cleaning alone does not.
- Hidden leaks are a separate problem. Mold isolated to the wall behind a toilet or under a vanity frequently signals a slow plumbing leak rather than shower steam. Treat the leak first or the mold will keep coming back.
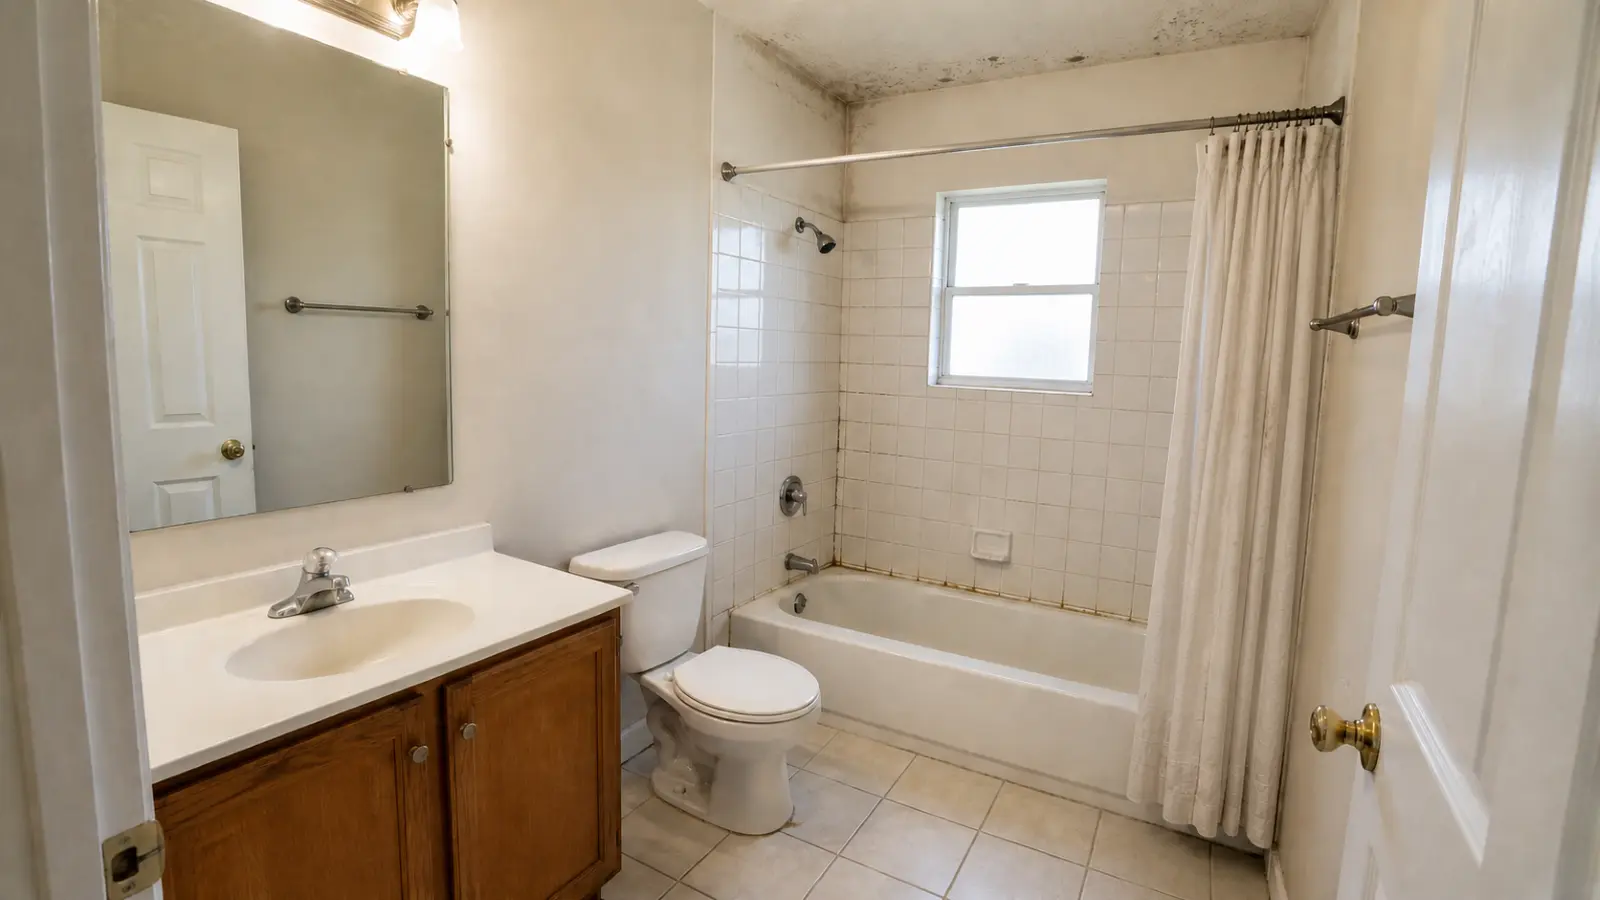
Why bathrooms are vulnerable to mold
Bathrooms are the single most mold-prone room in most homes because they concentrate every condition mold needs: moisture, warmth, organic material, and limited airflow. The EPA and IICRC S520 both identify relative humidity above 60%, sustained for 24–48 hours or longer, as the threshold at which mold spores begin germinating on wet surfaces, and a standard 10-minute shower can raise indoor relative humidity from 50% to over 90%.
Four surface and structural factors make bathrooms especially susceptible:
- Grout is porous and absorbs moisture along every joint line, giving mold a continuous food and water source.
- Caulk ages and cracks at tub and shower junctions, opening gaps where water infiltrates behind the tile.
- Drywall behind tile wicks water when caulk or grout seals fail, creating a hidden wet substrate that never fully dries.
- Soap scum and body oils coat shower walls and drains, providing the organic material mold colonies need to feed and reproduce.
Without an exhaust fan moving humid air out of the room, moisture lingers on every surface long after a shower ends. This is why a bathroom with a failed or undersized fan can sustain mold growth even with regular cleaning: the cleaning removes visible colonies but never addresses the underlying moisture that keeps them coming back. The EPA identifies ventilation failure as the primary driver of chronic bathroom mold.
Types of mold found in bathrooms
The most common bathroom molds are Cladosporium, Aspergillus, and Penicillium, all of which are allergenic rather than toxin-producing. Stachybotrys chartarum (black mold) is less common but requires a different response when it does appear. Pink mold is not a fungus at all.
Bathroom mold species differ significantly in how dangerous they are and how they should be treated. Cladosporium, Aspergillus, and Penicillium are allergenic and manageable with DIY cleaning on small patches, while Stachybotrys chartarum requires professional protocols and Serratia marcescens requires a disinfectant rather than an antifungal. Identifying which type you have before cleaning determines both the product you use and whether the job is safe to do yourself.
| Type | Appearance | Where it grows in bathrooms | Health category | DIY or pro |
|---|---|---|---|---|
| Cladosporium | Gray-green or olive-brown | Grout lines, caulk, window sills | Allergenic | DIY if under 10 sq ft |
| Aspergillus | White, yellow, green, or brown | Damp drywall, ceiling paint | Allergenic | DIY if under 10 sq ft |
| Penicillium | Blue-green, powdery | Water-damaged surfaces, walls | Allergenic | DIY if under 10 sq ft |
| Stachybotrys chartarum | Slimy, dark greenish-black | Drywall behind failed tile, chronic leak areas | Mycotoxin-producing | Professional always |
| Serratia marcescens (pink mold) | Pink or reddish-orange slime | Drains, shower floor, toilet tank | Bacterial, not fungal | DIY with disinfectant |
Stachybotrys chartarum (black mold)
True black mold is less common in bathrooms than its reputation suggests. Stachybotrys chartarum requires sustained, heavy water saturation of cellulose-rich materials like drywall paper or ceiling tiles, not just everyday shower humidity. When it does appear in bathrooms, it is typically on drywall behind a failed tile installation or on ceiling drywall above a chronic leak. If you see a slimy, very dark greenish-black growth that cannot be wiped off easily and is not along grout lines, do not disturb it. Confirmed black mold removal requires containment and professional protocols that go beyond surface cleaning.
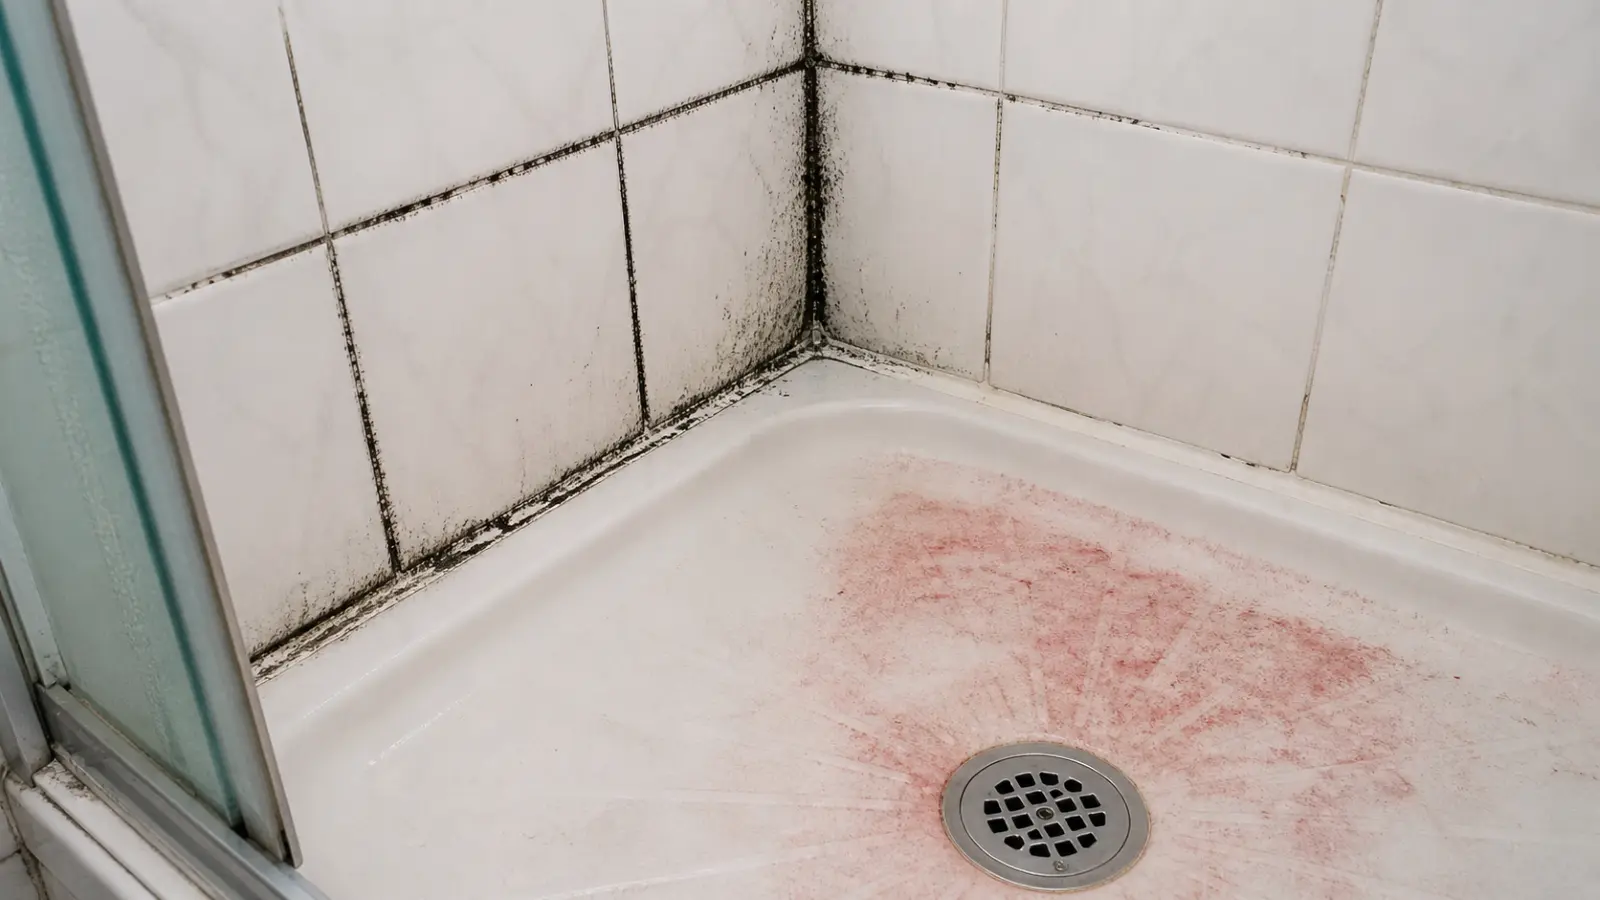
Pink mold (Serratia marcescens)
Pink or reddish-orange slime in the shower, around drains, and on the toilet tank is not a true mold at all. It is a bacterium called Serratia marcescens, which forms a biofilm on damp surfaces rich in soap residue and body oils. Unlike fungal molds, it does not respond to antifungal cleaners. It requires an EPA-registered disinfectant containing bleach or hydrogen peroxide and vigorous scrubbing to disrupt the biofilm. For healthy adults, Serratia marcescens is generally low-risk, but it can cause urinary tract infections or eye infections in people with compromised immune systems, and it spreads rapidly in warm, humid bathrooms.
Where bathroom mold grows
Bathroom mold most commonly grows in shower grout and caulk, on bathroom ceilings above the shower, behind tile walls where seals have failed, and around the toilet base and under the vanity. Each location has a distinct cause, and identifying the right cause determines whether cleaning fixes the problem or whether something structural needs to change.
| Location | Primary cause | Key warning signs | DIY or pro |
|---|---|---|---|
| Shower grout and caulk | Moisture trapped in porous material | Dark streaks along grout lines, slimy caulk bead | DIY if surface-level |
| Bathroom ceiling | Inadequate exhaust ventilation | Mold directly above shower head, returns after cleaning | DIY if small; pro if recurring |
| Behind tile and shower walls | Failed caulk or grout seal | Loose or hollow tiles, soft drywall at tile edge | Professional |
| Around toilet and under vanity | Slow plumbing leak | Mold away from shower, returns quickly after cleaning | Fix leak first, then assess |
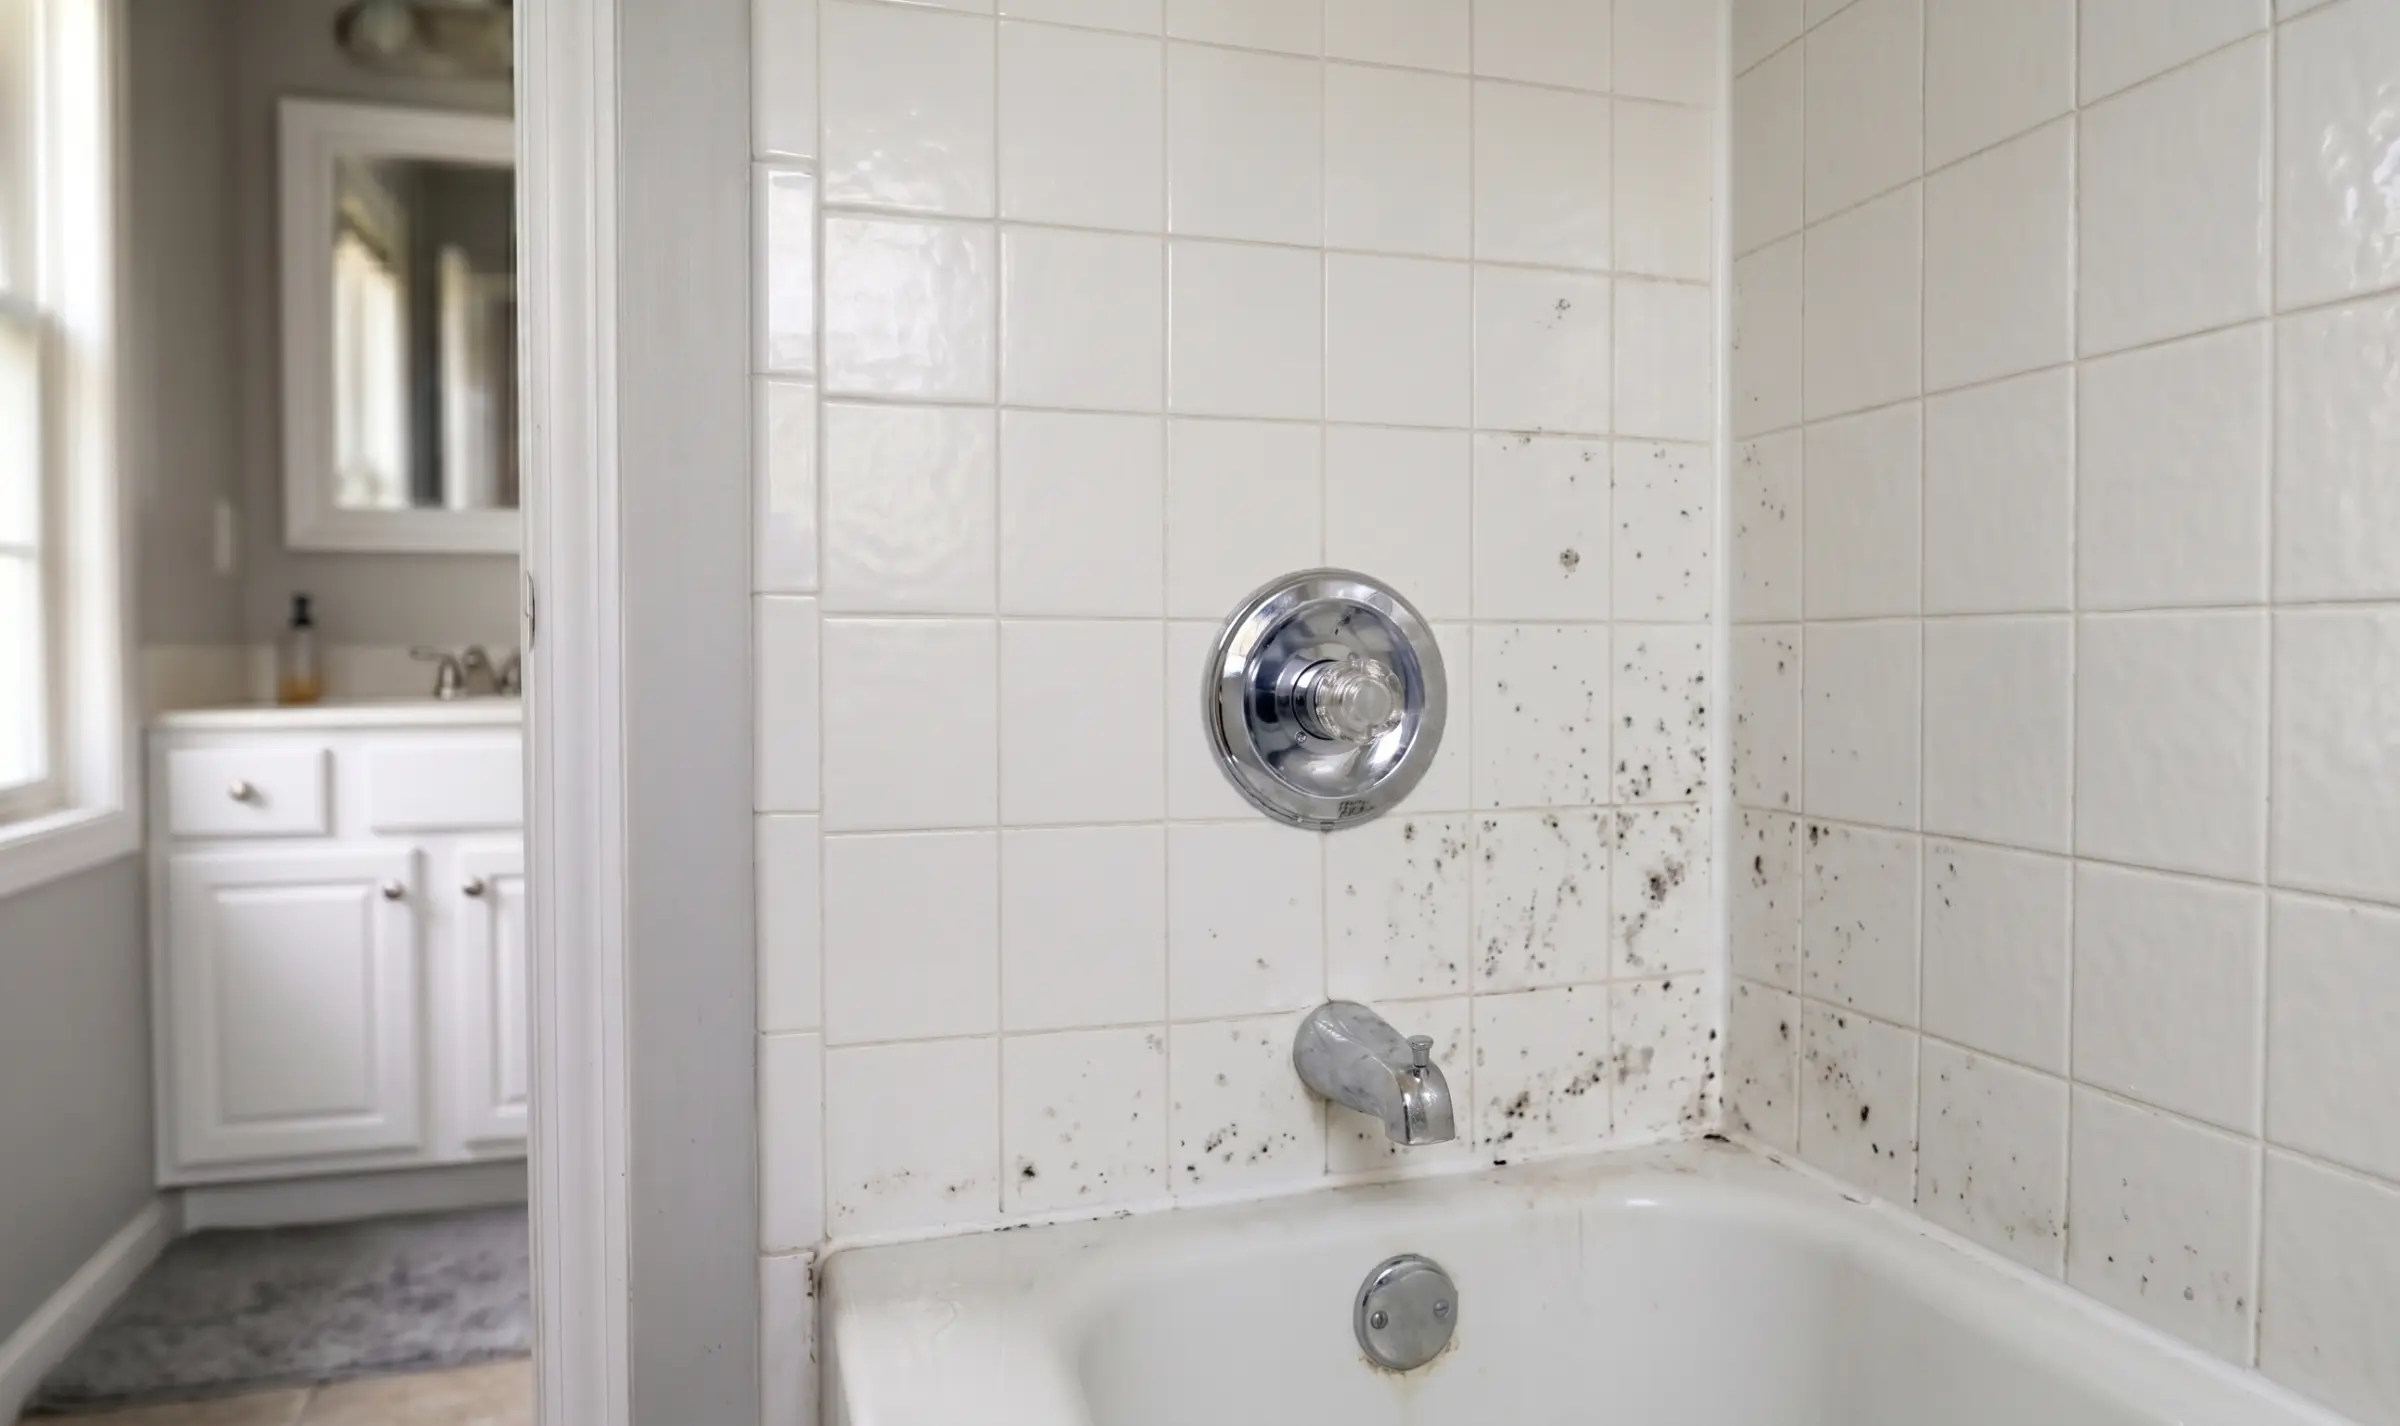
Shower grout and caulk
Grout lines and caulk seams are the most common mold locations in any bathroom. Both materials are porous and retain moisture in microscopic gaps between tiles and at the junction of tile and tub or tile and wall. This is the most DIY-appropriate bathroom mold problem: contained, visible, and accessible with a brush and cleaning solution. When grout is stained but not structurally compromised, cleaning and resealing will address it. When caulk is moldy, remove it entirely and replace it rather than cleaning over it. Cleaned caulk always recolonizes faster than fresh caulk because the surface microstructure retains spores below the waterline.
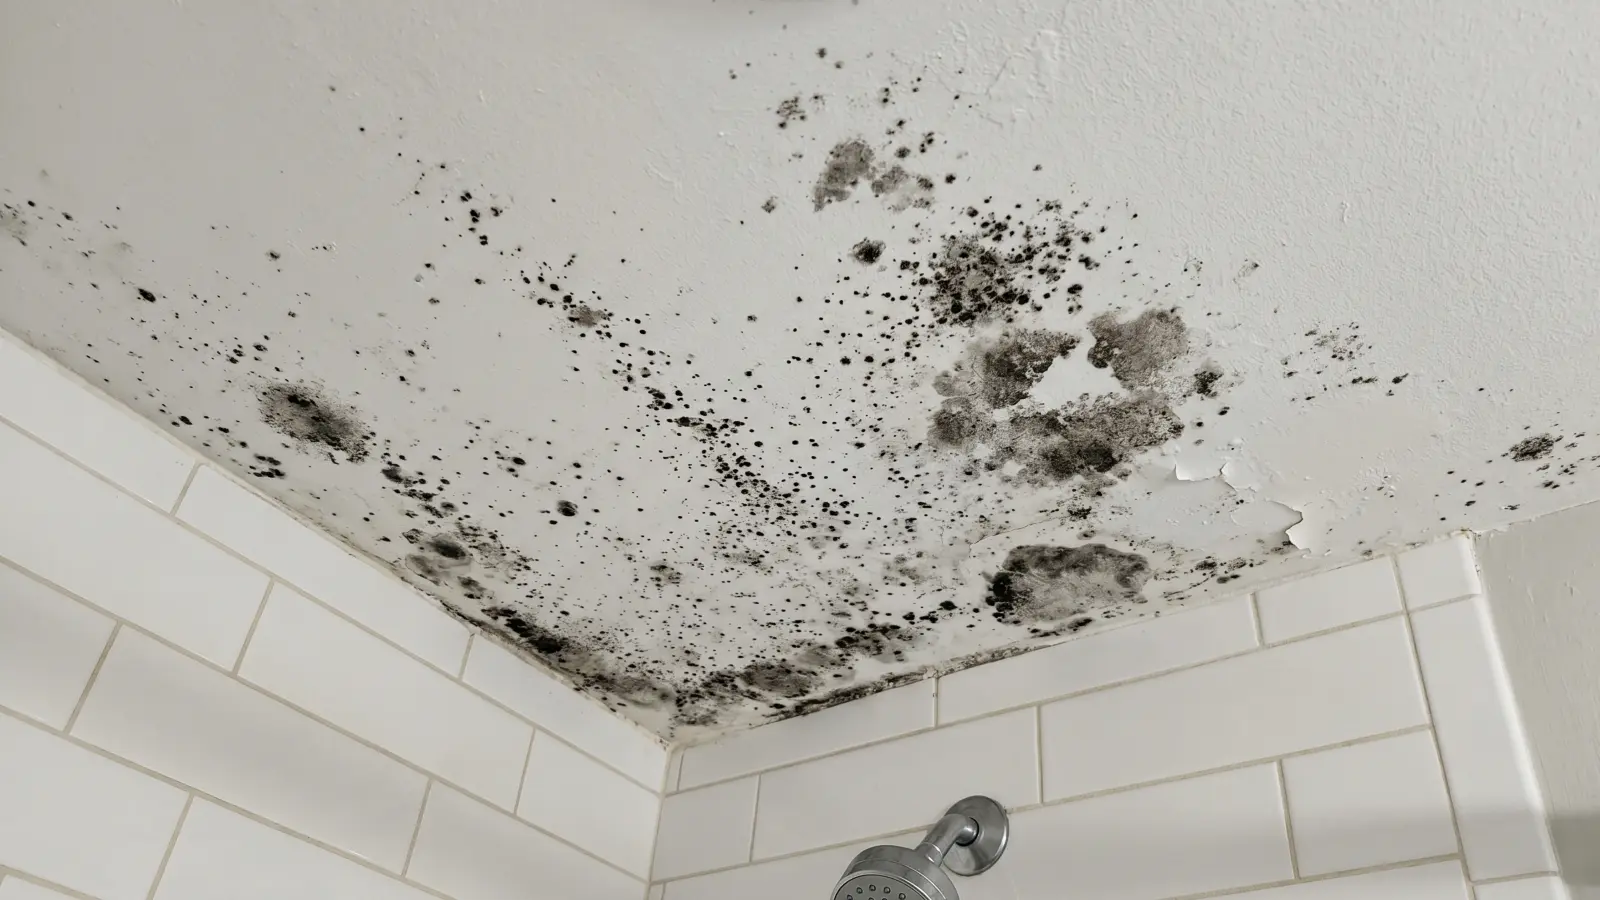
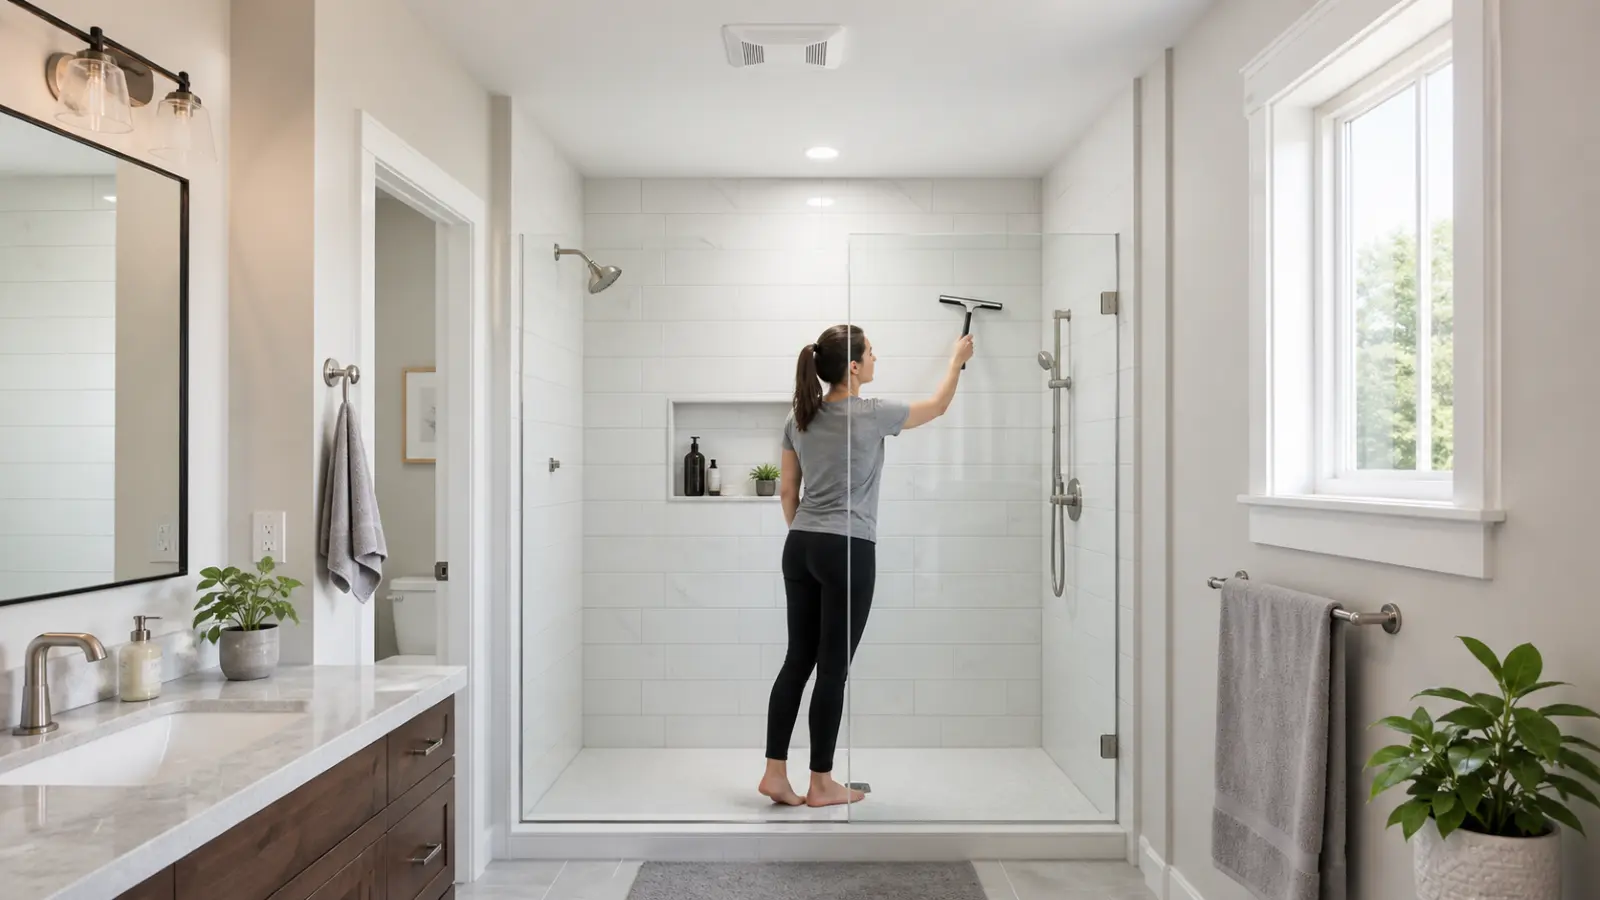
Bathroom ceiling mold
Mold on a bathroom ceiling, particularly directly above the shower, is almost always a ventilation failure. Shower steam rises and condenses on the cooler ceiling surface. If the exhaust fan cannot move enough air volume to pull that steam out before condensation occurs, the ceiling stays damp after every shower and mold establishes quickly. An exhaust fan rated for the bathroom size (minimum 1 CFM per square foot of floor space, or 50 CFM for rooms up to 50 square feet) and positioned near the shower rather than near the door is the primary fix. Cleaning the ceiling mold without addressing fan capacity will result in recurrence within weeks.
Mold on a ceiling directly below an upstairs bathroom or plumbing chase is a different problem: it signals a leak above, not a ventilation issue. Sustained water intrusion like that is one of the most common triggers for mold after water damage that spreads beyond a single surface.
Behind tile and shower walls
When caulk or grout between tiles fails, water infiltrates the substrate behind the tile, which is typically cement board or, in older bathrooms, moisture-damaged drywall. Once mold establishes inside the wall assembly, no surface cleaning will reach it. Warning signs include:
- Tiles that feel loose, flex when pressed, or produce a hollow sound when tapped
- Discoloration or soft spots at the base of the tiled wall
- Musty odor that persists after thorough cleaning and drying
At this stage, professional assessment is required. The tile must be removed, the substrate replaced, and a proper waterproofing membrane installed before retiling.
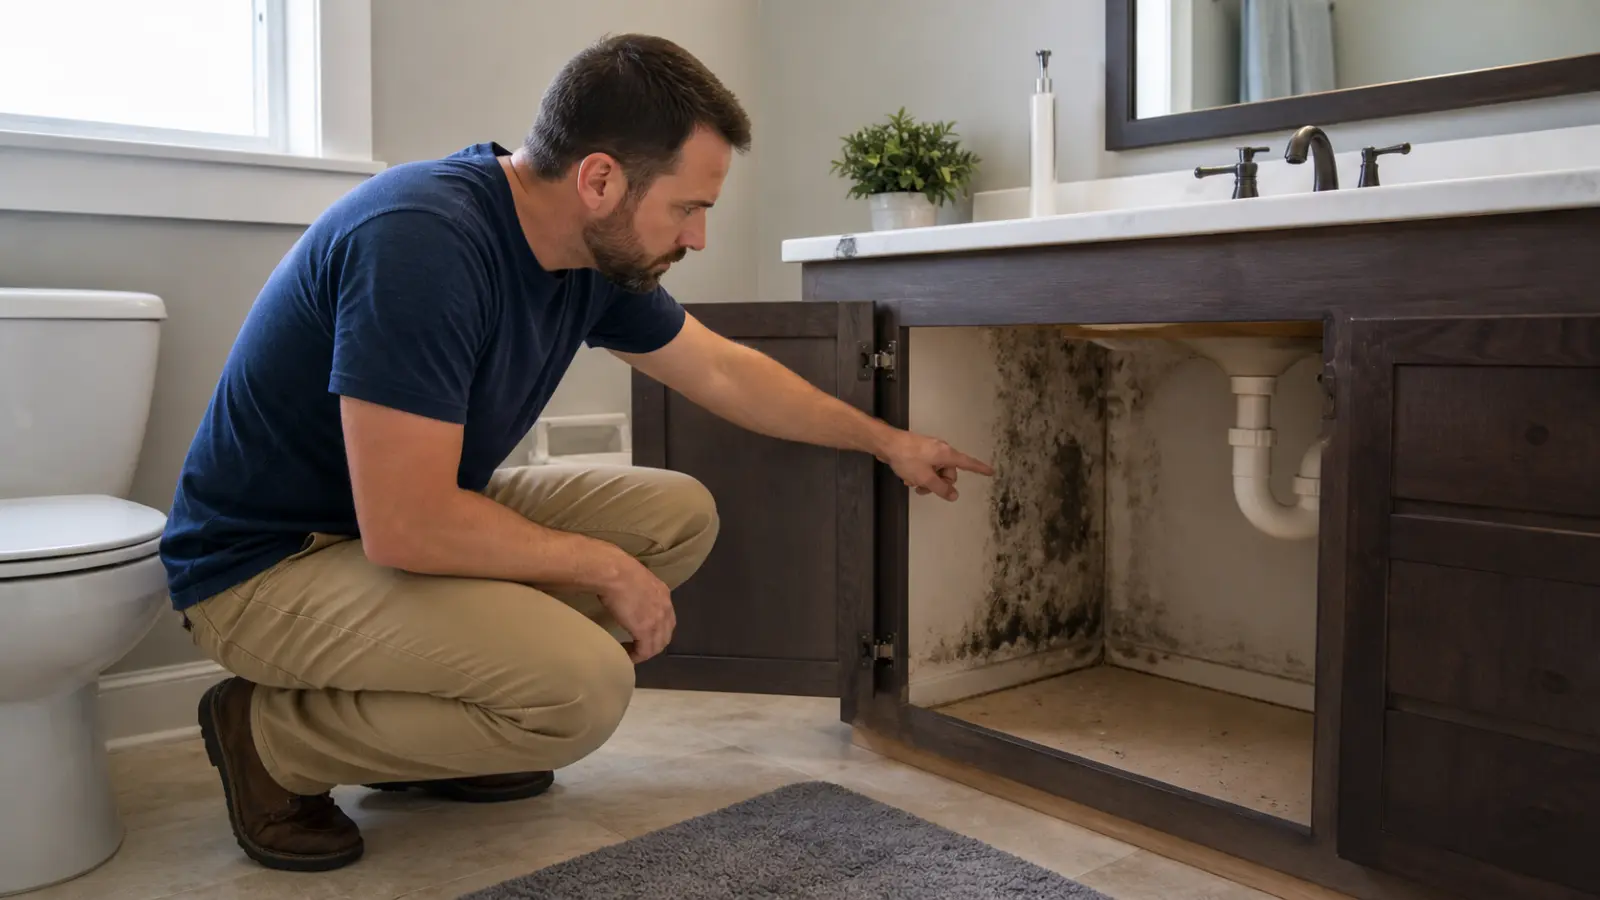
Around the toilet and under the vanity
Mold in these areas is more likely to indicate a slow plumbing leak than shower humidity. Persistent mold at the floor-to-wall junction near the toilet often signals a wax ring failure or supply line drip. Under the vanity, a slow drain trap or shut-off valve drip can sustain mold on the cabinet floor and interior walls without ever being visible from outside. Fix the plumbing source before addressing the mold, or the mold will return regardless of what cleaning product is used.
DIY bathroom mold removal
Bathroom mold removal is appropriate as a DIY task when the affected area is under 10 square feet, the mold is on a cleanable surface (tile, sealed grout, non-porous fixtures), and there is no sign of behind-wall penetration. The full supply list, PPE requirements, and step-by-step process for DIY mold removal applies to any room including bathrooms.
| Product | Dilution | Dwell time | Best for | Limitation |
|---|---|---|---|---|
| Bleach solution | 1 part bleach to 10 parts water | 10 minutes | Tile, sealed grout, tub surrounds | Does not penetrate porous materials; leaves spores in unsealed grout |
| White vinegar | Undiluted (5% acidity) | 60 minutes | Colored grout, general surfaces | Less effective on heavy surface growth than bleach |
| Hydrogen peroxide (3%) | Undiluted | 10 minutes | Any surface; good for confined spaces | Slightly weaker than bleach on heavy growth |
| Antifungal spray | Per label | Per label | Non-porous surfaces | Will not kill Serratia marcescens (pink mold); use antibacterial disinfectant instead |
What does not work: Painting over mold with any paint, including mold-resistant paint, does not kill it. Encapsulants slow regrowth on non-porous surfaces but cannot resolve active mold on drywall or wood. No product resolves mold that has grown behind tile or into drywall without physical removal of the affected material.
Caulk replacement: Moldy caulk should always be fully removed, not cleaned. Cut and pull the old bead with a utility knife or oscillating tool, clean the joint with isopropyl alcohol, let it dry completely, then apply fresh 100% silicone caulk rated for wet bathroom use. Mold-resistant silicone contains antimicrobial additives that slow recolonization.
Cleaning safety in a confined bathroom
Bathrooms are small and poorly ventilated by design, which makes mold cleaning riskier in terms of fume exposure than in larger rooms. Before starting:
- Open any window and run the exhaust fan throughout the job
- Wear an N95 respirator (not a paper dust mask), nitrile gloves, and eye protection
- Never mix bleach with vinegar, hydrogen peroxide, or any other cleaning product. The resulting chlorine gas is toxic in a confined space
- After cleaning, keep the exhaust fan running for at least 30 minutes before using the bathroom normally
When to call a professional
Professional mold remediation is the right call when the problem exceeds what surface cleaning can address. The EPA's 10 square foot threshold is a reliable starting point: anything larger than roughly a 3x3 foot area should be handled by a certified remediator.
- Tiles are loose or hollow. The substrate behind the tile is wet or deteriorating, meaning mold is inside the wall assembly. A remediator will need to open the wall to treat the full extent of growth.
- Drywall is soft, crumbling, or stained beyond the visible surface. Once mold penetrates drywall below the surface, the affected section must be cut out and replaced, not cleaned.
- Mold returns within 2–3 weeks of thorough cleaning. Rapid recurrence is a strong indicator of mold in a location you cannot see or reach.
- A persistent musty odor remains after cleaning and drying. Musty odor without visible growth often signals hidden mold behind walls or under flooring.
- Household members are at elevated risk. Anyone with asthma, mold allergies, chronic lung disease, or immunocompromise needs a more conservative approach. The CDC recommends that people with these conditions avoid exposure during mold removal and that their homes meet clearance testing standards before reoccupancy. Professional remediation with post-work clearance testing is the appropriate standard even for moderate-sized visible growth.
The when mold remediation is required decision framework covers contamination levels, health risk factors, and the full EPA guidance on scope thresholds.
Bathroom mold removal cost
Bathroom mold is typically the least expensive room in the home to remediate because it is a contained space and surface mold is often caught early. Per IICRC S520 classification, bathroom mold jobs most commonly fall into the Level 1 or Level 2 contamination categories, where affected areas are under 30 square feet and accessible without demolition, which keeps costs at the lower end of the professional remediation range. The costs below reflect professional remediation by a certified contractor and do not include plumbing repairs that may be needed if a leak caused the mold.
| Scenario | Typical cost | Notes |
|---|---|---|
| Surface mold on tile, grout, and caulk | $500–$1,000 | Cleaning, caulk replacement, antimicrobial treatment |
| Ceiling mold with drywall replacement | $800–$1,500 | Includes containment, drywall cut-out, and patching |
| Mold behind shower walls (tile removal) | $1,000–$2,000 | Depends on tile area and substrate condition |
| Hidden leak with wall cavity involvement | $1,500–$4,000+ | Adds plumbing access, drywall replacement, possible tile work |
| Exhaust fan upgrade (prevention) | $150–$400 | Including electrician labor for new or repositioned fan |
One cost-saving note: if bathroom ceiling or wall mold is limited to painted drywall and has not penetrated deep into the assembly, a professional can often apply an antimicrobial treatment and encapsulant without full demolition, keeping costs toward the lower end. Get this confirmed in writing in the scope of work before signing, and confirm whether post-remediation mold testing is included or billed separately.
National mold remediation cost data broken down by location, size, and mold type gives a fuller picture of what drives total project pricing.
How to prevent mold in your bathroom
Bathroom mold prevention is a moisture management problem. Every effective measure reduces how long surfaces stay wet after a shower or bath. The EPA recommends keeping indoor relative humidity between 30% and 60%, and bathrooms require active ventilation after every shower to stay within that range consistently.
| Prevention action | Frequency | Why it works |
|---|---|---|
| Run exhaust fan during shower and 20–30 min after | Every shower | Removes humid air before it condenses on surfaces |
| Squeegee shower walls | Every shower | Cuts surface moisture duration by 50–70% vs. air-drying |
| Keep humidity below 60% (verify with hygrometer) | Ongoing | Mold spores cannot germinate below 60% relative humidity |
| Re-caulk tub and shower junctions | Every 1–3 years | Silicone caulk degrades; failed seals let water behind tile |
| Reseal grout | Annually | Penetrating sealer reduces porosity and moisture retention |
| Fix dripping faucets and slow drains | As soon as noticed | Eliminates sustained moisture mold needs to establish |
| Wash bath mats and shower curtain liners | Weekly | Rubber backings and fabric hems are fast mold targets |
Fan sizing: The Home Ventilating Institute formula for bathroom exhaust fans is cubic feet of room volume divided by 7.5, which gives the minimum CFM required. A hygrometer ($10–$20) placed in the bathroom tells you whether your fan is actually doing the job. If humidity is still above 60% after the fan has run for 30 minutes, the fan is undersized or in the wrong position. Repositioning the fan close to the shower, rather than near the door, makes a significant difference because it pulls steam directly rather than drawing in dry hallway air.
During renovation: Choosing the right materials eliminates a significant share of long-term bathroom mold risk. Specify:
- Cement board or fiberglass-faced drywall behind all tile, not standard drywall
- 100% silicone caulk at every wet junction rather than latex or siliconized latex
- Epoxy or urethane grout in the shower instead of sanded cement grout
- Mold-resistant ceiling paint (containing antifungal additives) throughout the bathroom
For homeowners dealing with recurring mold despite consistent cleaning, the cause is almost always one of three things: an undersized or badly positioned exhaust fan, a grout or caulk seal that has failed and is letting water behind the tile, or a hidden plumbing leak. A certified mold inspection uses a thermal camera and moisture meter to identify hidden moisture sources before they become a larger remediation project.
Catching problems early matters as much as fixing them once found. Regularly checking for early signs of mold around fixtures, under the vanity, and along the base of tiled walls lets you act before surface growth becomes a behind-wall problem.
Frequently asked questions
Bathroom mold is the most common room-specific mold problem in U.S. homes, and most cases are caused by the same three failures: inadequate exhaust ventilation, failed caulk or grout seals, and delayed response to plumbing leaks.
What causes mold in bathrooms?
Bathroom mold is caused by sustained humidity above 60%, inadequate exhaust ventilation, and porous surfaces like grout and caulk that stay wet long after a shower ends.
Is bathroom mold dangerous?
Most bathroom mold species are allergenic, not toxic, causing nasal irritation, coughing, and eye irritation in sensitive individuals. People with asthma, mold allergies, or compromised immune systems experience symptoms more severely. The clinical picture by population group and mold type is covered under is mold dangerous.
What is the pink mold in my bathroom?
Pink or reddish-orange slime in the shower is almost always Serratia marcescens, a bacterium rather than a true fungal mold. It forms a biofilm on soap residue and body oils in warm, damp conditions. Because it is bacterial, antifungal mold sprays do not kill it effectively. Use an EPA-registered disinfectant with bleach or hydrogen peroxide, scrub to break up the biofilm, rinse, and dry the surface completely. Without consistent humidity control and weekly cleaning, it will return.
How do I get rid of mold on my bathroom ceiling?
Apply a 1-to-10 bleach-water solution, let it dwell for 10 minutes, scrub with a soft brush, and rinse. More importantly, fix the root cause: upgrade the exhaust fan to a model sized for your bathroom's cubic footage and position it close to the shower rather than near the door. If ceiling mold covers more than a couple of square feet or the ceiling drywall feels soft, the drywall may need to be replaced.
How much does professional bathroom mold removal cost?
Surface mold on tile, grout, and caulk typically costs $500–$1,000 for a professional visit. When mold has penetrated behind shower walls or into ceiling drywall, costs rise to $1,000–$2,000 or more depending on how much material must be removed and replaced. Any plumbing repair is typically priced separately. The per-square-foot pricing mechanics and what contractors typically include are covered under mold remediation cost per square foot.
When should I call a professional for bathroom mold?
Call a professional when the area exceeds 10 square feet, when tiles feel loose or hollow, when drywall is soft or discolored beyond the visible surface, when mold returns quickly after thorough cleaning, or when anyone in the household has asthma, allergies, or immune compromise. A professional should also assess any mold associated with a plumbing leak rather than shower steam.
How do I prevent mold in my bathroom?
Control moisture: run the exhaust fan for 20–30 minutes after every shower, squeegee tile walls after each use, keep humidity below 60%, re-caulk and reseal grout annually, fix drips immediately, and wash bath mats and shower curtain liners weekly. For bathrooms with persistent mold, a certified mold remediation process contractor can scope the moisture source accurately and prevent recurrence.
Sam Hickerson is the founder of RestoreAdvisor and writes consumer guides on mold remediation, inspection, testing, and home recovery. His work focuses on helping homeowners understand costs, risks, and when to call a professional. He draws on guidance from the EPA, CDC, IICRC, and other authoritative sources to make complex home issues easier to navigate.