
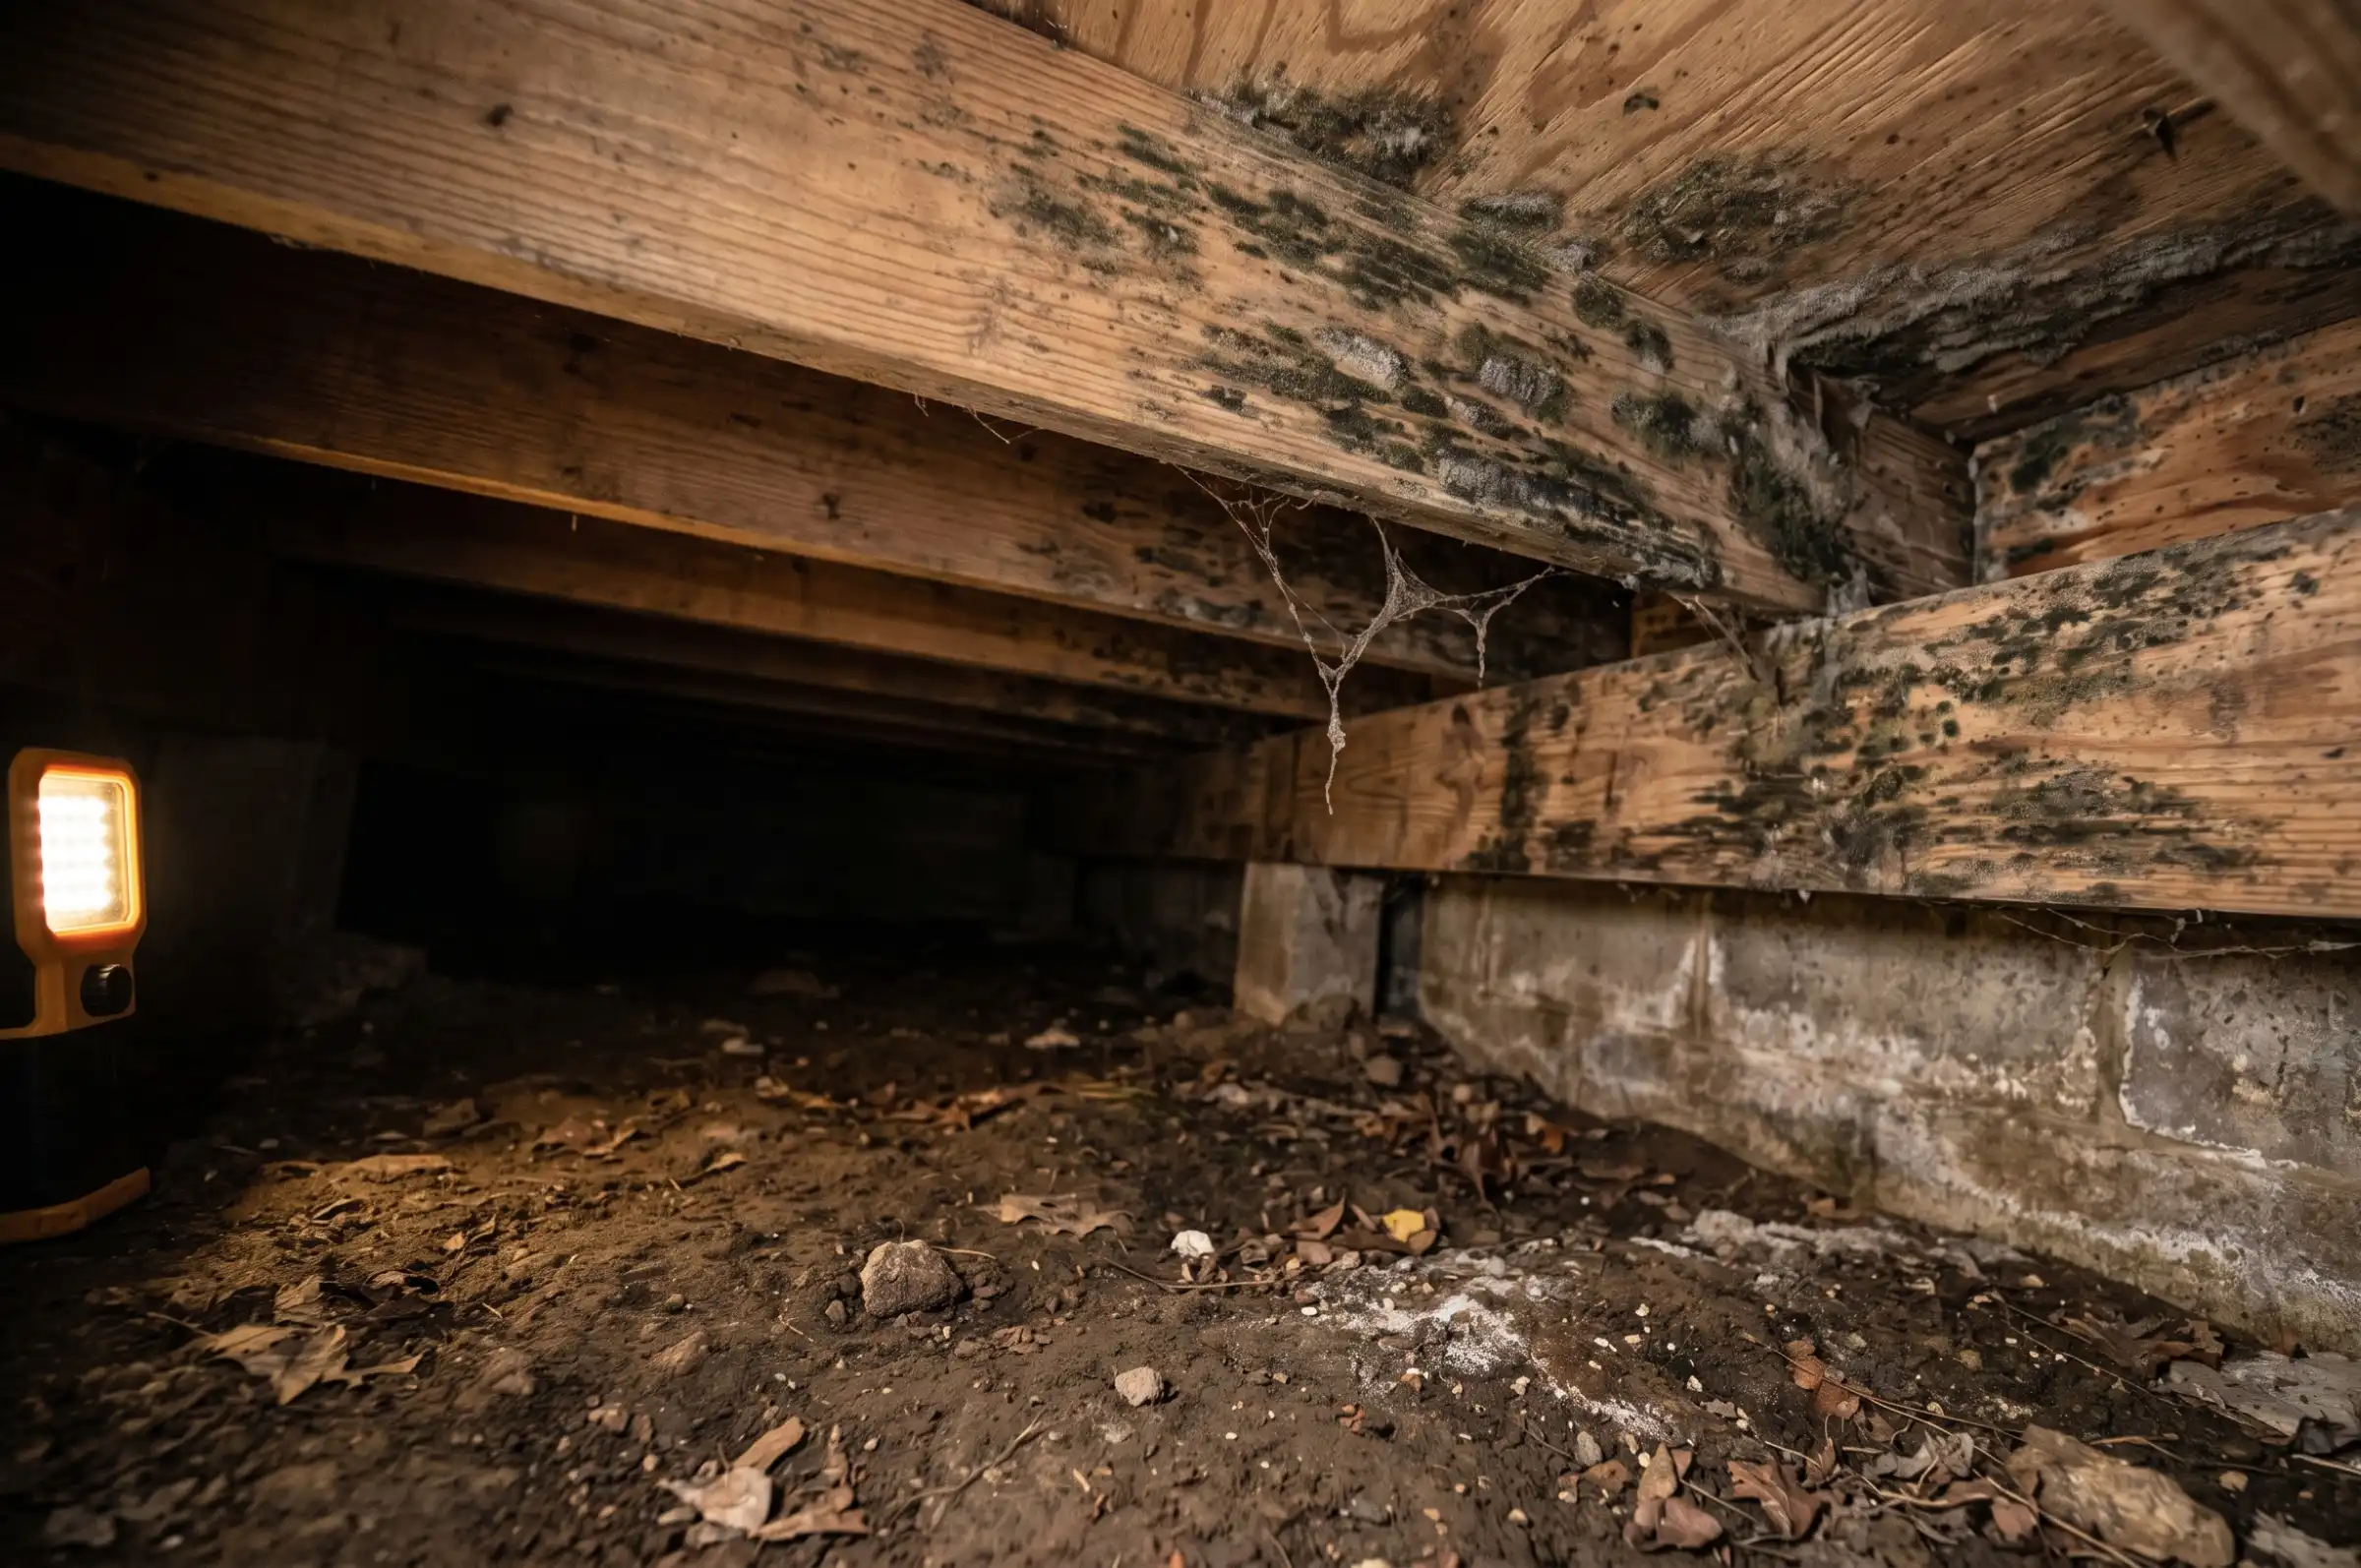

Finding mold in a crawl space is unsettling, and the uncertainty about how serious it is and what it will cost can feel worse than the problem itself. The good news: this is a well-understood problem with reliable solutions, and knowing what you are dealing with makes the path forward much clearer.
Crawl space mold is fungal growth that develops on the structural wood, insulation, and soil surfaces beneath a home's living area when relative humidity consistently exceeds 60%, as defined under the ANSI/IICRC S520 Standard for Professional Mold Remediation. It is the most common location for mold in U.S. homes, and because the space is hidden, it typically reaches significant size before any symptom appears above the floor.
Key insights
- Humidity is the trigger. Once relative humidity inside a crawl space consistently exceeds 60%, mold colonies can establish on wood surfaces within days.
- The stack effect carries mold upstairs. Building science research shows that up to 50% of the air on a home's first floor originates in the crawl space or basement, pulling mold spores directly into living areas.
- Bleach does not work on wood. Bleach cannot penetrate porous wood surfaces to kill mold at the root. Professional removal uses mechanical abrasion or media blasting followed by antimicrobial treatment.
- Remediation and encapsulation are not the same thing. Remediation removes existing mold. Encapsulation eliminates the moisture conditions that caused it. Both are usually needed for lasting results.
- Professional remediation is the standard. The EPA recommends professional remediation for any mold area exceeding 10 square feet. Crawl space mold almost always exceeds this threshold.
- Cost ranges widely. Removal costs $1,500–$8,000 depending on size, severity, and whether insulation must be replaced. Full encapsulation adds $5,000–$15,000.
Why crawl spaces are prime mold territory
Crawl spaces create ideal mold conditions because they combine sustained moisture, organic food sources, limited airflow, and darkness in one confined space. The EPA and IICRC both identify crawl spaces as among the highest-risk locations in a home for mold colonization. Ground moisture continuously evaporates upward through bare soil and porous concrete block foundations. Cold water pipes, HVAC ducts, and steel fasteners generate condensation during warm months. Foundation vents, which were widely installed to ventilate crawl spaces, often make humidity worse in humid climates by pulling in warm exterior air that cools and condenses on cold surfaces. Add organic food sources including Douglas fir floor joists, OSB subfloor sheathing, insulation kraft paper, and wood debris, and the environment sustains mold growth year-round.
 Bare soil like this evaporates moisture continuously, which is why an unencapsulated crawl space stays humid regardless of how dry conditions are outside.
The most common causes of crawl space mold, in order of frequency, are persistent ground moisture without a vapor barrier, inadequate or counterproductive foundation vents in humid climates, plumbing leaks from supply lines or drain pipes routed through the space, and surface water intrusion through foundation walls or improper exterior grading. Crawl spaces that have experienced flooding or a significant plumbing failure are at especially high risk of mold after water damage establishing before any visible sign appears above the floor.
How to detect crawl space mold
Crawl space mold is confirmed by direct visual inspection combined with moisture measurement, and you do not need to see visible growth to suspect it. A persistent musty odor, unexplained indoor humidity, or a moisture meter reading above 19 percent on structural wood are all reliable signals that warrant a closer look.
 A reading past 19% like this one flags active moisture infiltration; above 28% wood rot becomes likely alongside the mold itself.
The indicators below fall into two categories: what you can observe from inside the home before opening the access hatch, and what a direct inspection of the crawl space itself reveals.
Signs observable from inside the home:
| Indicator | What it suggests |
|---|---|
| Musty or earthy odor from floor vents or low rooms | Active mold producing microbial volatile organic compounds (MVOCs) |
| Allergy or respiratory symptoms that improve away from home | Spores entering living area via stack effect |
| Soft spots or sagging in floor above crawl space | Advanced mold with structural wood rot |
| High indoor humidity even with HVAC running | Moisture migrating upward from crawl space |
| Condensation on first-floor windows or pipes | Elevated relative humidity throughout lower home |
| Peeling floor finish or warped hardwood | Moisture wicking up through subfloor |
Signs found during visual inspection of the crawl space:
Dark or discolored patches on floor joists, rim joists, or subfloor sheathing are the clearest indicator. Active mold may appear fuzzy or powdery in gray, black, green, or white. Discolored or stained wood without visible growth may indicate past water exposure or early-stage colonization. A moisture meter reading above 19% on structural wood is a serious warning sign. Readings above 28% indicate conditions where wood rot is also likely.
A professional mold inspection uses additional tools including infrared cameras to detect moisture behind surfaces and air cassette sampling to quantify spore levels. This is the most reliable way to confirm the extent of contamination before deciding on a scope of work.
Mold species commonly found in crawl spaces
The most common mold species found in crawl spaces are Cladosporium, Penicillium, Aspergillus, and Stachybotrys chartarum, each with distinct appearances, preferred substrates, and remediation requirements. Identifying the species present guides the appropriate protocol under IICRC S520.
| Species | Appearance | Common location | Health category | Protocol |
|---|---|---|---|---|
| Cladosporium | Olive-green to black, powdery | Floor joists, subfloor | Allergenic | Standard remediation |
| Penicillium | Blue-green, velvety | Insulation, wood debris | Allergenic/ irritant | Standard remediation |
| Aspergillus | White to gray, various | Wood, soil, insulation | Allergenic/ opportunistic pathogen | Standard remediation |
| Stachybotrys chartarum | Slimy, dark greenish-black | Wood with prolonged saturation | Mycotoxin-producing | Enhanced protocols |
| Serpula lacrymans | Brown, rust-colored sheets | Structural wood | Wood rot fungus | Structural assessment required |
Stachybotrys chartarum, commonly called black mold, requires sustained wood moisture above 90% to colonize. It is less common than Cladosporium or Penicillium but demands more careful handling due to trichothecene mycotoxin production. If testing confirms Stachybotrys, additional containment measures and post-clearance testing are standard. Species-specific protocols are covered in black mold removal.
 Coverage spanning this much rim joist and subfloor typically involves more than one species, which is why lab confirmation matters before scoping the remediation.
Serpula lacrymans and related brown rot fungi are sometimes mistaken for mold. Brown rot is a wood decay fungus, not a mold in the strict sense, but it indicates severe and sustained moisture exposure and can cause significantly greater structural damage than mold alone. Any contractor assessing crawl space mold should also evaluate for structural wood compromise.
Health risks and the stack effect
Occupants of homes with crawl space mold face a 50–100% increased risk of respiratory symptoms and asthma compared to occupants of dry buildings, according to the WHO's 2009 indoor air quality guidelines, and the exposure pathway is the crawl space itself. The stack effect, a fundamental principle of building physics, causes warm air to rise and exit through upper floors while drawing replacement air upward from lower spaces, meaning air from below the floor is continuously pulled into living areas.
Building science field studies indicate that as much as 40–60% of first-floor indoor air in homes with vented crawl spaces originates in the crawl space. When mold is present, spores, mycotoxins, and mold fragments travel this same pathway. Common health effects include persistent nasal congestion and sneezing, eye irritation, skin rashes, exacerbation of existing asthma, and fatigue that improves when away from home. Children, elderly adults, pregnant women, and anyone with immunosuppression or pre-existing respiratory conditions are at greatest risk. For a full breakdown of mold health effects by population and mold category, see is mold dangerous.
DIY vs. professional crawl space mold removal
Professional remediation is the correct approach for nearly all crawl space mold. The EPA's published guidance recommends professional remediation for any mold affecting more than 10 square feet. In crawl spaces, growth almost always exceeds this threshold by the time it is discovered, frequently covering 50–200 or more square feet across floor joists and subfloor.
Beyond the size issue, the confined, low-clearance environment creates physical and safety challenges that make DIY genuinely dangerous. Disturbing mold colonies in an enclosed space without negative air pressure containment spreads spores directly into the living area above. Proper PPE for crawl space work includes an N-100 or P-100 half-face respirator, Tyvek coveralls, gloves, and eye protection. Most homeowners do not have this equipment and are not trained in confined space safety.
There is also the effectiveness question. Bleach, the most commonly attempted DIY treatment, does not penetrate porous wood surfaces. It may remove surface staining temporarily while leaving viable mold hyphae inside the wood. Mold typically returns within weeks.
The narrow appropriate scope for DIY is limited to very small, accessible spots (under 10 square feet) on non-porous surfaces with an identifiable and fixed moisture source. The conditions under which homeowners can safely handle small jobs are covered in DIY mold removal.
For everything else, professional remediation is the right call, and when mold remediation is required covers the specific conditions that determine which side of that line you are on.
The professional crawl space mold remediation process
Professional crawl space mold remediation follows the ANSI/IICRC S520 Standard for Professional Mold Remediation, which defines the scope of work, containment requirements, and clearance criteria. A properly executed project proceeds in seven phases.
Phase 1: Inspection and assessment
An IICRC-certified technician performs a visual assessment and measures wood moisture content with a pin or pinless moisture meter. Readings above 19% indicate active moisture infiltration. Air or surface sampling may be collected to identify mold species and establish a pre-remediation baseline for post-clearance comparison.
Phase 2: Moisture source correction
No remediation proceeds without first correcting the moisture source. A plumbing leak must be repaired, drainage issues addressed, and failed vapor barriers replaced or removed. Skipping this step guarantees that mold returns within months, regardless of how thoroughly the existing growth is removed.
Phase 3: Containment setup
The crawl space access hatch is sealed with 6-mil polyethylene sheeting and a negative air machine is installed to maintain negative pressure inside the space. This prevents disturbed spores from migrating into the living area above. HEPA air scrubbers run throughout the project.
 Sealing the access hatch first, before any material is disturbed, is what keeps spores from riding the stack effect straight into the living space above.
Phase 4: Insulation removal
Fiberglass batt insulation between floor joists traps moisture and harbors mold growth that cannot be treated without removing it first. Contaminated insulation is double-bagged in 6-mil poly bags and disposed of as regulated waste. This step is often one of the larger cost components of the project.
Phase 5: Mold removal from structural wood
Surface mold on floor joists and subfloor sheathing is treated by one of two primary methods depending on severity.
For lighter infestations with surface mold, mechanical abrasion using wire brushing and hand sanders physically removes the mold along with a thin layer of wood fiber. This method is appropriate when wood moisture content has returned below 16% and visible growth is limited to the surface.
For heavier infestations or widespread colonization, soda blasting is the professional standard. Soda blasting uses compressed air to project sodium bicarbonate against wood surfaces at high velocity, physically removing mold along with staining without leaving toxic residue or damaging sound wood fiber. Dry ice blasting is an alternative that leaves no media to clean up afterward. Both methods are followed immediately by HEPA vacuuming of all surfaces and debris.
 The contrast between the cleaned and untreated sections here shows what soda blasting removes that wire brushing alone typically can't reach.
Phase 6: Antimicrobial treatment
After mechanical removal and HEPA vacuuming, an EPA-registered antimicrobial solution is applied to all treated wood surfaces. Many contractors also apply a borate-based wood preservative to inhibit future fungal growth. An encapsulant coating may be applied as a final barrier, particularly on surfaces with deep grain staining.
Phase 7: Clearance testing
Post-remediation air sampling and surface tape-lift samples are collected after the space has been allowed to stabilize. Results must show that spore counts have returned to background (outdoor ambient) levels before the job is closed. This step protects the homeowner and documents that remediation was successful. How clearance sampling works and how to read lab results is covered in mold testing.
The mold remediation process covers the full professional sequence beyond the crawl space context.
Crawl space encapsulation: what it is and when you need it
Crawl space encapsulation is the permanent sealing of the crawl space to block ground moisture and exterior humidity from entering the space. It is not a mold treatment and does not replace remediation. Encapsulation addresses the moisture conditions that allowed mold to grow in the first place.
A full encapsulation system includes a reinforced polyethylene vapor barrier (typically 12–20 mil thickness) installed across the floor and up the foundation walls, sealed at seams and wall transitions with tape or adhesive. Foundation vents are sealed off permanently, converting the crawl space from a vented to a conditioned or semi-conditioned environment. A commercial-grade dehumidifier sized for the space is installed to maintain relative humidity below 50–55% year-round.
 A sealed vent like this one converts the space from vented to conditioned, removing the pathway that let humid exterior air condense on cold surfaces in the first place.
Whether encapsulation is necessary depends on your climate, soil moisture, and the underlying cause of the mold. In dry climates with low groundwater, a basic 6-mil vapor barrier may be sufficient. In humid climates such as the Southeast, Gulf Coast, or Pacific Northwest, or in any home where mold has already developed, full encapsulation with a dehumidifier is the standard of care. Without controlling the moisture source, mold will return within one to three years regardless of how thoroughly it was removed.
Encapsulation also benefits the home beyond mold prevention. A sealed, conditioned crawl space reduces HVAC load, lowers heating and cooling costs, discourages pest entry, and improves floor temperature and comfort on the first floor.
Crawl space mold removal and encapsulation costs
Most homeowners pay $1,500–$8,000 for crawl space mold remediation, with the average falling between $3,500 and $5,000. Adding encapsulation brings the total to $5,000–$15,000 or more depending on crawl space size, the extent of growth, whether insulation removal is required, and whether structural wood replacement is needed. For full national cost tables by project size and mold type, mold remediation cost has the complete breakdown.
Per-square-foot pricing mechanics are at mold remediation cost per square foot.
| Scope | Typical cost | Timeline | What drives price |
|---|---|---|---|
| Spot treatment, under 50 sq ft, no insulation | $500–$1,500 | 1–2 days | Minimal setup, small area |
| Standard job, 50–200 sq ft, with insulation removal | $1,800–$4,500 | 2–4 days | Insulation disposal, media blasting |
| Extensive job, 200–500 sq ft, heavy infestation | $4,000–$8,000 | 3–5 days | Full media blast, structural wood treatment |
| Very low clearance (under 3 ft) | Add 20%–30% | Extended | Difficult working conditions, slower progress |
| Stachybotrys (black mold) confirmed | Add 15%–25% | Extended | Enhanced containment, additional clearance testing |
The figures above cover mold removal only. For many homeowners, particularly those in humid climates or with a history of recurring moisture, encapsulation is the necessary second step that makes remediation last. Without addressing the underlying moisture conditions, mold typically returns within one to three years regardless of how thoroughly it was removed. The table below breaks down encapsulation costs by system type so you can plan the full scope before getting bids.
| Scope | Typical cost | Includes | Notes |
|---|---|---|---|
| Basic vapor barrier only (6-mil) | $1,200–$2,500 | Floor coverage only | Minimum intervention, humid climate will need more |
| Mid-grade encapsulation (12-mil barrier + sealed vents) | $3,000–$6,000 | Floor and partial wall coverage | Standard for most homes |
| Full encapsulation (20-mil barrier, sealed vents, dehumidifier) | $5,000–$12,000 | Complete system | Recommended for humid climates, recurring mold |
| Encapsulation with drainage and sump pump | $8,000–$15,000+ | Full moisture management system | Required where groundwater or surface water intrusion is active |
Additional cost factors
Insulation removal and replacement adds $500–$4,000 depending on the type of insulation and the square footage involved. Structural wood replacement for joists or subfloor sheathing compromised by rot adds $500–$5,000 or more depending on extent. Clearance testing after remediation typically runs $300–$600 and should always be included in the project scope.
Low crawl space clearance under 3 feet increases labor cost by 20–30% due to reduced productivity and the need for specialized positioning equipment. Homes in humid climates may require more robust encapsulation systems to maintain humidity below 55% throughout the year.
Does homeowners insurance cover crawl space mold?
Insurance coverage for crawl space mold depends entirely on the cause. Mold resulting from a sudden, accidental covered event, such as a burst pipe or appliance failure, is typically covered under the dwelling protection portion of a standard homeowners policy. The mold must be reported promptly and linked clearly to the qualifying event.
Mold caused by groundwater, chronic humidity, inadequate drainage, or foundation seepage is classified as a maintenance or gradual-damage issue and is generally excluded. Most policies explicitly exclude mold arising from continuous or repeated seepage or leakage of water over weeks, months, or years.
A small number of states expanded mold coverage limits in 2025, including Florida, New York, New Jersey, North Carolina, and South Carolina. If you are in one of these states, review your specific policy for updated limits. In most other states, standard mold coverage is capped at $1,000–$10,000 unless a mold endorsement was purchased separately.
If you believe your mold resulted from a covered peril, document the moisture source thoroughly with photos, get a written assessment from a certified inspector, and submit the claim before proceeding with remediation. Remediation without prior documentation and insurer approval may affect reimbursement.
Preventing crawl space mold from returning
Long-term mold prevention in a crawl space requires controlling humidity, eliminating moisture entry points, and maintaining conditions that are inhospitable to fungal growth. The following actions, prioritized by impact, address the root causes rather than the symptoms.
| Prevention action | Frequency | Why it works |
|---|---|---|
| Maintain crawl space RH below 55% | Continuous (monitor with hygrometer) | Mold cannot establish below this humidity threshold |
| Install or upgrade vapor barrier | One-time (inspect annually) | Blocks ground moisture evaporation, the primary source |
| Seal foundation vents in humid climates | One-time conversion | Vented crawl spaces in humid regions raise, not lower, interior humidity |
| Service crawl space dehumidifier | Annually | Ensures continuous humidity control; empty or clean drain line |
| Inspect for plumbing leaks | Annually and after any event | Dripping pipes create localized high-moisture zones that feed mold |
| Grade soil away from foundation | As needed | Prevents surface water from pooling at foundation wall |
| Check and clear gutters and downspouts | Twice annually | Diverts roof water away from foundation and soil near crawl space |
| Inspect crawl space visually | Annually | Early detection limits remediation scope and cost |
A wireless humidity sensor placed inside the crawl space allows continuous monitoring from inside the home. Most sensors with a companion app cost $20–$50 and will alert you if humidity rises above a set threshold. This is one of the lowest-cost and most effective early warning investments available to homeowners with a history of crawl space moisture.
 This reading sits just above the 60% threshold where colonies can establish, which is the kind of early warning a $20 sensor catches before mold ever becomes visible.
Hiring the right contractor
A qualified crawl space mold contractor holds IICRC Applied Microbial Remediation Technician (AMRT) certification and operates under a company with IICRC Certified Firm status, which requires maintaining current technician certifications and insurance. These credentials are what distinguish professional mold remediation from unverified work in a market with no federal licensing standard.
Before signing any contract, search both the technician's name and the company through the IICRC Global Locator, as individual credentials and firm-level certification are listed separately and both need to be current.
Remediation and inspection should be performed by separate companies. A contractor who both inspects and remediates has a financial incentive to overstate the scope of the problem. Get the inspection from an independent third party, then use the inspection report as the basis for getting competitive remediation bids.
A full contractor vetting framework including what a written scope of work must contain and how to compare bids is at how to choose a mold remediation company.
Frequently asked questions
How do I know if I have mold in my crawl space?
The most reliable signs are a persistent musty odor coming from floor vents or low-lying areas, respiratory symptoms or allergy flare-ups that improve when you leave home, and visible dark staining on floor joists when you look inside the crawl space. A professional inspection using a moisture meter and air sampling provides a definitive answer.
Can I remove crawl space mold myself?
No, not in most cases. Crawl spaces present physical and safety risks that go beyond the standard DIY limitations for mold work. The confined access, low clearance, and inability to establish negative air pressure without professional equipment mean that disturbing colonies disperses spores directly into living areas above. OSHA classifies enclosed, low-oxygen, or hazardous-air spaces as confined spaces requiring specific entry protocols. Most crawl space mold jobs exceed both the EPA's 10-square-foot professional-remediation threshold and the physical conditions under which DIY is safe.
Does bleach kill crawl space mold?
No. Bleach cannot penetrate porous wood surfaces to kill mold at the root. It may lighten surface staining temporarily while leaving viable mold hyphae inside the wood grain. Mold treated with bleach alone typically regrows within weeks. Professional removal uses mechanical abrasion or media blasting, not chemical disinfectants alone.
How long does mold remediation take in a crawl space?
Remediation alone typically takes 2–4 days. Adding insulation removal and a vapor barrier extends that to 4–5 days. Full encapsulation with dehumidifier installation takes 5–7 days. Complex projects involving very low clearance or heavy Stachybotrys growth take longer.
Will encapsulation prevent mold permanently?
Yes, when properly installed and maintained, crawl space encapsulation is highly effective at preventing mold recurrence. The dehumidifier must be serviced annually and the vapor barrier inspected for tears or displacement. In climates with high groundwater, drainage systems may also be necessary. No solution is permanent without ongoing maintenance.
What is soda blasting in a crawl space?
Soda blasting uses compressed air to project sodium bicarbonate against wood surfaces, physically abrading and removing mold colonies and staining without leaving toxic residue or damaging sound wood fiber. It is the most widely used professional removal method for wood structures in crawl spaces and attics, valued for its effectiveness and low toxicity compared to chemical treatments.
How do I find a qualified crawl space mold contractor?
Verify IICRC AMRT certification for the technicians and IICRC Certified Firm status for the company through the IICRC Global Locator. Ensure the company carries general liability, workers compensation, and pollution liability insurance. Get the mold inspection from a separate company before soliciting remediation bids. The mold remediation checklist covers contractor vetting before, during, and after the job.
Sam Hickerson is the founder of RestoreAdvisor and writes consumer guides on mold remediation, water damage restoration, inspection, testing, and home recovery. His work focuses on helping homeowners understand costs, risks, and when to call a professional. He draws on guidance from the EPA, CDC, IICRC, and other authoritative sources to make complex home issues easier to navigate.