
Kitchen mold is fungal growth that colonizes kitchen surfaces when sustained moisture combines with organic material and temperatures between 40°F and 100°F (4°C–38°C), the growth conditions defined in ANSI/IICRC S520, the Standard for Professional Mold Remediation. It grows where moisture collects, and kitchens produce it constantly through cooking, dishwashing, plumbing supply lines, and appliance condensation. If you have spotted dark patches under the sink, on the ceiling above the stove, or along window caulk lines, you are dealing with one of the most common mold problems in residential homes. The good news is that most kitchen mold is containable and fixable once you understand the source.
Most homeowners find kitchen mold in the wrong order: they clean the surface before they identify the moisture source, use the wrong product for the surface type, and wonder why it comes back. Getting the sequence right (source first, surface second, product matched to material) is what separates a permanent fix from a recurring problem.
Key insights
- Moisture drives everything. Mold spores exist in every kitchen. They only colonize when moisture is sustained above 60% relative humidity or a surface stays wet for 24–48 hours, per EPA guidelines.
- The 10 sq ft rule applies here. The EPA advises homeowners to handle mold patches under 10 square feet themselves, per the EPA Brief Guide to Mold, Moisture, and Your Home. Larger areas, or any growth involving drywall or structural framing, require a licensed remediation contractor.
- Bleach fails on porous surfaces. Bleach is primarily water and does not penetrate wood or particleboard. Using it on cabinet bases or unfinished wood can worsen mold growth rather than eliminate it.
- Under the sink is the most common kitchen mold location. Slow supply line drips and drain pipe condensation in an enclosed wood cabinet create ideal mold conditions in as little as 24 hours.
- Fix the source first. Cleaning mold without repairing the leak or humidity problem that caused it guarantees recurrence, often within weeks.
- Professional remediation is not always necessary. Small, surface-level kitchen mold on non-porous materials with a resolved moisture source is a legitimate DIY job with the right PPE and technique.
Why kitchens are high-risk for mold
Kitchens are among the highest-risk rooms in a home for mold growth because they combine the three factors mold requires: a consistent moisture source, organic material to feed on, and temperatures between 40°F and 100°F (4°C–38°C). Everyday cooking activities alone generate 2–4 pounds of water vapor daily in an average household, according to NIOSH research on dampness and mold in buildings.
Beyond cooking steam, kitchens contain multiple active plumbing connections, hidden enclosed spaces (cabinets, toe kicks, wall cavities behind dishwashers), and surfaces such as grout, caulk, and wood that absorb and retain moisture. Range hoods that recirculate rather than vent to the exterior only filter grease; they do not remove humidity, which accumulates on ceiling surfaces and in wall cavities above the stove.
Poor ventilation compounds all other risks. If indoor relative humidity exceeds 60% consistently, mold can establish on nearly any surface, including painted drywall and the back faces of cabinet boxes, without any visible leak present.
Mold species commonly found in kitchens
The most common mold species found in kitchens are Cladosporium, Aspergillus, Penicillium, Alternaria, and Stachybotrys chartarum, each associated with specific kitchen zones and moisture conditions. Identifying them by appearance and location determines the correct cleaning approach and whether professional involvement is needed.
| Species | Appearance | Common kitchen locations | Health category | DIY or pro |
|---|---|---|---|---|
| Cladosporium | Olive-green to black, powdery | Window sills, grout, ceiling | Allergenic | DIY if under 10 sq ft |
| Aspergillus | Green, yellow, or white with dark centers | Cabinet interiors, behind refrigerator | Allergenic / opportunistic | DIY if under 10 sq ft |
| Penicillium | Blue-green, velvety | Under sink, pantry, around dishwasher | Allergenic | DIY if under 10 sq ft |
| Stachybotrys chartarum | Slimy, dark greenish-black | Behind walls after sustained leak, ceiling after roof leak | Toxigenic | Professional required |
| Alternaria | Dark brown or black, woolly | Around sink, window frames | Allergenic | DIY if under 10 sq ft |
Stachybotrys chartarum requires sustained, long-term moisture (typically from an active leak present for weeks or months) and grows on cellulose-based materials like drywall paper and wood framing. Its presence in a kitchen almost always indicates a slow plumbing leak or roof leak that went undetected. If you find black, slimy mold after a prolonged leak, do not disturb it. Call a professional who follows black mold removal protocols, which include stricter containment and do-not-disturb procedures than standard mold remediation.
Kitchen mold by location
The five locations where kitchen mold most commonly develops are under the sink, on the ceiling, behind the refrigerator, inside cabinet interiors, and along grout and caulk lines. Each has a different primary moisture source, surface material, and removal approach, which is why treating them the same way consistently produces poor results.
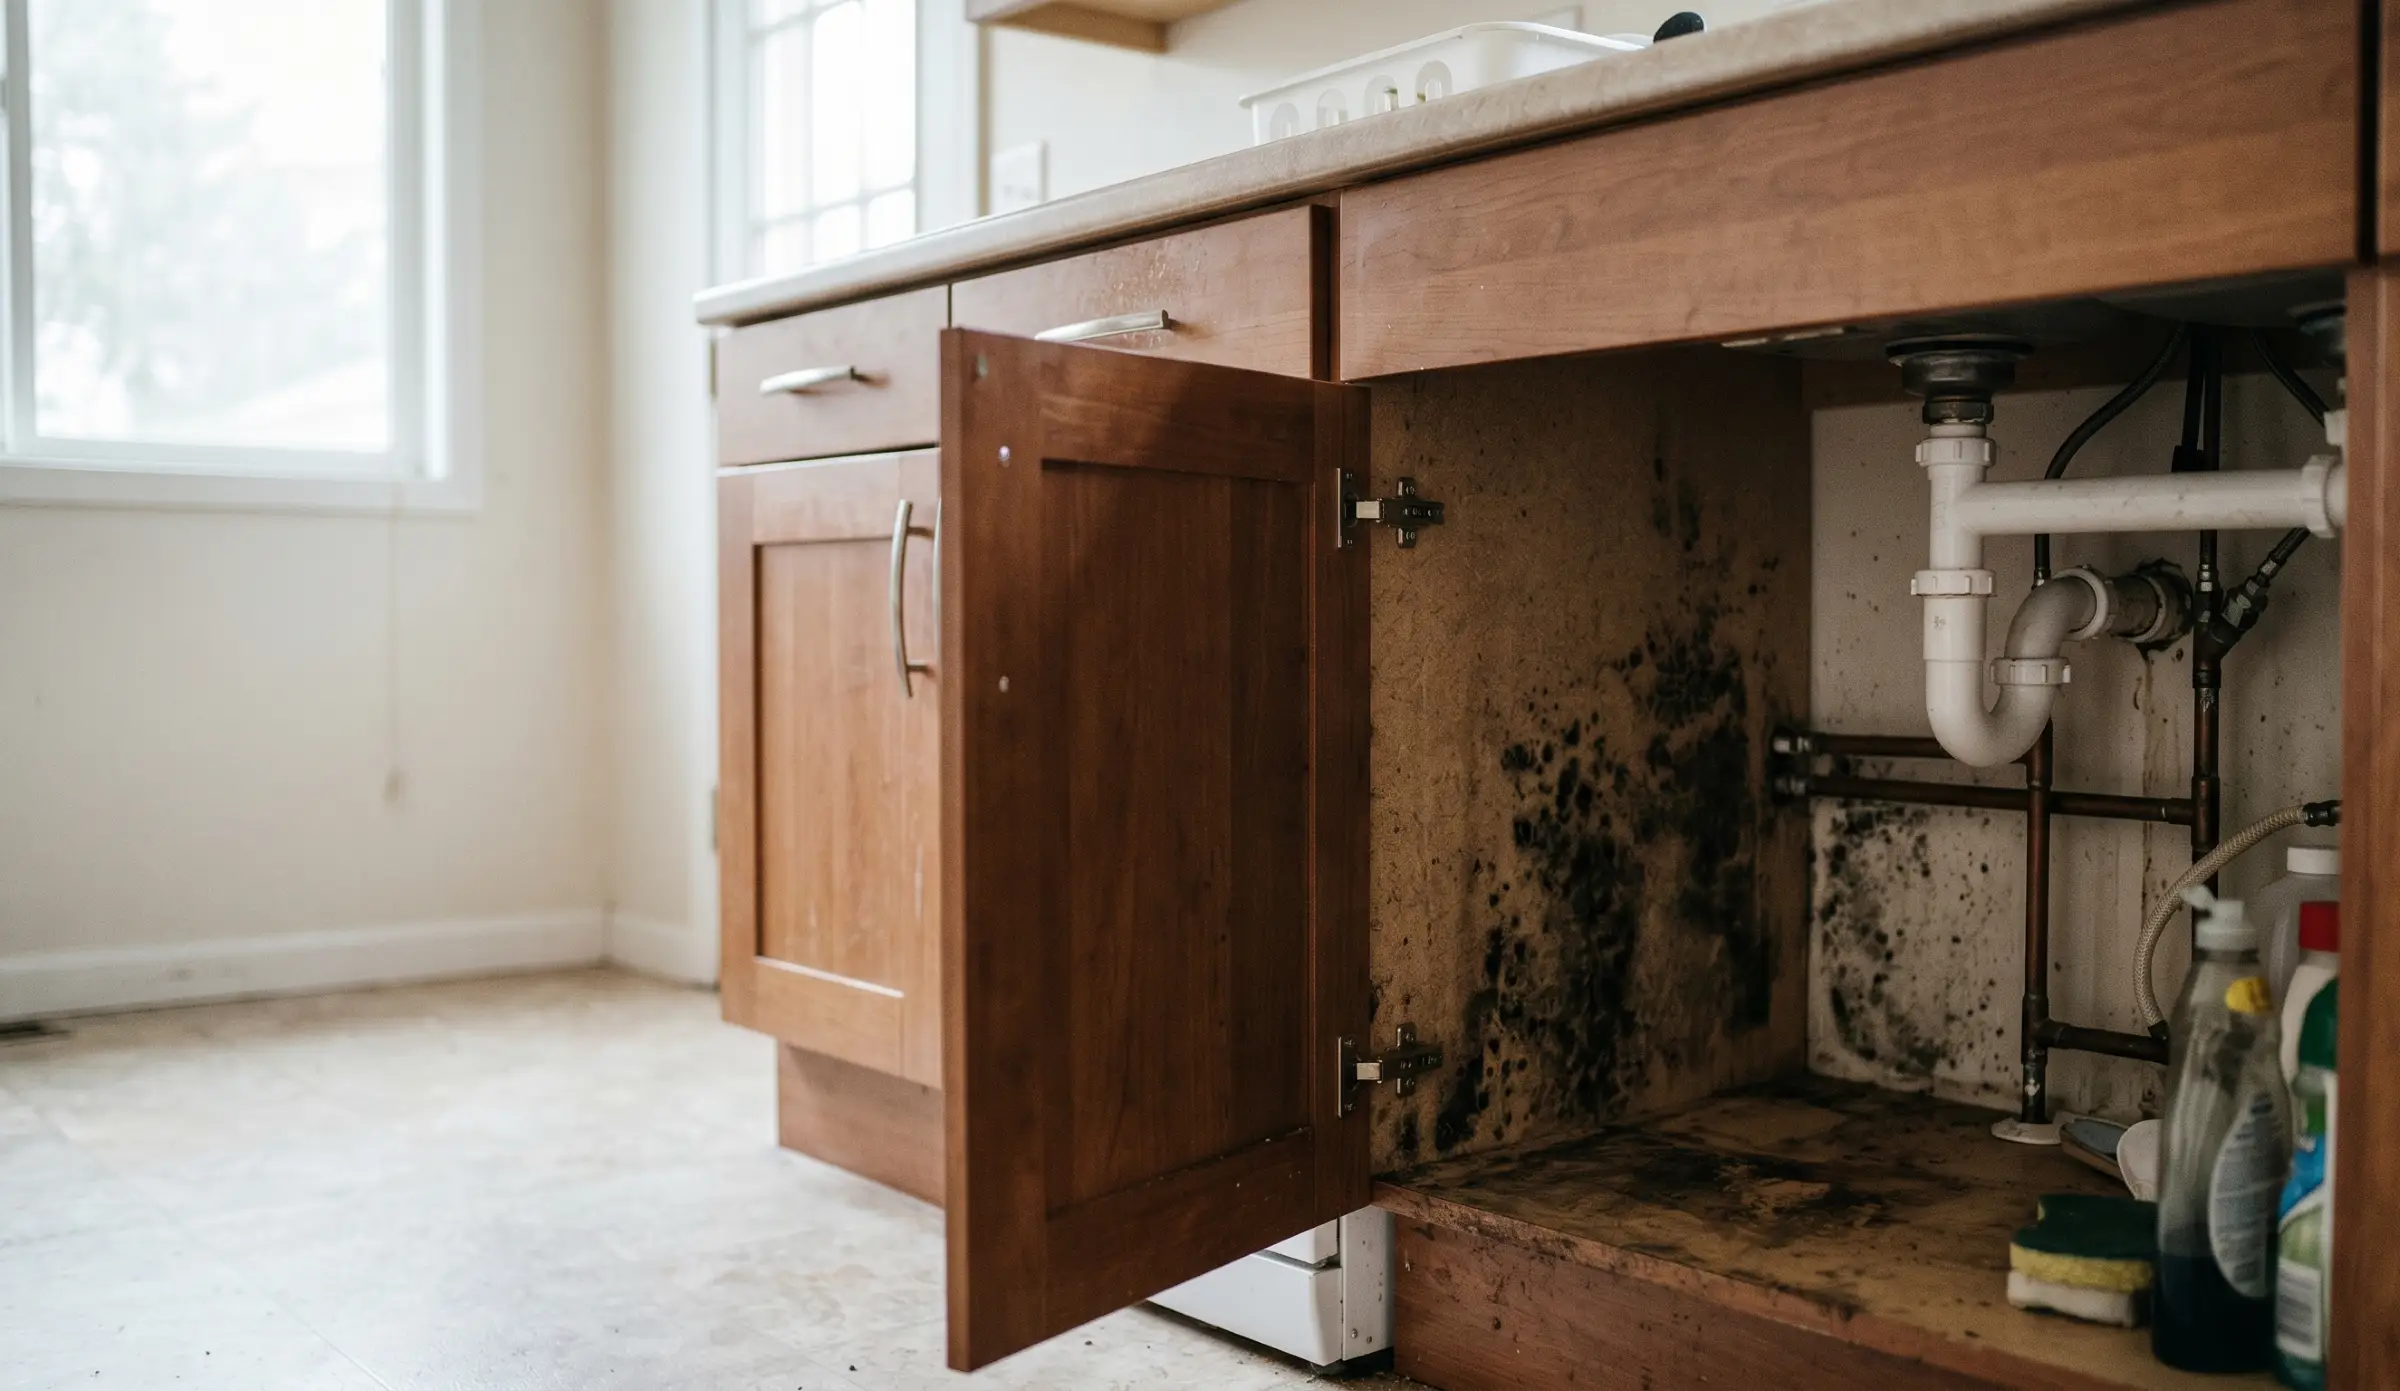
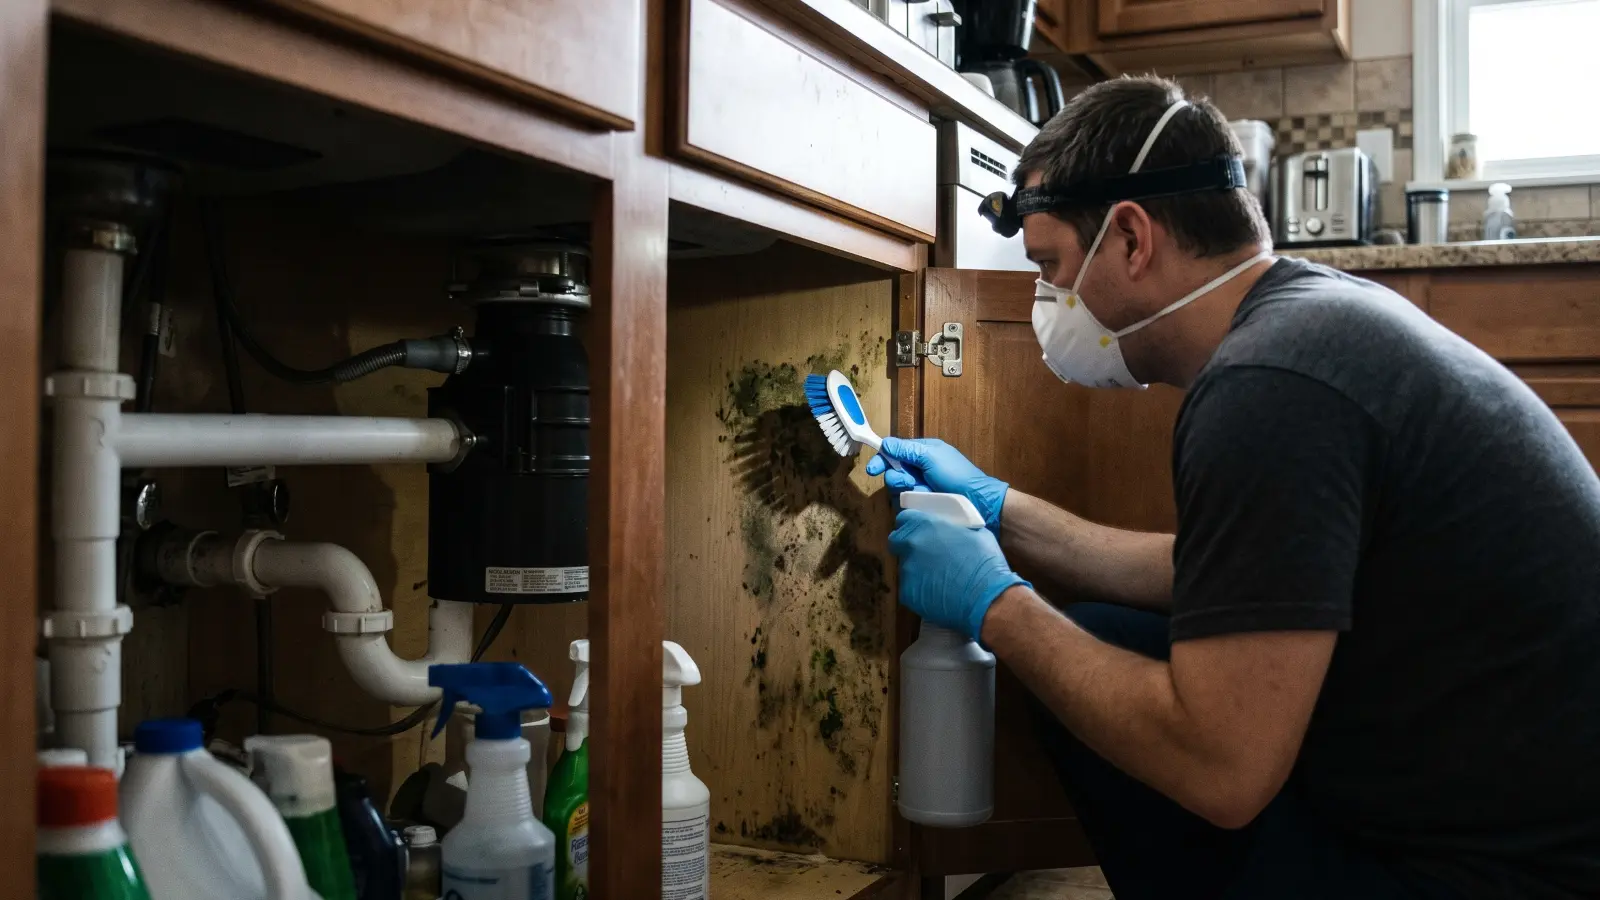
Mold under the kitchen sink
Mold under the kitchen sink is the most common kitchen mold location. The enclosed cabinet traps moisture from slow supply line leaks, drain trap condensation, garbage disposal seal failures, and minor dishwasher drain hose weeping. Cabinet bases are typically particleboard, which absorbs moisture rapidly and begins supporting mold within 24–48 hours of sustained exposure.
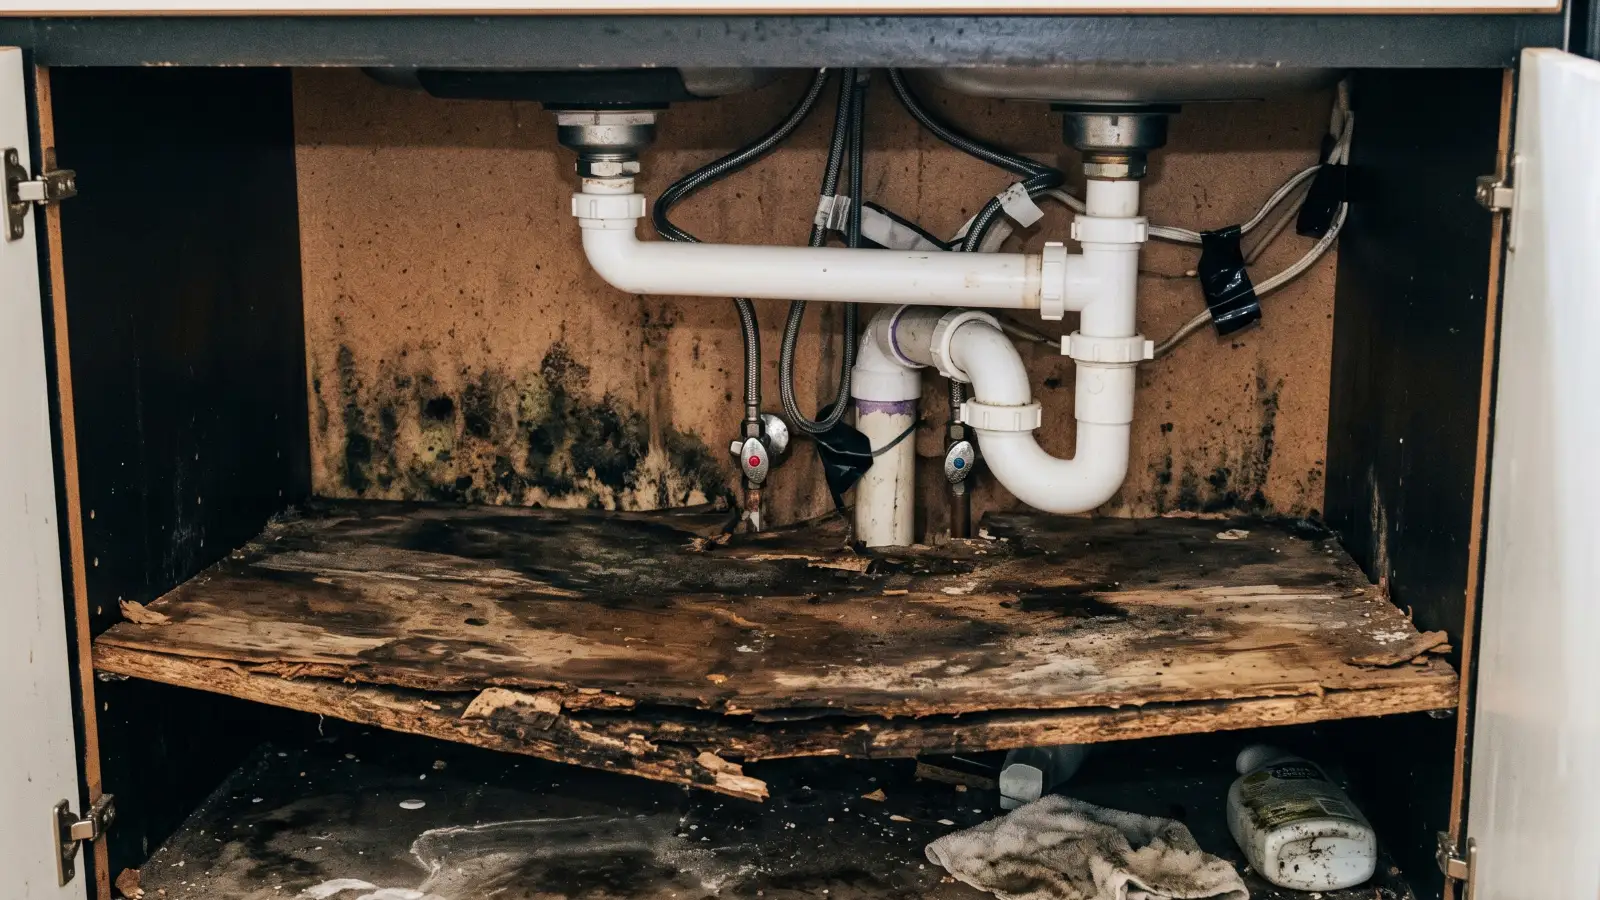
What to look for: Dark staining on the cabinet base, musty odor when opening the cabinet door, soft or swollen particleboard, water rings on stored items, or visible dark patches along the back wall of the cabinet.
DIY scope: If the leak is repaired and the mold is surface-level on a non-porous surface such as a painted wall or PVC pipe, clean it yourself. Particleboard cabinet bases that show mold penetration must be replaced, not cleaned; particleboard cannot be fully dried once saturated.
When to call a pro: Call a professional if the mold has extended into drywall behind the cabinet, if the particleboard base is soft or crumbling, if a leak was active for more than 48 hours, or if the musty odor persists after cleaning.
Mold on the kitchen ceiling
Mold on the kitchen ceiling typically results from cooking steam condensing on a cooler surface, a bathroom or laundry room directly above, or a roof or supply-line leak. The cause determines the removal approach, so identifying the moisture source before cleaning is essential.

Identifying the cause:
- Diffuse gray or greenish patch near the stove or dishwasher without a water stain ring indicates humidity and condensation.
- A defined brown ring with mold at the center usually indicates an active or past water leak from above.
- Mold across a large area of ceiling, including away from appliances, suggests chronic high humidity throughout the kitchen.
DIY scope: Small patches on painted drywall ceiling under 10 square feet with a resolved moisture source can be cleaned with detergent and water, then treated with a diluted hydrogen peroxide solution. If the drywall is soft, stained through, or the mold has been present for months, the affected section should be cut out and replaced. The mold on drywall clean-vs-replace decision framework covers exactly when drywall can be salvaged and when it cannot.
When to call a pro: Any ceiling mold larger than 10 square feet, any ceiling mold associated with an active roof or plumbing leak, or any situation where the mold has penetrated into the framing above the drywall requires professional remediation.
Mold behind the refrigerator
Mold behind the refrigerator grows primarily from two sources: a clogged or disconnected defrost drain line and a malfunctioning or overflowing drain pan. Most refrigerators route condensate to an evaporation pan beneath the unit; when that pan cracks or the drain line blocks, water spreads behind the unit and stays hidden and moist for months.
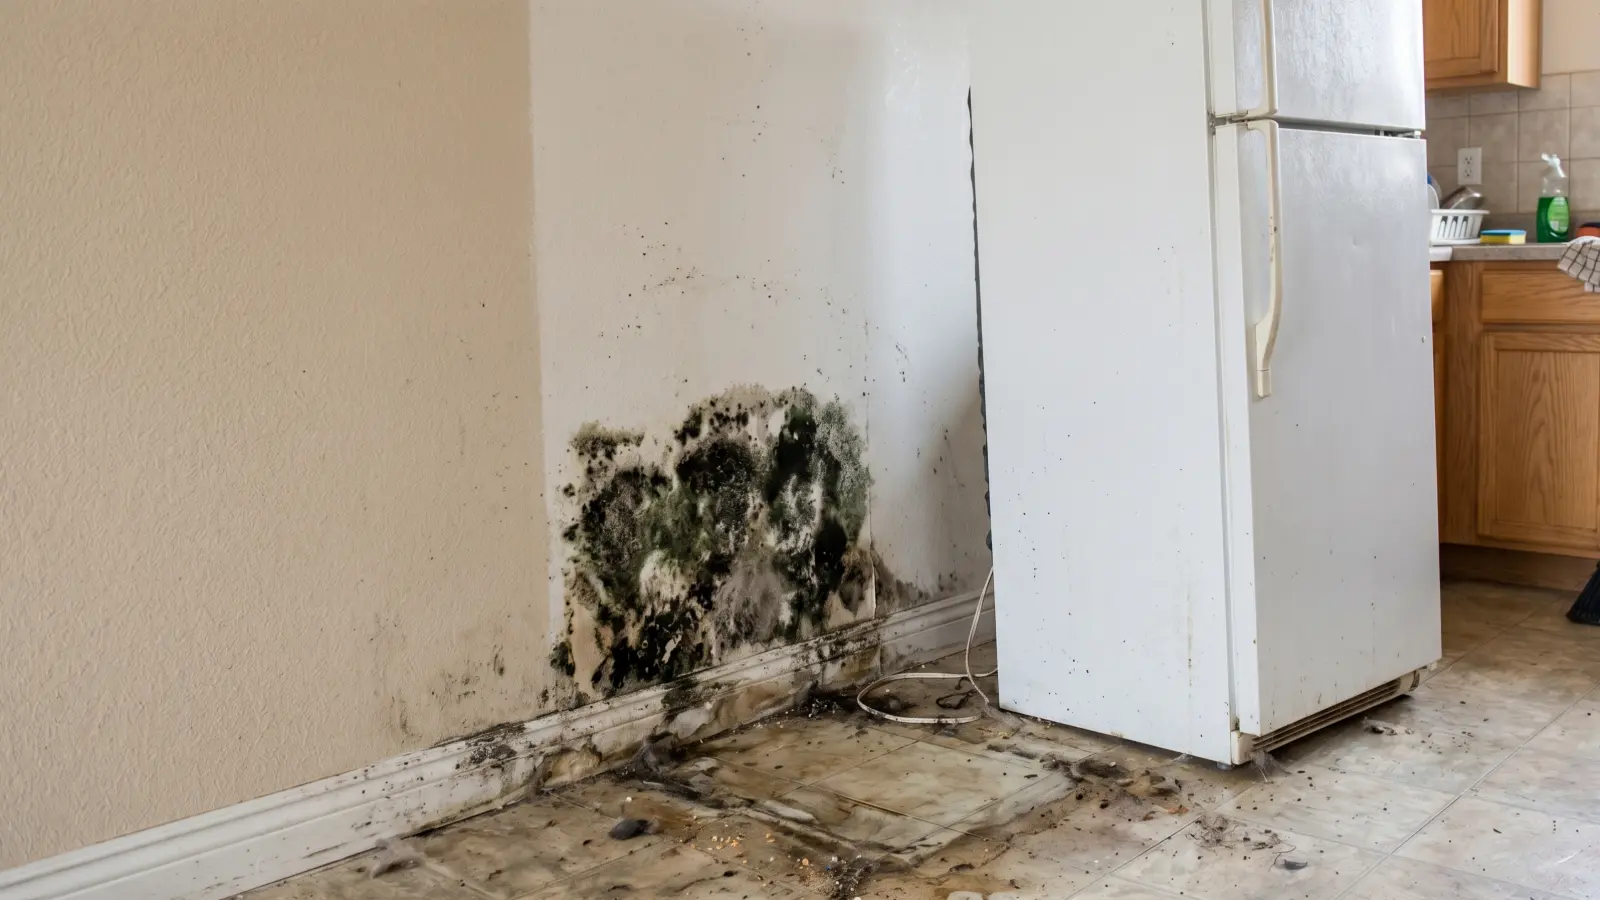
What to look for: Pull the refrigerator away from the wall and inspect the floor, baseboard, and lower wall. Mold appears as dark greenish-black or grayish patches at floor level, often with visible water damage to the baseboard or wall paint.
DIY scope: Surface mold on a non-porous floor (tile, sealed concrete) or painted wall in a small area is a DIY job once the drain pan or line is repaired. Empty, clean, and dry the drain pan before reinstalling the refrigerator.
When to call a pro: If the flooring is vinyl plank, laminate, or hardwood that has absorbed water, or if the mold has penetrated into the drywall or subfloor, professional assessment is warranted. Slow refrigerator leaks can be active for months before discovery, and the timeline of mold after water damage determines how far contamination has spread into surrounding materials.
Mold in kitchen cabinets
Cabinet interiors other than under the sink develop mold from high ambient humidity, items stored while still damp, or minor leaks from above-counter supply connections. Upper cabinets adjacent to the range can also accumulate mold from cooking steam rising through gaps in the backsplash.
DIY scope: Wipe down interior cabinet surfaces with detergent and water, then allow to dry completely before restocking. Line cabinet bases with a waterproof mat. For painted wood or melamine interiors, hydrogen peroxide (3%) is effective and less harsh than bleach.
When to call a pro: If mold has grown on the back of cabinet boxes where they contact an exterior wall, or if mold is present across multiple cabinets with no clear cause, this may indicate a wall cavity moisture issue or plumbing leak inside the wall.
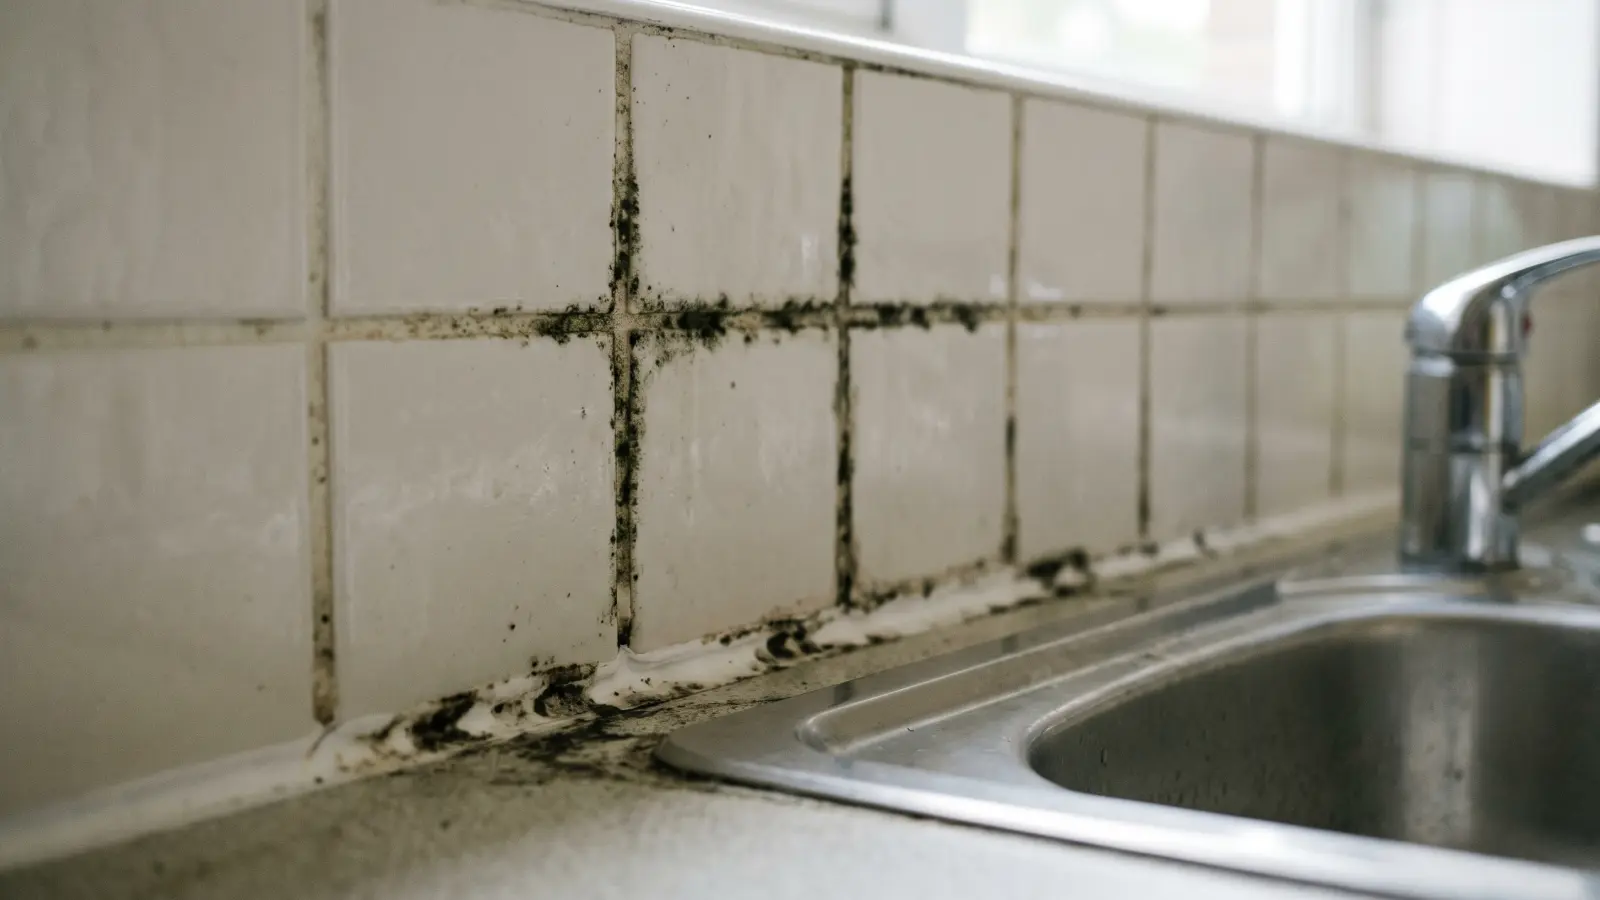
Mold on kitchen grout and caulk
Grout and caulk around the sink, backsplash, and countertop edges are among the most common kitchen mold surfaces because they are porous, regularly wet, and rarely fully dried. The dark, rough texture of grout lines provides ideal surface area for mold adhesion.
Cleaning grout: Hydrogen peroxide (3%) works well on grout without damaging the tile surface. Apply, let dwell for 10 minutes, scrub with a stiff grout brush, and rinse. For heavier mold embedded in grout, alkaline tile cleaners formulated for grout are more effective. If grout lines remain discolored after cleaning, regrout the affected section, as deep mold penetration cannot be scrubbed out.
Replacing caulk: Caulk that shows mold is best removed entirely rather than cleaned. Score the old caulk with a utility knife, pull it out, clean the joint with hydrogen peroxide, allow it to dry completely for at least 24 hours, and apply fresh mildew-resistant caulk. Re-caulking over moldy existing caulk traps the mold underneath.
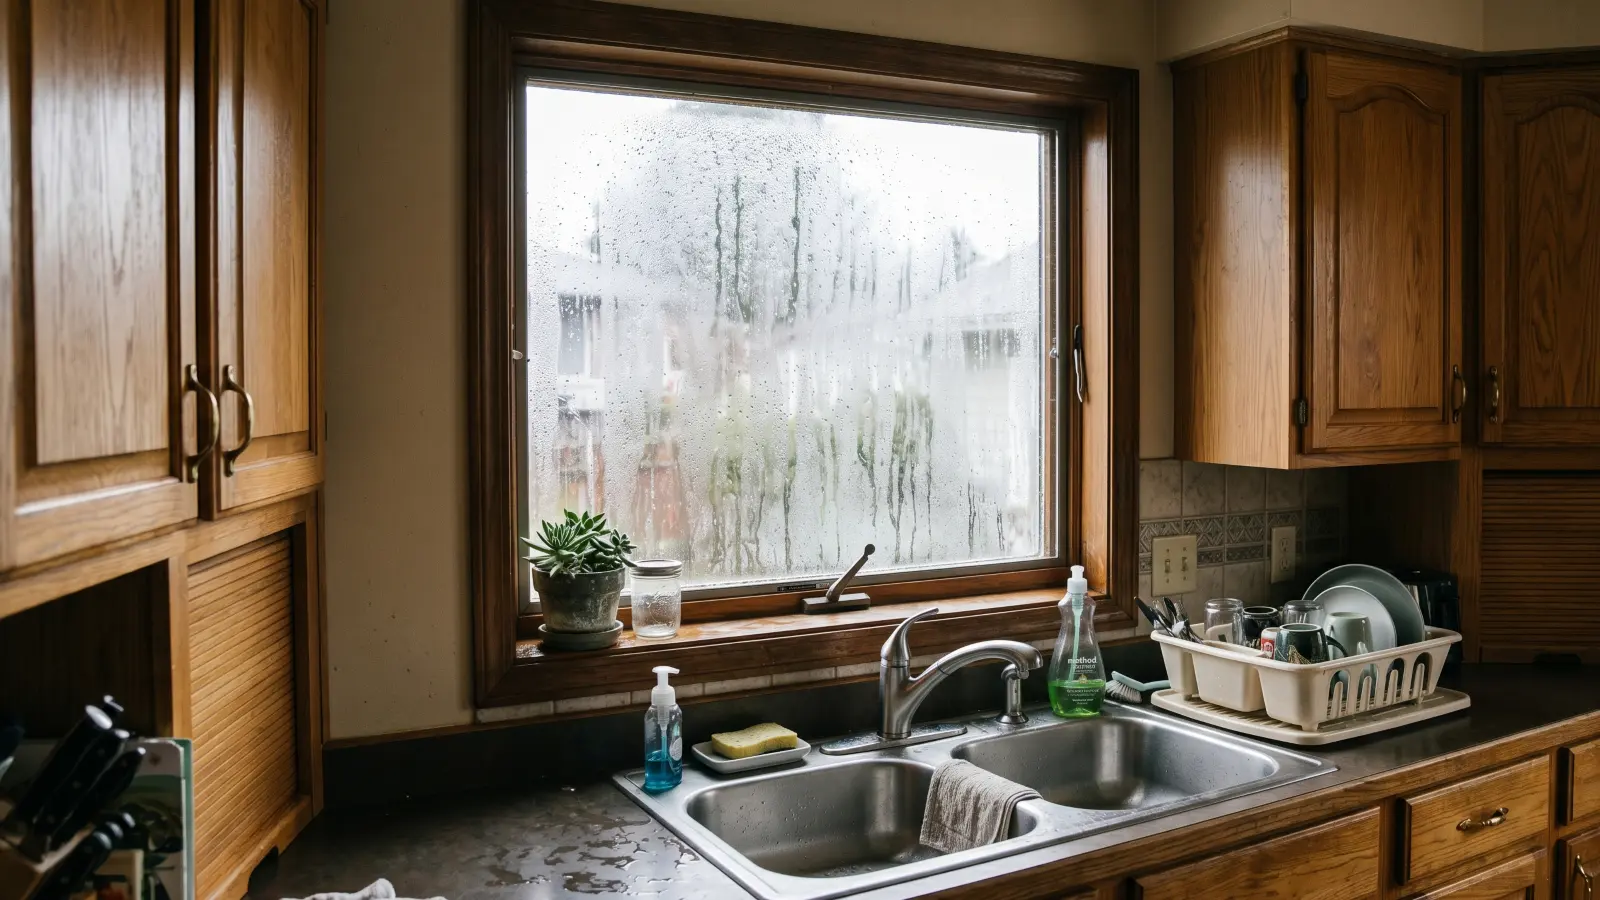
Mold around kitchen windows
Window area mold in kitchens results from condensation forming on cold glass or frames during cooking and dishwashing, or from failed window weatherstripping that allows outdoor moisture to enter. North-facing windows in kitchens are particularly susceptible because they receive less sunlight and stay cooler.
What to look for: Black or gray speckling along the window frame, sill, or caulk line. Mold on the interior face of the frame or sill is typically condensation-driven. Mold on the exterior frame, soffit above the window, or drywall beside the window may indicate a window seal failure or exterior water intrusion.
DIY scope: Surface mold on painted window frames and sills cleans well with detergent and water followed by hydrogen peroxide. Recaulk the interior frame perimeter with mildew-resistant caulk. Replace weatherstripping if deteriorated.
When to call a pro: If mold extends from the window frame into the surrounding drywall, or if water stains are visible on the interior wall adjacent to the window, a professional inspection can determine whether the window frame needs replacement or the wall cavity requires remediation.
Cleaning products for kitchen mold
The right cleaning product for kitchen mold depends entirely on the surface material: hydrogen peroxide (3%) for grout and caulk, detergent and water for non-porous surfaces, and no bleach on wood or particleboard. Using the wrong product can damage materials, fail to eliminate mold roots, or in the case of bleach on porous surfaces, worsen the problem by adding moisture.
| Product | Dilution | Dwell time | Best for | Limitation |
|---|---|---|---|---|
| Dish detergent and water | 1 tbsp per quart | None | Non-porous surfaces (tile, sealed countertop, painted wall) | Does not kill mold; removes surface growth only |
| Hydrogen peroxide (3%) | Undiluted | 10 minutes | Grout, caulk, painted surfaces, non-porous cabinet interiors | Less effective on heavy growth; may lighten dark grout |
| White vinegar | Undiluted | 1 hour | Painted surfaces, non-porous interiors | Strong odor; not effective on all species |
| Antifungal spray (commercial) | Per label | Per label | Grout, tile, caulk, bathroom-type surfaces | Cost; confirm kitchen-safe before use on food contact surfaces |
| Chlorine bleach solution | 1 cup per gallon of water | 10 minutes | Non-porous hard surfaces only: tile, porcelain, sealed concrete | Ineffective and harmful on wood, particleboard, drywall; produces fumes |
Important note on bleach: Bleach is not recommended for wood or particleboard surfaces. The water content of bleach solution penetrates porous materials and adds moisture without fully eliminating mold roots. ANSI/IICRC S520 does not list chlorine bleach as an approved biocide for porous substrates precisely because surface application cannot reach the mycelium embedded in the material. On non-porous materials such as tile or porcelain, bleach is effective but provides no advantage over hydrogen peroxide and is more hazardous to handle in an enclosed kitchen space.
The EPA mold cleanup guidance recommends detergent and water as the first-line cleaning approach for most surfaces, with biocide use reserved for situations where a persistent moisture problem creates ongoing risk.
DIY removal vs. professional remediation
Whether kitchen mold is a DIY job or a professional job depends on four factors: the size of the affected area, the surface type, whether the moisture source is resolved, and the health profile of the household.
| Factor | DIY appropriate | Call a professional |
|---|---|---|
| Area size | Under 10 sq ft (EPA threshold) | Over 10 sq ft |
| Surface type | Non-porous: tile, sealed countertop, painted wall | Porous: drywall, unfinished wood, particleboard, subfloor |
| Moisture source | Already repaired before cleaning | Still active or unidentified |
| Occupant health | No high-risk individuals | Children, elderly, asthma, immunocompromised occupants |
| Mold type | Allergenic species, surface growth | Slimy black mold (possible Stachybotrys), growth after long-term leak |
| Odor after cleaning | Resolved | Persists, indicating hidden mold |
The EPA contamination level framework classifies jobs by square footage and material type into Level I, II, and III, determining whether a job falls within DIY scope or requires professional mold remediation. Two escalation signs worth calling out that the table above does not fully capture: mold that returns within a few weeks of cleaning (indicating a moisture source still active or unidentified), and mold visible on cabinet framing or wall studs behind the cabinet box (indicating the problem has moved into structural materials regardless of surface area).
For confirmed professional jobs, a certified contractor follows the mold remediation process from assessment and containment through clearance testing, with each phase documented for insurance and future disclosure purposes.
The nine-step DIY mold removal sequence covers containment, PPE, surface-specific cleaning, verification, and drying in the order that prevents cross-contamination.
Kitchen mold remediation cost
Kitchen mold remediation cost ranges from under $500 for a contained non-porous surface job to over $3,000 when the problem has extended into structural materials. National mold remediation cost averages by infestation size, room location, and mold type provide the broader context. The figures below reflect kitchen-specific scenarios.
| Scenario | Typical cost | What drives the cost |
|---|---|---|
| Surface mold on sink cabinet interior, non-porous | $300–$600 | Small scope, no material removal required |
| Mold in particleboard cabinet base, replacement required | $500–$1,200 | Cabinet base removal and replacement, antimicrobial treatment |
| Ceiling mold, drywall replacement (1–2 panels) | $800–$1,800 | Drywall removal, framing inspection, reinstallation, painting |
| Mold behind refrigerator with drywall and subfloor involvement | $1,000–$2,500 | Multiple material types, potential subfloor replacement |
| Mold in wall cavity behind cabinets (cabinet removal required) | $2,000–$5,000+ | Cabinet removal and reinstallation, structural drying, clearance testing |
| Large infestation spanning multiple zones | $3,000–$10,000+ | Multiple affected areas, significant demolition and reconstruction |
Cost is primarily driven by two factors: the quantity of porous material that must be removed and replaced, and access difficulty. Jobs requiring cabinet removal or framing access cost significantly more because of the labor involved in the surrounding work, not just the mold removal itself.
Most professional remediation contractors charge separately for post-remediation clearance testing, which typically adds $200–$500 to the total. Clearance testing confirms that airborne spore counts have returned to normal levels before reconstruction begins, and the mold testing methodology determines what a valid clearance result looks like and how to read lab reports.
Kitchen mold prevention
The six most effective actions for preventing kitchen mold are running the range hood every time you cook, fixing plumbing leaks within 24 hours, maintaining indoor humidity below 60%, cleaning refrigerator drain pans monthly, resealing grout and caulk annually, and inspecting the sink cabinet interior weekly for drip evidence. These address the root causes of kitchen mold rather than treating surface symptoms after the fact.
| Prevention action | Frequency | Why it works |
|---|---|---|
| Run the range hood every time you cook | Every use | Removes cooking steam at the source before it condenses on ceiling and cabinet surfaces |
| Wipe down the sink cabinet interior and check for drips | Weekly | Catches slow supply line or drain leaks before mold establishes |
| Clean and dry refrigerator drain pan | Monthly | Prevents overflow that feeds mold behind and under the unit |
| Inspect sink supply lines, drain connections, and garbage disposal seal | Monthly | Supply lines develop pinhole leaks; early detection prevents extended moisture exposure |
| Clean grout lines and recaulk sink and countertop edges | Annually | Removes embedded surface mold; fresh caulk seals gaps that trap moisture |
| Check window weatherstripping and frame caulk | Annually | Prevents condensation-driven mold on window surfaces |
| Monitor kitchen humidity with a hygrometer | Ongoing | Maintain 30%–50% relative humidity; above 60% triggers mold growth on almost any surface |
| Pull refrigerator out and inspect wall and floor | Every 6 months | Defrost drain issues develop slowly; early inspection prevents months of hidden moisture |
Range hood sizing matters: the Home Ventilating Institute (HVI) recommends a minimum of 100 CFM for kitchen exhaust fans, calculated at 1 CFM per square foot of kitchen floor area plus additional capacity for high-BTU ranges. Recirculating hoods that vent back into the kitchen filter grease only; they do nothing for humidity.
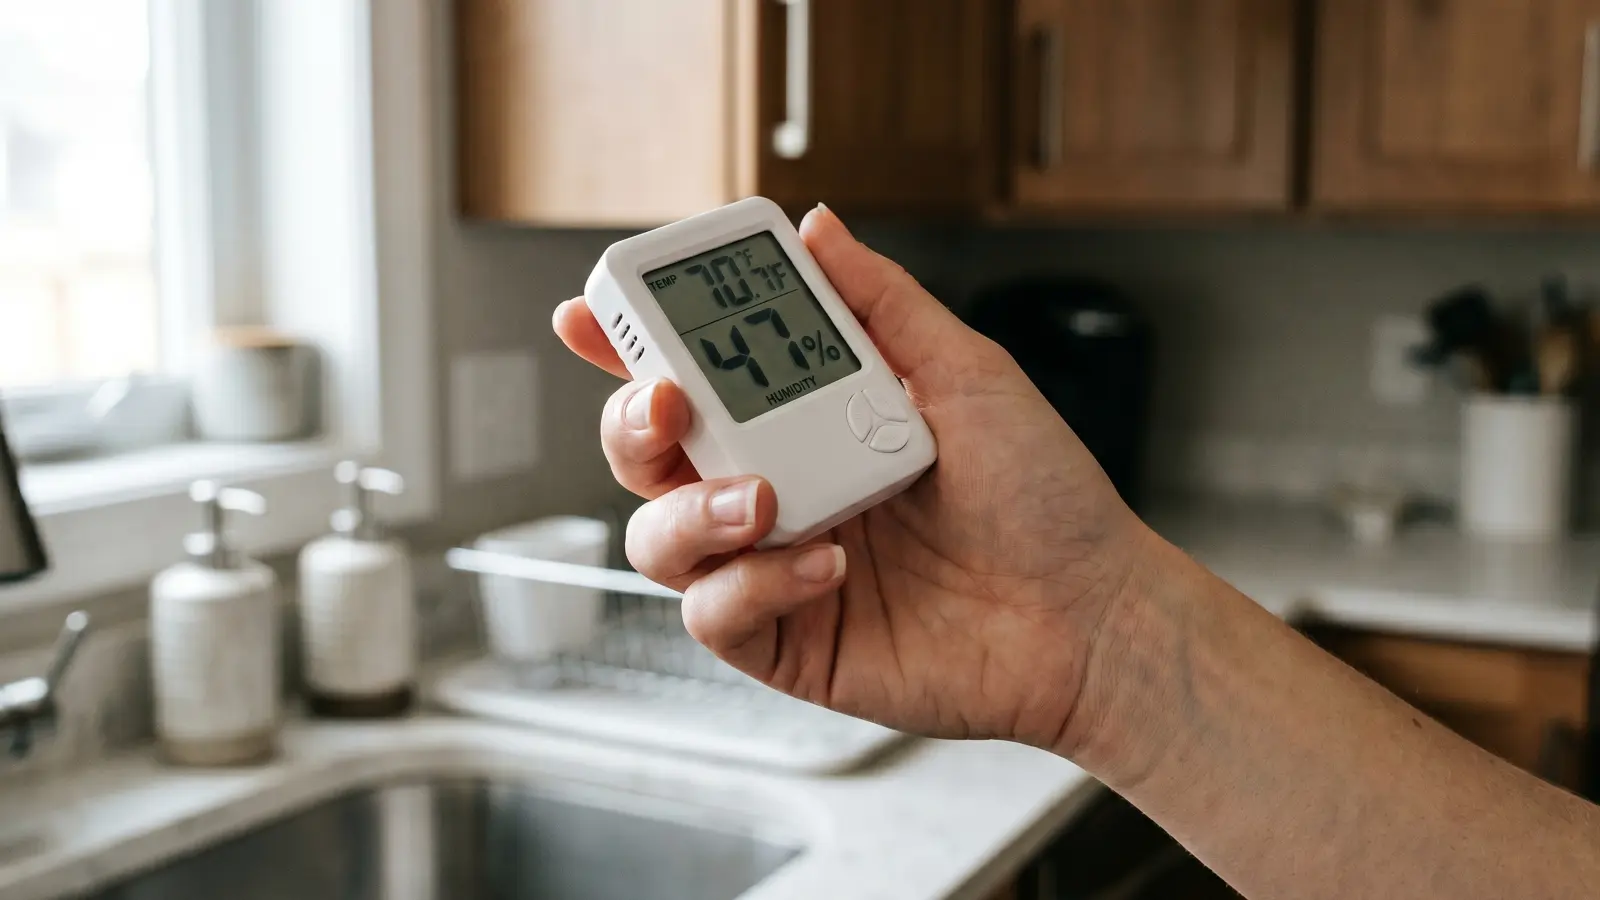
If your kitchen consistently runs above 60% humidity despite ventilation, a portable dehumidifier sized for the kitchen square footage can maintain safe levels. The target is 30%–50% relative humidity, measured with a digital hygrometer. The relationship between humidity and mold growth, including how to size a dehumidifier and which rooms are highest risk, is covered in depth in that resource.
For homeowners who discover that mold is tied to a plumbing leak that caused broader water damage, when remediation is required versus when drying alone is sufficient depends on how long the moisture was present and which materials were affected.
When to call a mold inspector
A professional mold inspection is the right call when mold is suspected but not visible, or when a plumbing leak was active for more than 48 hours before discovery. Inspectors use moisture meters and infrared cameras to find hidden moisture behind cabinet boxes, inside wall cavities, and under flooring without destructive investigation, reaching areas no homeowner can assess visually.
The CDC recommends professional assessment when mold is extensive or when occupants have ongoing health symptoms that may be mold-related.
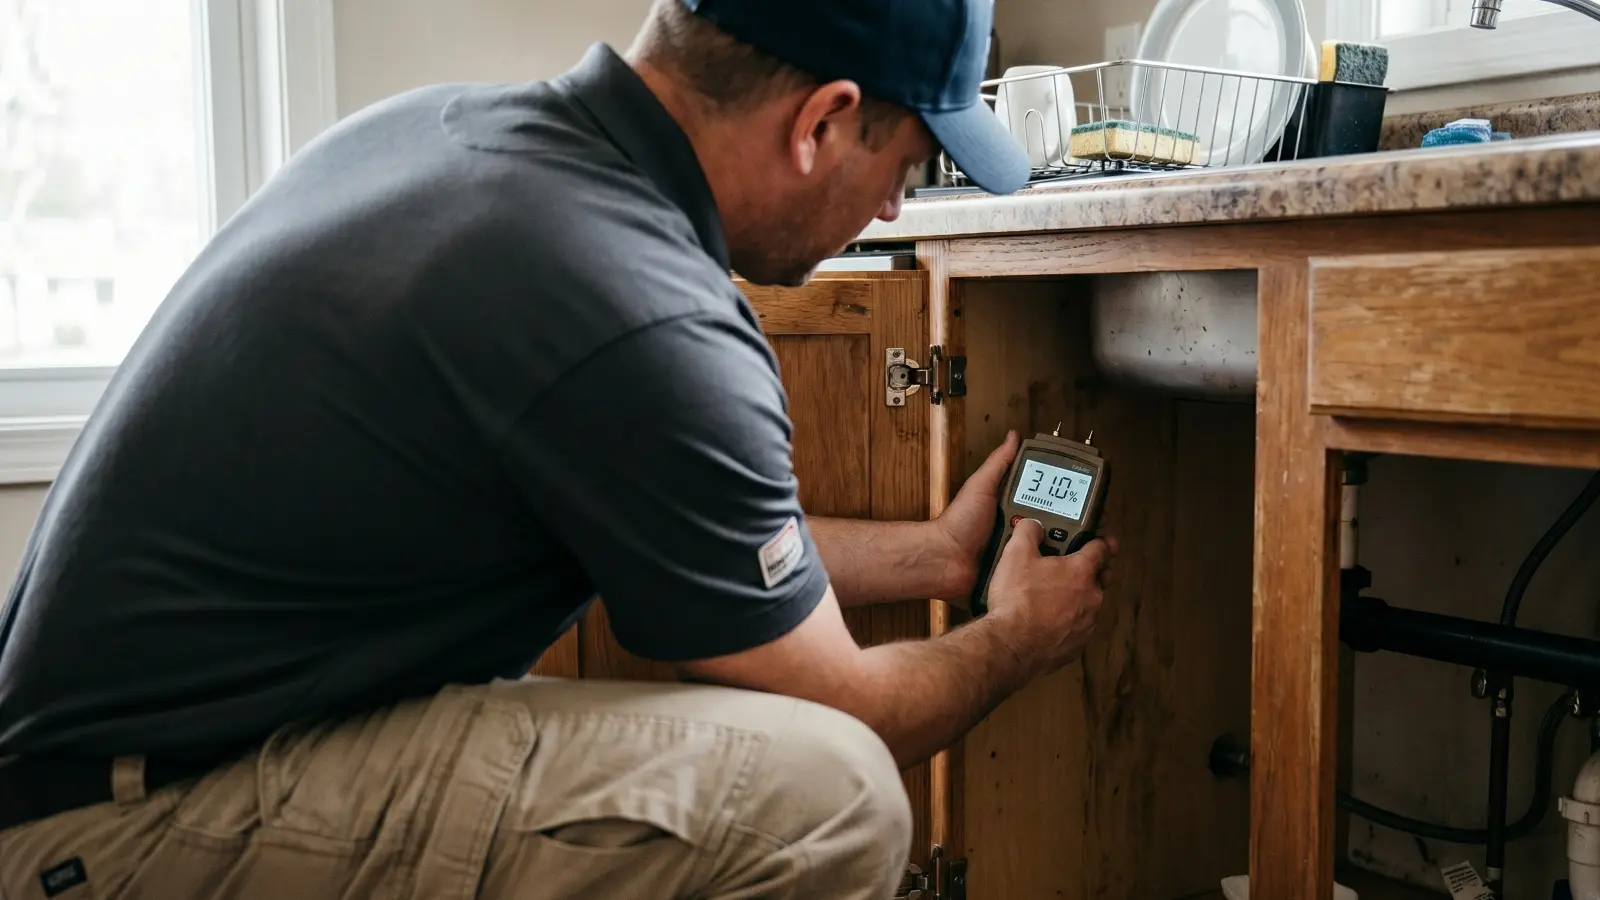
Any moisture meter reading above 19% on wood indicates elevated mold risk; above 28% indicates active wood degradation is likely, per IICRC S520 assessment protocols. This is particularly relevant in kitchens where cabinet boxes sit against walls for years without the back faces ever being inspected. Early signs of mold by room type, including odor patterns, health symptoms that improve when leaving the home, and surface staining, can help you identify a problem before it becomes visible on surfaces.
Frequently asked questions
Is mold in the kitchen dangerous?
Yes. Mold in the kitchen poses health risks through two pathways: airborne spore inhalation and surface contamination near food preparation areas. Allergenic species such as Cladosporium and Aspergillus trigger hay fever symptoms, respiratory irritation, and asthma attacks. Toxigenic species such as Stachybotrys chartarum produce mycotoxins linked to more serious respiratory conditions with prolonged exposure. Children, elderly individuals, and immunocompromised occupants are at elevated risk. The health risks of mold exposure are significant enough that mold is dangerous to high-risk populations even at relatively small contamination levels.
What causes mold under the kitchen sink?
Slow plumbing leaks are the primary cause. Supply line drips, drain pipe condensation, and garbage disposal seal failures create persistent moisture inside the enclosed cabinet. Wood and particleboard cabinet bases absorb moisture and support mold growth within 24–48 hours of sustained exposure.
Can I remove kitchen mold myself?
For non-porous surfaces under 10 square feet with the moisture source already fixed, DIY removal is appropriate per EPA guidelines. Use detergent and water or hydrogen peroxide. Do not use bleach on wood or particleboard cabinets; bleach is primarily water and does not penetrate porous materials effectively.
How do I get rid of mold on kitchen grout?
Apply hydrogen peroxide (3%) directly to grout lines, let it dwell for 10 minutes, then scrub with a stiff brush. Rinse thoroughly and dry completely. If grout lines remain discolored after cleaning, regrout the affected section. Sealing grout annually prevents future colonization.
How much does kitchen mold removal cost?
Professional kitchen mold remediation typically costs $500–$1,200 for a contained under-sink cabinet job. Ceiling or wall mold requiring drywall removal runs $1,000–$3,000. Larger infestations that have spread behind cabinets or into framing can cost $3,000 or more depending on the scope of material removal and reconstruction required.
Why does mold keep coming back in my kitchen?
Recurring mold almost always means the moisture source has not been resolved. Common culprits include a slow leak under the sink, a clogged or disconnected refrigerator drain line, inadequate range hood ventilation, or a window with failed caulk. Fix the moisture source before cleaning; otherwise recurrence is nearly certain.
Should I test for mold in my kitchen?
Testing is most useful when mold is suspected but not visible, when occupants have persistent unexplained symptoms, or after professional remediation as a clearance confirmation. For visible mold already identified, testing before removal does not change the remediation approach and adds cost without changing the outcome.
Sam Hickerson is the founder of RestoreAdvisor and writes consumer guides on mold remediation, inspection, testing, and home recovery. His work focuses on helping homeowners understand costs, risks, and when to call a professional. He draws on guidance from the EPA, CDC, IICRC, and other authoritative sources to make complex home issues easier to navigate.