
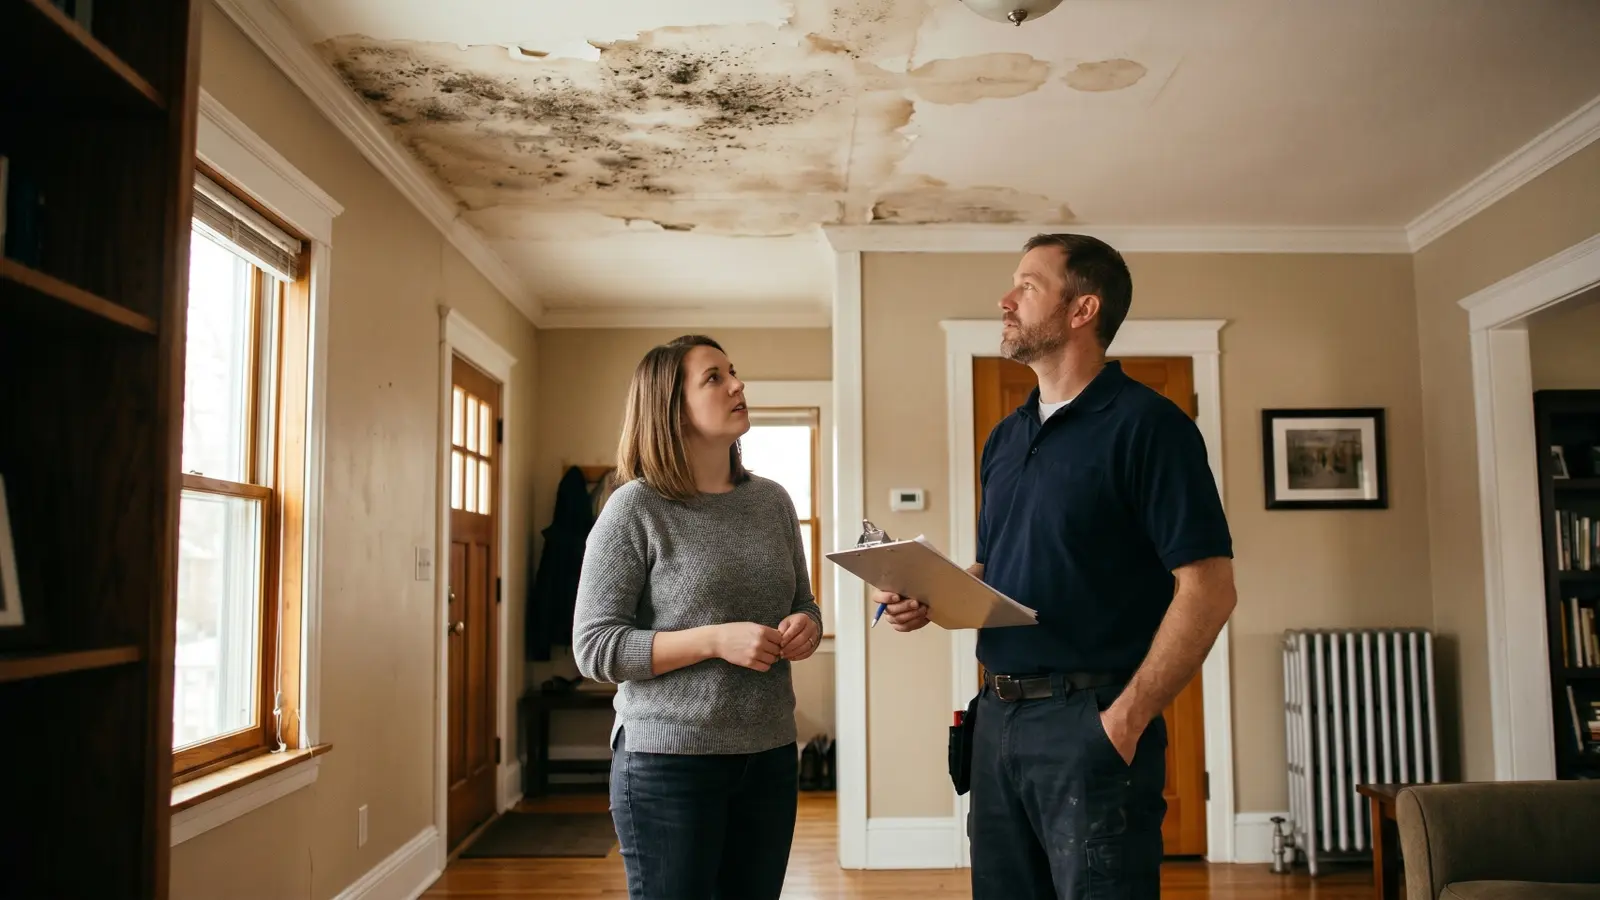
If you're looking at dark spots or discoloration on your ceiling, you need two things: to know what's causing them and to know whether you can fix them yourself. This page covers both: how to identify the moisture source driving ceiling mold by room and location, when DIY cleaning is appropriate, what it costs to hire a professional, and how to stop it from coming back.
Ceiling mold is fungal growth that establishes on ceiling surfaces when moisture accumulates and persists, defined under ANSI/IICRC S520 as a condition requiring source correction before any removal attempt. Understanding the cause matters because cleaning without fixing it guarantees recurrence, often within 24 to 48 hours under warm conditions.
Key insights
- Moisture is always the cause. Ceiling mold does not appear without a sustained moisture source: poor ventilation, a roof or plumbing leak, condensation from inadequate insulation, or indoor humidity above 60% RH.
- The EPA 10 sq ft rule applies here. Surface mold under 10 square feet on painted drywall is within DIY scope; anything larger or tied to water damage requires a certified professional per EPA guidance.
- Cleaning without fixing the source fails. Mold can re-establish on a cleaned ceiling surface within 24 to 48 hours if the moisture driving it is still present, per IICRC S520.
- Dark color does not mean Stachybotrys. Multiple common species appear black or dark green. Visual identification is unreliable; professional testing is needed to confirm species.
- Bleach does not work on drywall. Bleach removes staining on painted surfaces but does not penetrate the paper face of drywall where mold roots grow. Vinegar, hydrogen peroxide, or borax solutions are more effective.
- Soft or sagging drywall means replace, not clean. Once moisture has saturated the gypsum core, the material cannot be made mold-free by surface cleaning and must be cut out and replaced.
What ceiling mold looks like
Ceiling mold appears as dark spots, discolored patches, or fuzzy growth in shades of black, dark green, brown, or gray. The color and texture vary by species and the amount of moisture present, but the growth pattern is usually a reliable indicator of the underlying cause.

A musty or earthy odor in the room, even without visible spots, is a reliable indicator of hidden ceiling mold. Mold releases microbial volatile organic compounds (MVOCs) during active growth, which are detectable by smell before a colony becomes large enough to see. Consistent signs of mold combined with symptoms that improve when you leave the building suggest the ceiling or walls above are involved.
| Appearance | What it suggests | Common species |
|---|---|---|
| Small black or dark green spots, slightly fuzzy | Common surface mold, usually from humidity | Cladosporium, Aspergillus |
| Grayish-white powdery patches | Early-stage growth on low-moisture surfaces | Penicillium, Aspergillus |
| Slimy, dark greenish-black growth | Sustained water contact; higher remediation concern | Stachybotrys chartarum |
| Brown or yellow water stain ring with dark center | Active or recent leak feeding mold growth | Multiple species |
| Spreading discoloration with paint bubbling or peeling | Moisture trapped between paint and drywall | Multiple species |
Mold versus water stains
Water stains are yellowish-brown rings left by dried moisture with no fuzzy texture. Mold grows on top of water stains and will have a visible texture or darker coloring at the center. To test: apply a few drops of diluted bleach to the spot. A water stain does not react; mold will lighten noticeably within a minute or two.
Popcorn and textured ceilings
Textured coatings are porous and trap moisture, making them more susceptible to mold than smooth painted surfaces. Mold on popcorn ceilings is harder to remove completely because the irregular surface protects spores during cleaning. If mold has colonized a popcorn or textured ceiling, removal of the texture is almost always required as part of remediation. Older popcorn ceilings installed before 1978 may contain asbestos, which changes the remediation protocol entirely.
Causes of ceiling mold by room and location
Ceiling mold always originates from a moisture source. The location of the growth is the most reliable clue to what is driving it, and identifying that source correctly is the single most important step because cleaning without correcting the underlying cause guarantees recurrence. The same source-correction principle applies across all forms of mold remediation: the surface treatment fails without it.
Different rooms face unique moisture challenges. Bathrooms top the list due to constant steam exposure, but bedroom, kitchen, and basement ceilings each have their own specific failure modes.
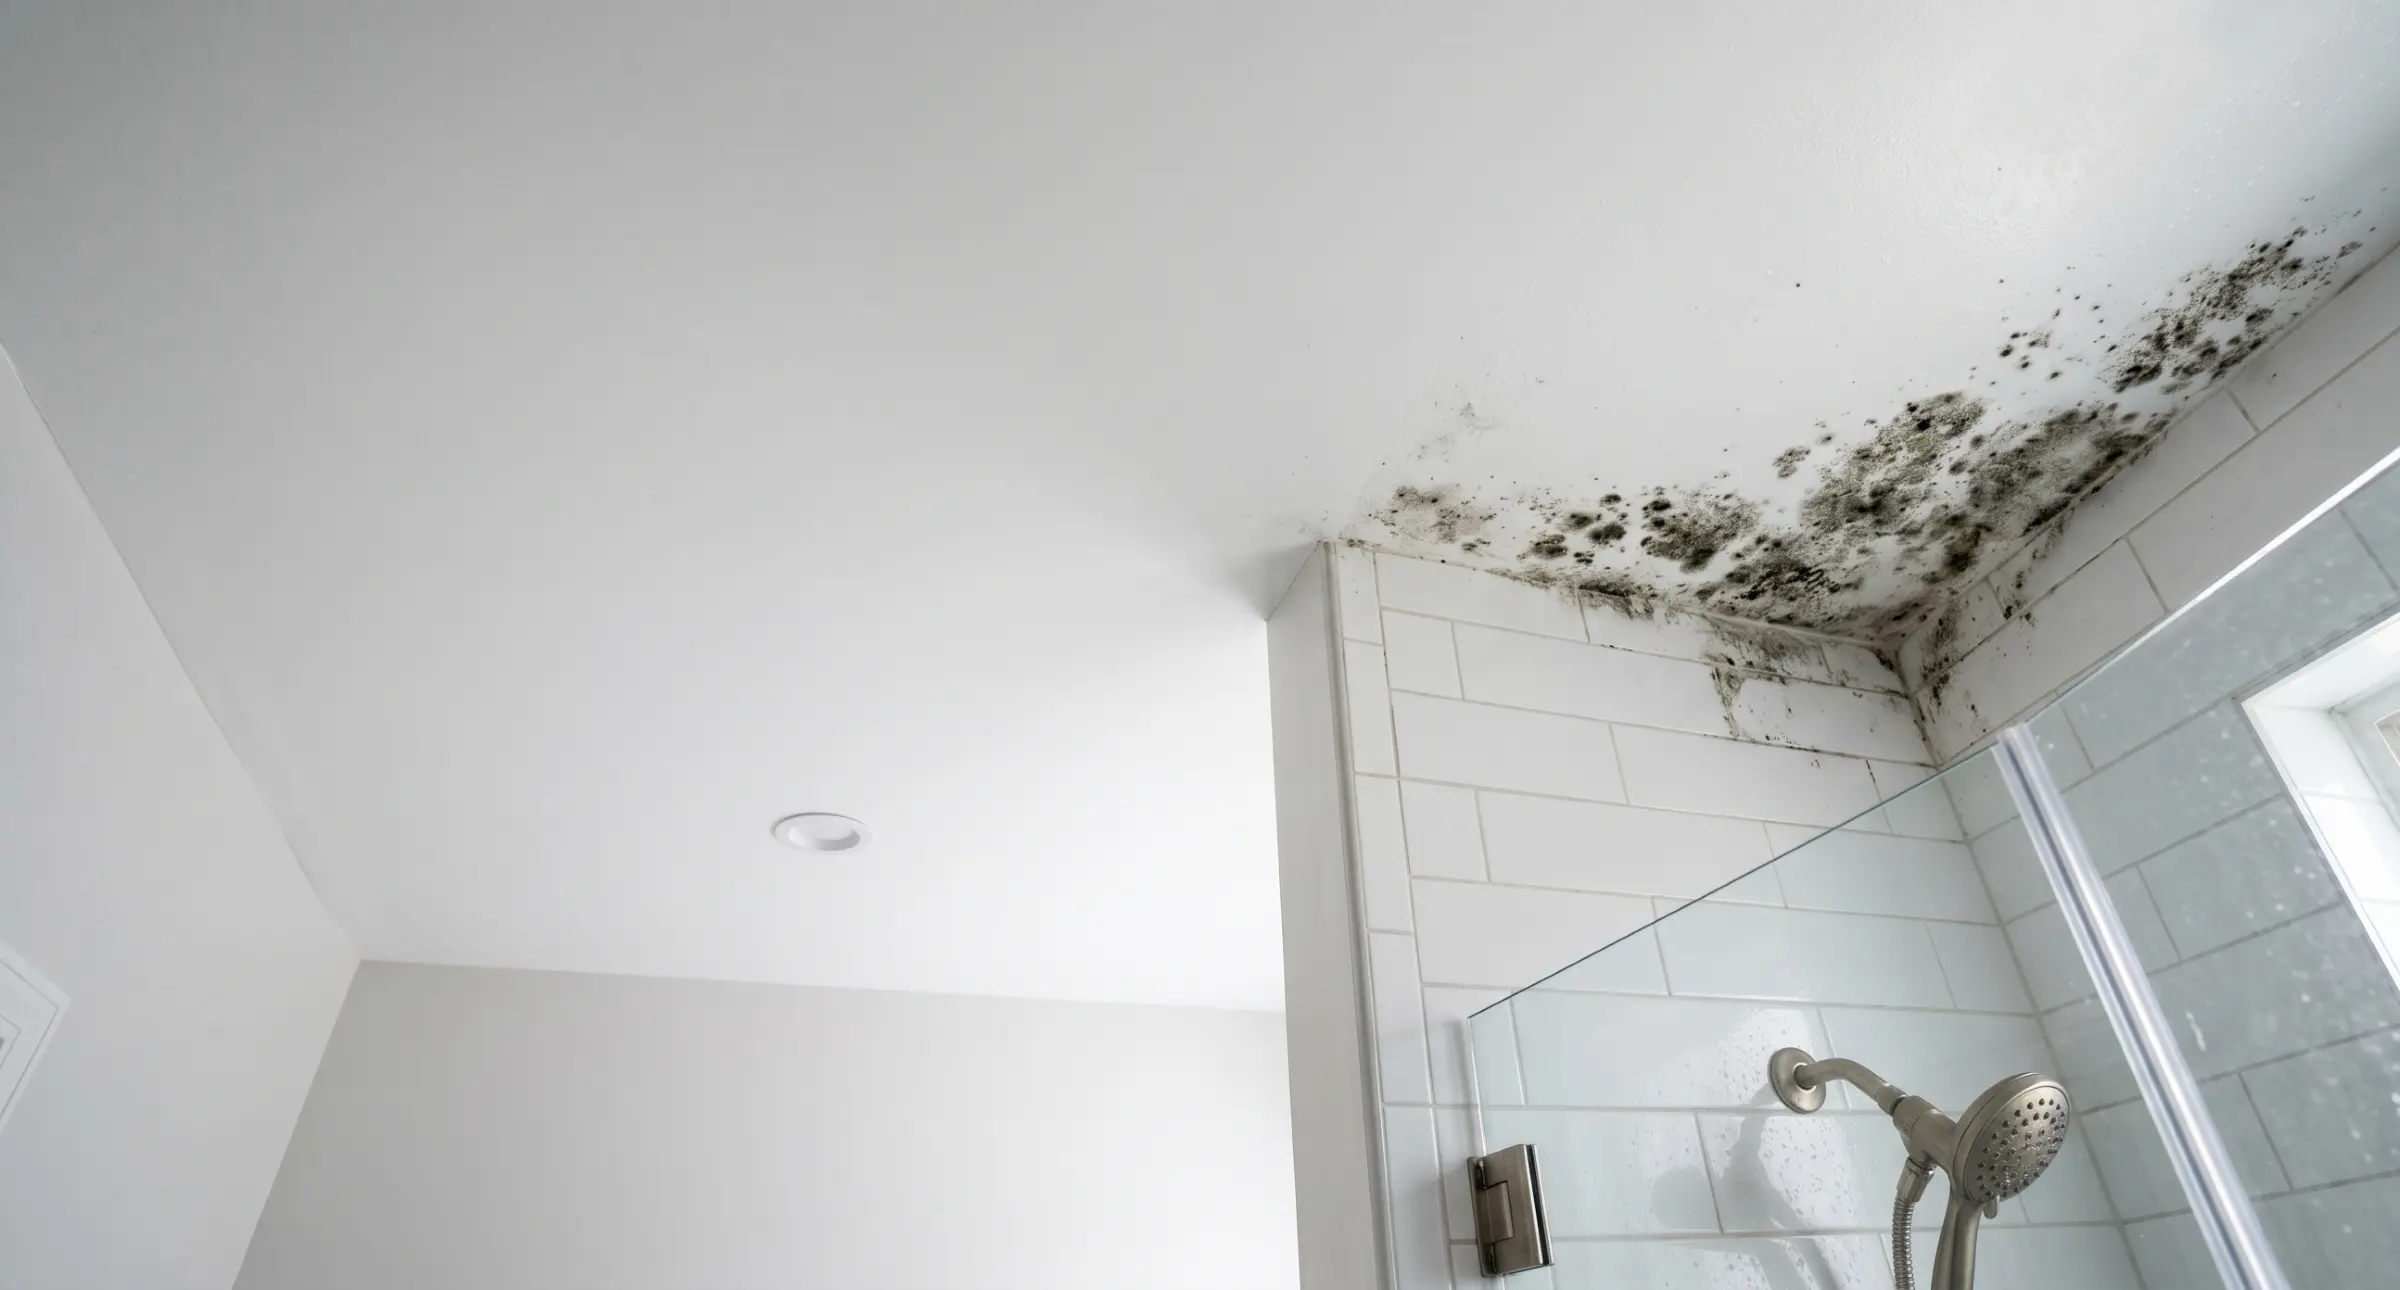
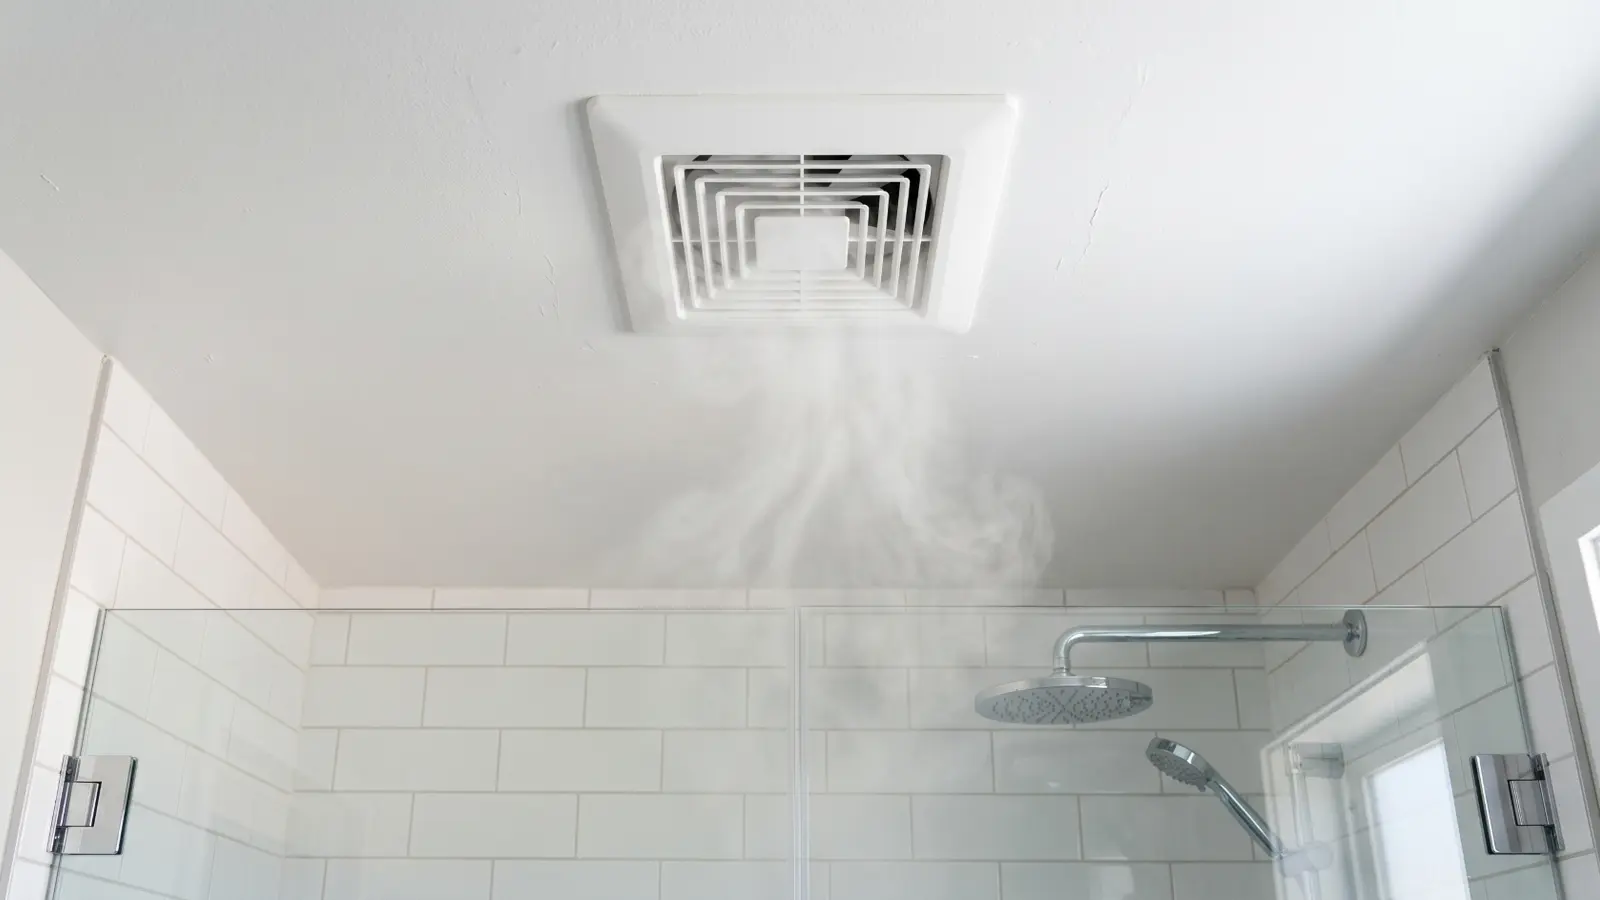
Bathroom ceiling mold
Bathroom ceilings are the most common location for mold in U.S. homes. Steam from showers raises humidity rapidly, and without adequate exhaust ventilation, that moisture condenses on the ceiling surface. The Home Ventilating Institute (HVI) standard requires at least 1 CFM of airflow per square foot of bathroom area, with a minimum of 50 CFM for most residential bathrooms. Undersized, poorly positioned, or malfunctioning fans are the primary cause of bathroom mold on ceilings.
Mold that concentrates directly above the shower or tub and spreads outward toward corners is almost always a ventilation problem. Mold that appears near light fixtures, along exterior walls, or across the entire ceiling is more likely tied to humidity or insulation issues.
Bedroom and living room ceiling mold
In rooms without obvious humidity sources, ceiling mold typically indicates one of three problems: a roof leak, a plumbing leak from the unit or room above, or inadequate insulation causing condensation on the ceiling surface.
Roof leaks produce mold that mirrors the shape of the water intrusion, often a ring or streak pattern near the ceiling's highest point or directly below roofing seams, valleys, or flashing. Plumbing leaks appear directly below the location of supply or drain lines above. Condensation mold is diffuse and often most pronounced on exterior walls or in corners where thermal bridging causes the ceiling to be significantly cooler than room air. A roof leak feeding moisture into the ceiling assembly from above is one of the most common pathways for mold from a leaking roof to go undetected for months.
Kitchen ceiling mold
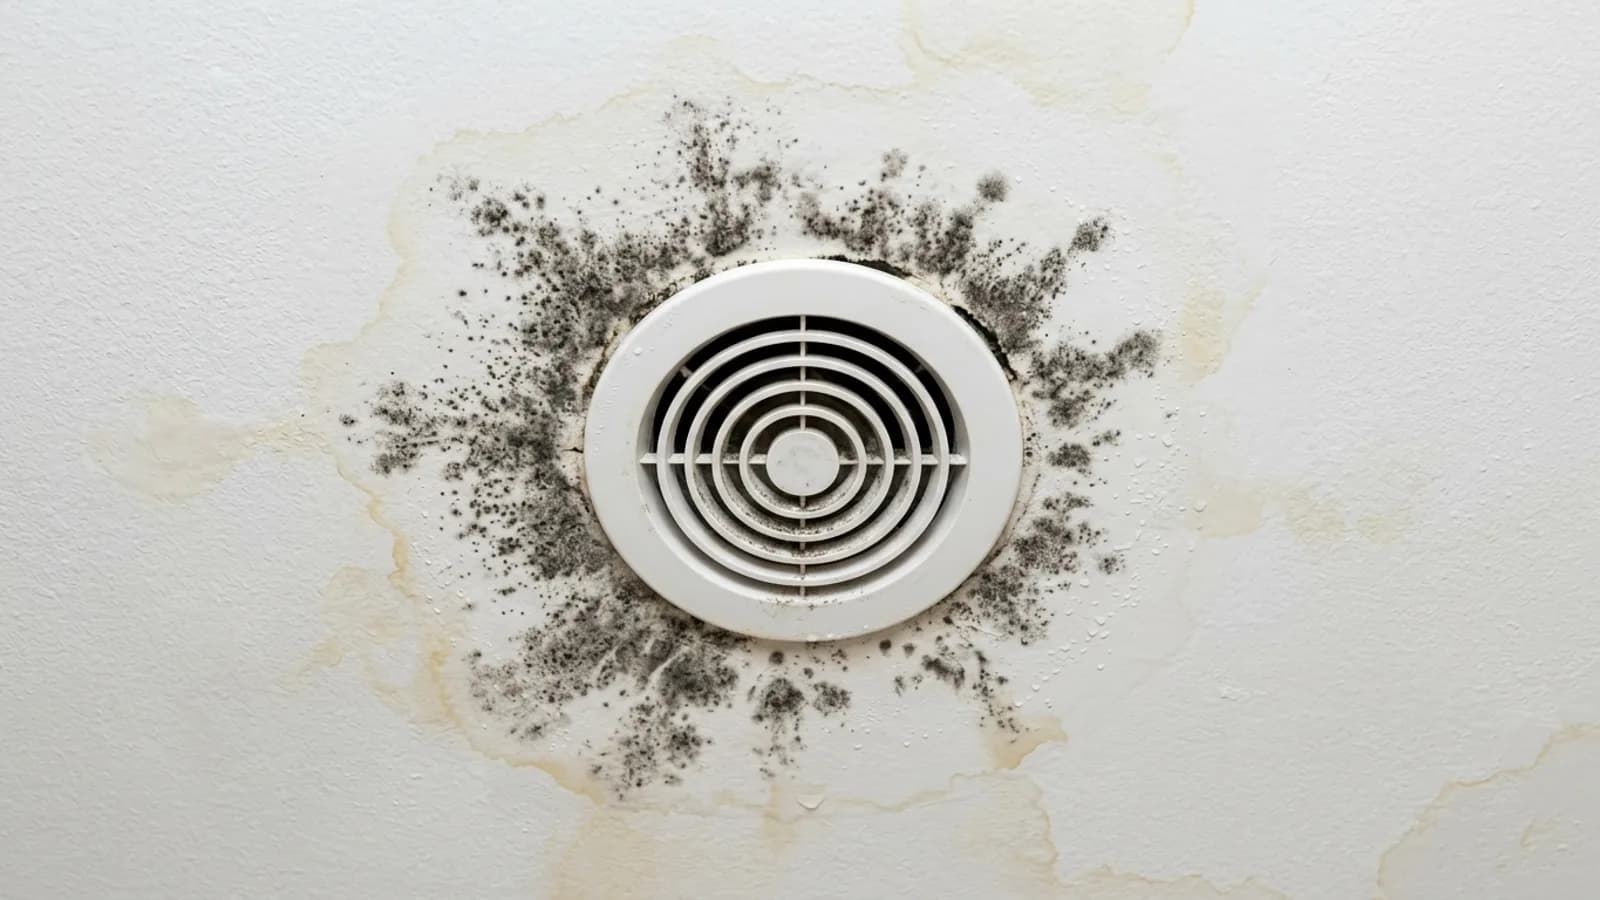
Kitchen ceilings accumulate steam from cooking. Mold on the kitchen ceiling is most common above the stove when range hood ventilation is absent or undersized. The HVI recommends 100 CFM of ventilation capacity for most residential range hoods. Grease buildup on kitchen ceilings also provides an organic substrate that supports mold growth even at moderate humidity levels, which is why kitchen mold often persists even after the visible spots are cleaned.
Basement ceiling mold
Basement ceilings include the underside of the floor structure above, often exposed joists, subfloor, and insulation batts. This area is particularly vulnerable because moisture migrates upward through concrete slabs and basement walls. Mold on basement ceiling joists and subfloor typically signals a humidity problem from the basement itself, a plumbing leak in a first-floor bathroom directly above, or condensation on cold structural members during summer months. The conditions that drive basement mold are the same ones that eventually reach the ceiling structure.
Condensation versus leak: how to tell the difference
The growth pattern on the ceiling surface is the most reliable diagnostic tool before any invasive inspection. These patterns correspond to the five most common moisture pathways.
| Pattern | More likely cause |
|---|---|
| Diffuse, spreading from corners or exterior walls | Condensation from cold ceiling, poor insulation |
| Ring or streak pattern below a specific point | Active or past roof leak |
| Directly below a bathroom or kitchen | Plumbing leak or drain condensation |
| Whole-ceiling coverage in a humid room | Ventilation failure or chronically high indoor humidity |
| Spots appear only in cold months | Thermal bridging, warm air hitting cold ceiling surface |
How to remove mold from a ceiling: DIY steps
Surface mold on a painted drywall ceiling is within DIY scope when the affected area is under 10 square feet and there is no evidence of drywall penetration such as soft spots, sagging, or recurring growth after prior cleaning. Per EPA mold cleanup guidance, areas 10 square feet or larger should be handled by a certified contractor.
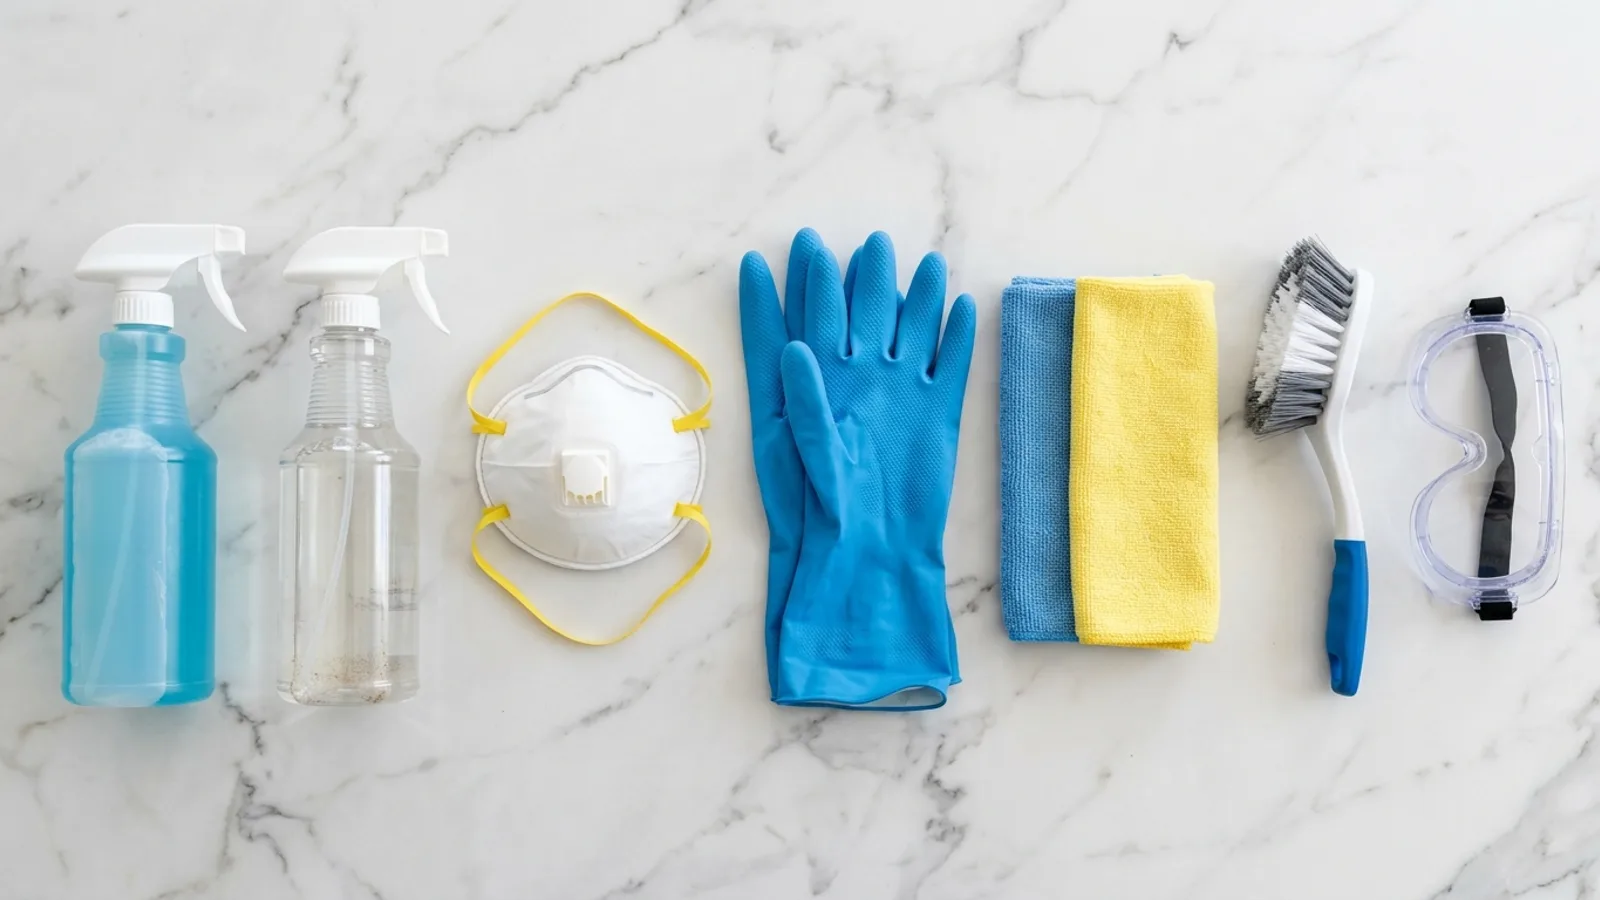
Gather all necessary supplies before starting: an N95 respirator, safety goggles, nitrile gloves, plastic sheeting for the floor, a spray bottle, soft-bristle brush, clean rags, and your chosen cleaning solution. Having everything within reach means you won't need to climb up and down repeatedly once you start. Preventing recurrence after cleaning is covered in the mold prevention section below, where humidity targets and ventilation specs are detailed by room.
1. Fix the moisture source first
Identify and repair the cause before touching the mold. If the ceiling is below a bathroom, check fan performance. If the area is near an exterior wall or below an attic, inspect for roof leaks or condensation. Cleaning without addressing the source guarantees recurrence.
2. Gather PPE and set up containment
Put on an N95 respirator, safety goggles, and nitrile gloves. Lay plastic sheeting on the floor below the work area. Close HVAC vents in the room to prevent spore spread. Open a window or run an exhaust fan vented to the outside.
3. Mist before scrubbing
Lightly mist the mold with your cleaning solution before scrubbing. This wets the spores and significantly reduces the number that become airborne during cleaning.
4. Clean working from outside to inside
Apply cleaning solution and scrub with a soft-bristle brush, working from the outer edge of the stained area toward the center to avoid spreading spores. Use only enough moisture to clean. Drywall does not need to be saturated.
5. Remove and bag waste
Wipe residue with a damp rag. Seal all used rags, gloves, and debris in a plastic bag immediately before removing from the room.
6. Dry thoroughly
Allow the ceiling to dry for 24 to 48 hours minimum. Use a fan and a dehumidifier to accelerate drying. Do not repaint until fully dry.
7. Repaint with mold-resistant products
Once dry, apply a mold-resistant primer, then a mold-resistant ceiling paint. Mold-resistant paint only helps on a fully clean, dry surface; it does not stop regrowth if moisture or live mold remain.
The DIY mold removal process covers full PPE costs and a surface-by-surface cleaning comparison that first-time DIYers will find useful before starting ceiling work.
Cleaning products for ceiling mold
| Product | Dilution | Best for | Limitation | Drywall safe? |
|---|---|---|---|---|
| White vinegar (undiluted) | None | Surface mold on painted drywall | Strong odor; may lighten some paints | Yes |
| Hydrogen peroxide (3%) | None or 1:1 with water | Painted surfaces, tile | Bleaches some finishes | Yes |
| Borax solution | 1 cup per gallon warm water | Drywall, wood ceilings | Requires thorough mixing | Yes |
| Bleach solution (1:10) | 1 part bleach, 9 parts water | Non-porous tile and grout | Does not penetrate drywall; kills surface only | Not recommended |
| Commercial antimicrobial (EPA-registered) | Per label | All ceiling types | Cost; requires good ventilation | Check label |
When to call a professional
Professional mold remediation is required when ceiling mold exceeds the EPA's 10 sq ft DIY threshold, or when any of the conditions below are true regardless of how small the visible area appears.
The CDC: Basic Facts About Mold identifies immunocompromised individuals, children, and people with respiratory conditions as the populations most at risk from any mold exposure, which is why household health profile is a factor in the professional-versus-DIY decision even for small patches.
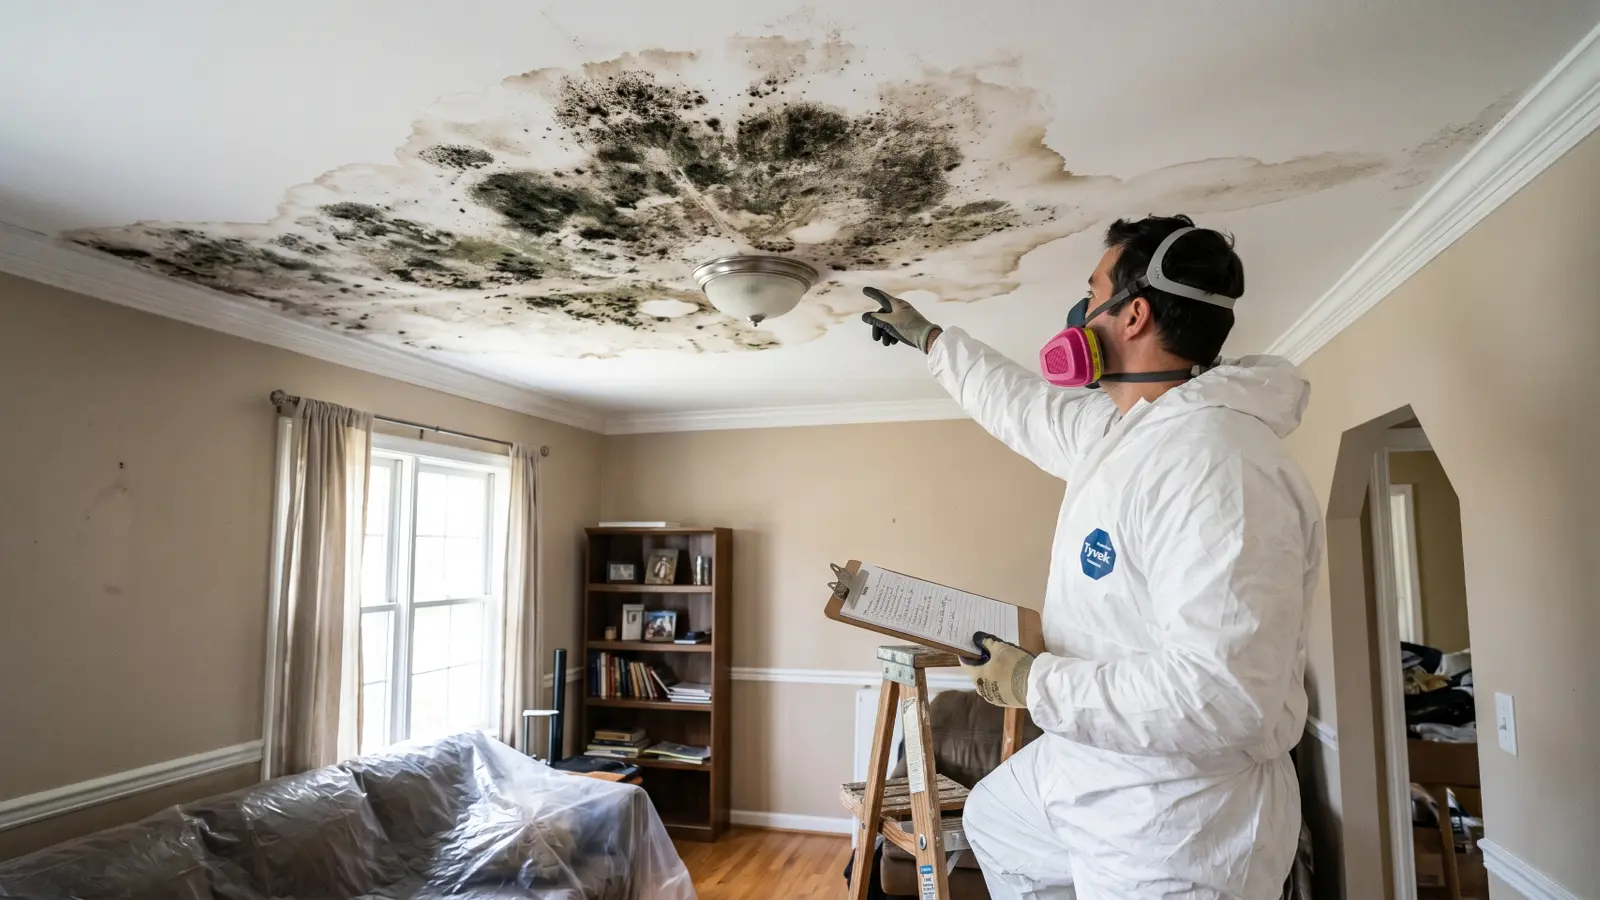
Call a certified contractor (IICRC AMRT credential or equivalent) when any of the following apply:
- The affected area is 10 sq ft or larger
- Drywall is soft, spongy, sagging, or visibly saturated
- Growth returns within weeks of cleaning
- Mold is tied to a roof leak, plumbing leak, or flooding event
- A musty odor persists after surface cleaning
- Anyone in the home is immunocompromised, has asthma, is under age 5, or is over 65
- Mold has spread to HVAC vents or ductwork above the ceiling
When ceiling mold is the visible symptom of mold after water damage, the moisture event needs professional documentation and drying before any mold removal begins. Treating the mold without first drying the ceiling assembly addresses the symptom while the cause continues. If testing confirms Stachybotrys, black mold removal protocols require full containment, negative air pressure, and HEPA filtration regardless of the size of the affected area.
For uncertain situations, a professional mold inspector with air sampling and surface swabs can confirm the species present and the extent of contamination beyond what is visible before any remediation begins.
Ceiling mold removal cost
Professional ceiling mold removal costs $500 to $3,000 for most residential jobs. The wide range reflects significant differences in ceiling material, cause complexity, job size, and whether drywall replacement is required.
Ceiling mold remediation is priced differently depending on whether the job is surface-only cleaning or requires full drywall replacement and structural drying. Per-square-foot rates for surface work on standard drywall run $10 to $25. Rates increase when the ceiling is textured or when the work requires containment and air filtration for Stachybotrys.
| Scenario | Typical scope | Cost range | Notes |
|---|---|---|---|
| Small bathroom ceiling spot | 5–20 sq ft, surface only | $500–$900 | Ventilation fix not included |
| Bedroom or living room ceiling (humidity or minor leak) | 20–50 sq ft, painted drywall | $800–$1,800 | May include drywall patching |
| Ceiling with drywall replacement required | 25–75 sq ft, full tearout | $1,500–$3,500 | Drywall, labor, finishing included |
| Ceiling tied to roof leak (with repair) | Variable; leak repair needed | $2,000–$10,000+ | Roofing repair is separate line item |
| Popcorn ceiling mold (full texture removal) | Any size | $1,200–$4,000 | Asbestos testing required pre-1978 |
Restoration costs such as drywall replacement, taping, mudding, and repainting are typically billed separately from mold remediation. Budget $2 to $5 per square foot for drywall patching and $1 to $3 per square foot for repainting after clearance. National mold remediation cost data shows ceiling jobs with structural involvement trend toward the upper end of the $1,500–$6,000 national range.
How to prevent mold on ceilings
Preventing ceiling mold requires controlling indoor humidity below 60% RH, ensuring ventilation is adequate for the moisture load each room produces, and repairing leaks within 24 to 48 hours before mold has time to establish. All three conditions must be maintained continuously since a single sustained moisture event is enough to restart growth on a previously clean surface.
Proper ventilation is the most important single factor for rooms with consistent moisture exposure. For bathroom ceilings specifically: if the exhaust fan is over five years old or makes a rattling noise, have it tested with a flow meter or replaced with a model rated for the room's actual square footage. Most builders install minimum-code fans that are undersized for typical shower steam loads. An HVI-certified fan rated for the bathroom's square footage, mounted directly above the shower, and vented to the exterior solves the large majority of bathroom ceiling mold cases.
| Preventive action | Target | Frequency | Why it works |
|---|---|---|---|
| Run bathroom exhaust fan | During and 20 min after shower | Every use | Removes steam before it condenses on ceiling |
| Keep indoor humidity below 60% RH | 30%–50% RH year-round | Monitor monthly | Eliminates the primary growth condition |
| Inspect roof flashing, valleys, and penetrations | No visible damage | Annually (after storms) | Catches leaks before ceiling saturation |
| Check insulation continuity on top floor ceilings | No gaps or compression | Every 3–5 years | Prevents cold ceiling surfaces that condense moisture |
| Inspect plumbing supply and drain lines above ceilings | No staining or drips | Annually | Catches slow leaks before mold establishes |
| Apply mold-resistant paint in high-humidity rooms | Full coverage | At each repaint | Slows colonization on clean surfaces |
| Use dehumidifier in chronically humid spaces | Below 60% RH | Continuously in summer | Reduces ambient moisture available to mold |
Indoor humidity and mold growth are directly linked: RH above 60% is the primary trigger for ceiling colonization in most U.S. homes, and maintaining levels below 50% year-round is the single most reliable prevention measure across all room types.
A room-by-room mold prevention schedule with maintenance frequency targets for every area of the home is the most reliable way to stay ahead of conditions before they reach the ceiling.
Frequently asked questions
What causes mold on ceilings?
The most common causes are inadequate bathroom ventilation, roof leaks, plumbing leaks from the floor above, and chronically high indoor humidity above 60% RH. Condensation on cold ceiling surfaces in poorly insulated rooms is also a frequent trigger, particularly on exterior-facing ceilings in cold climates.
Can I remove mold from my ceiling myself?
Surface mold covering less than 10 square feet on painted drywall or non-porous tile is within DIY scope with proper PPE. Areas larger than 10 square feet, recurring growth, suspected Stachybotrys, or any mold tied to a hidden leak or water damage event require a certified professional per EPA guidance.
Is black mold on the ceiling dangerous?
Yes, all ceiling mold poses a health risk and warrants prompt removal, though dark or black coloring alone does not confirm Stachybotrys chartarum since several common species appear black. The health risks of mold are real across species, particularly for children, elderly individuals, and people with asthma or compromised immune systems.
Why does mold keep coming back on my ceiling?
Recurring ceiling mold means the moisture source was not corrected. Cleaning removes visible growth, but mold re-establishes on a damp surface within 24 to 48 hours under warm conditions. If the same spot returns within weeks of cleaning, there is an active moisture source that needs to be identified and fixed before another cleaning attempt. Recurring black mold removal situations in particular almost always indicate a hidden structural moisture pathway rather than a surface problem.
How much does ceiling mold removal cost?
Professional ceiling mold removal typically runs $500 to $3,000 for most residential jobs. Small bathroom spots under 20 sq ft often cost $500 to $900. Larger areas requiring drywall replacement or connected to a roof leak can reach $3,000 to $10,000 when structural repairs are factored in.
Does mold on the ceiling mean there is mold in the attic?
Not necessarily, but ceiling mold on upper-floor rooms or near exterior walls is a strong indicator that attic condensation, inadequate insulation, or a roof leak is feeding moisture into the ceiling assembly. A mold inspection with a moisture meter can confirm whether the attic is involved without requiring invasive access.
Will painting over ceiling mold stop it?
No. Paint does not kill mold or seal spores permanently. Growth bleeds through standard paint within weeks. Mold-resistant paint only prevents colonization on already-clean, dry surfaces. The mold must be fully removed and the moisture source corrected before any repainting.
Sam Hickerson is the founder of RestoreAdvisor and writes consumer guides on mold remediation, inspection, testing, and home recovery. His work focuses on helping homeowners understand costs, risks, and when to call a professional. He draws on guidance from the EPA, CDC, IICRC, and other authoritative sources to make complex home issues easier to navigate.