
Mold on drywall is fungal growth that colonizes the paper facing and gypsum core of standard wallboard when moisture exposure exceeds 48 hours, per EPA documentation and ANSI/IICRC S520. It is one of the most common and most mishandled home problems. Homeowners paint over it, bleach it, or clean only what they can see, not realizing mold penetrates far deeper than the surface. This guide covers what it looks like, how deep it goes, when to clean versus replace, and what professional remediation involves.
Key insights
- Drywall is extremely mold-vulnerable. Its paper face is made from cellulose, the same organic material mold uses as a food source. Moisture turns any standard drywall panel into an ideal growth substrate within 24 to 48 hours, per EPA guidance on mold and moisture.
- Surface mold is rarely the whole story. Once mold reaches the paper backer of drywall, it has moved beyond what surface cleaning can address. The IICRC S520 standard classifies water-damaged drywall as a porous material requiring removal rather than cleaning.
- The EPA 10-square-foot threshold applies here. Surface mold on sealed, painted drywall under 10 square feet can qualify for DIY cleanup. Anything larger, or any growth on unpainted drywall, requires professional assessment.
- Paint does not kill mold. Painting over visible mold traps moisture and nutrients behind the surface, accelerating hidden growth. The IICRC S520 explicitly prohibits encapsulation as a substitute for removal.
- Mold-resistant drywall is not the same as moisture-resistant drywall. Standard green board (moisture-resistant) still has a paper face that mold can colonize. True mold-resistant panels use a fiberglass facing that mold cannot feed on.
- The moisture source must be fixed first. Any remediation that does not start with repairing the leak, correcting the humidity, or solving the condensation problem will result in regrowth on the new material.
What mold looks like on drywall
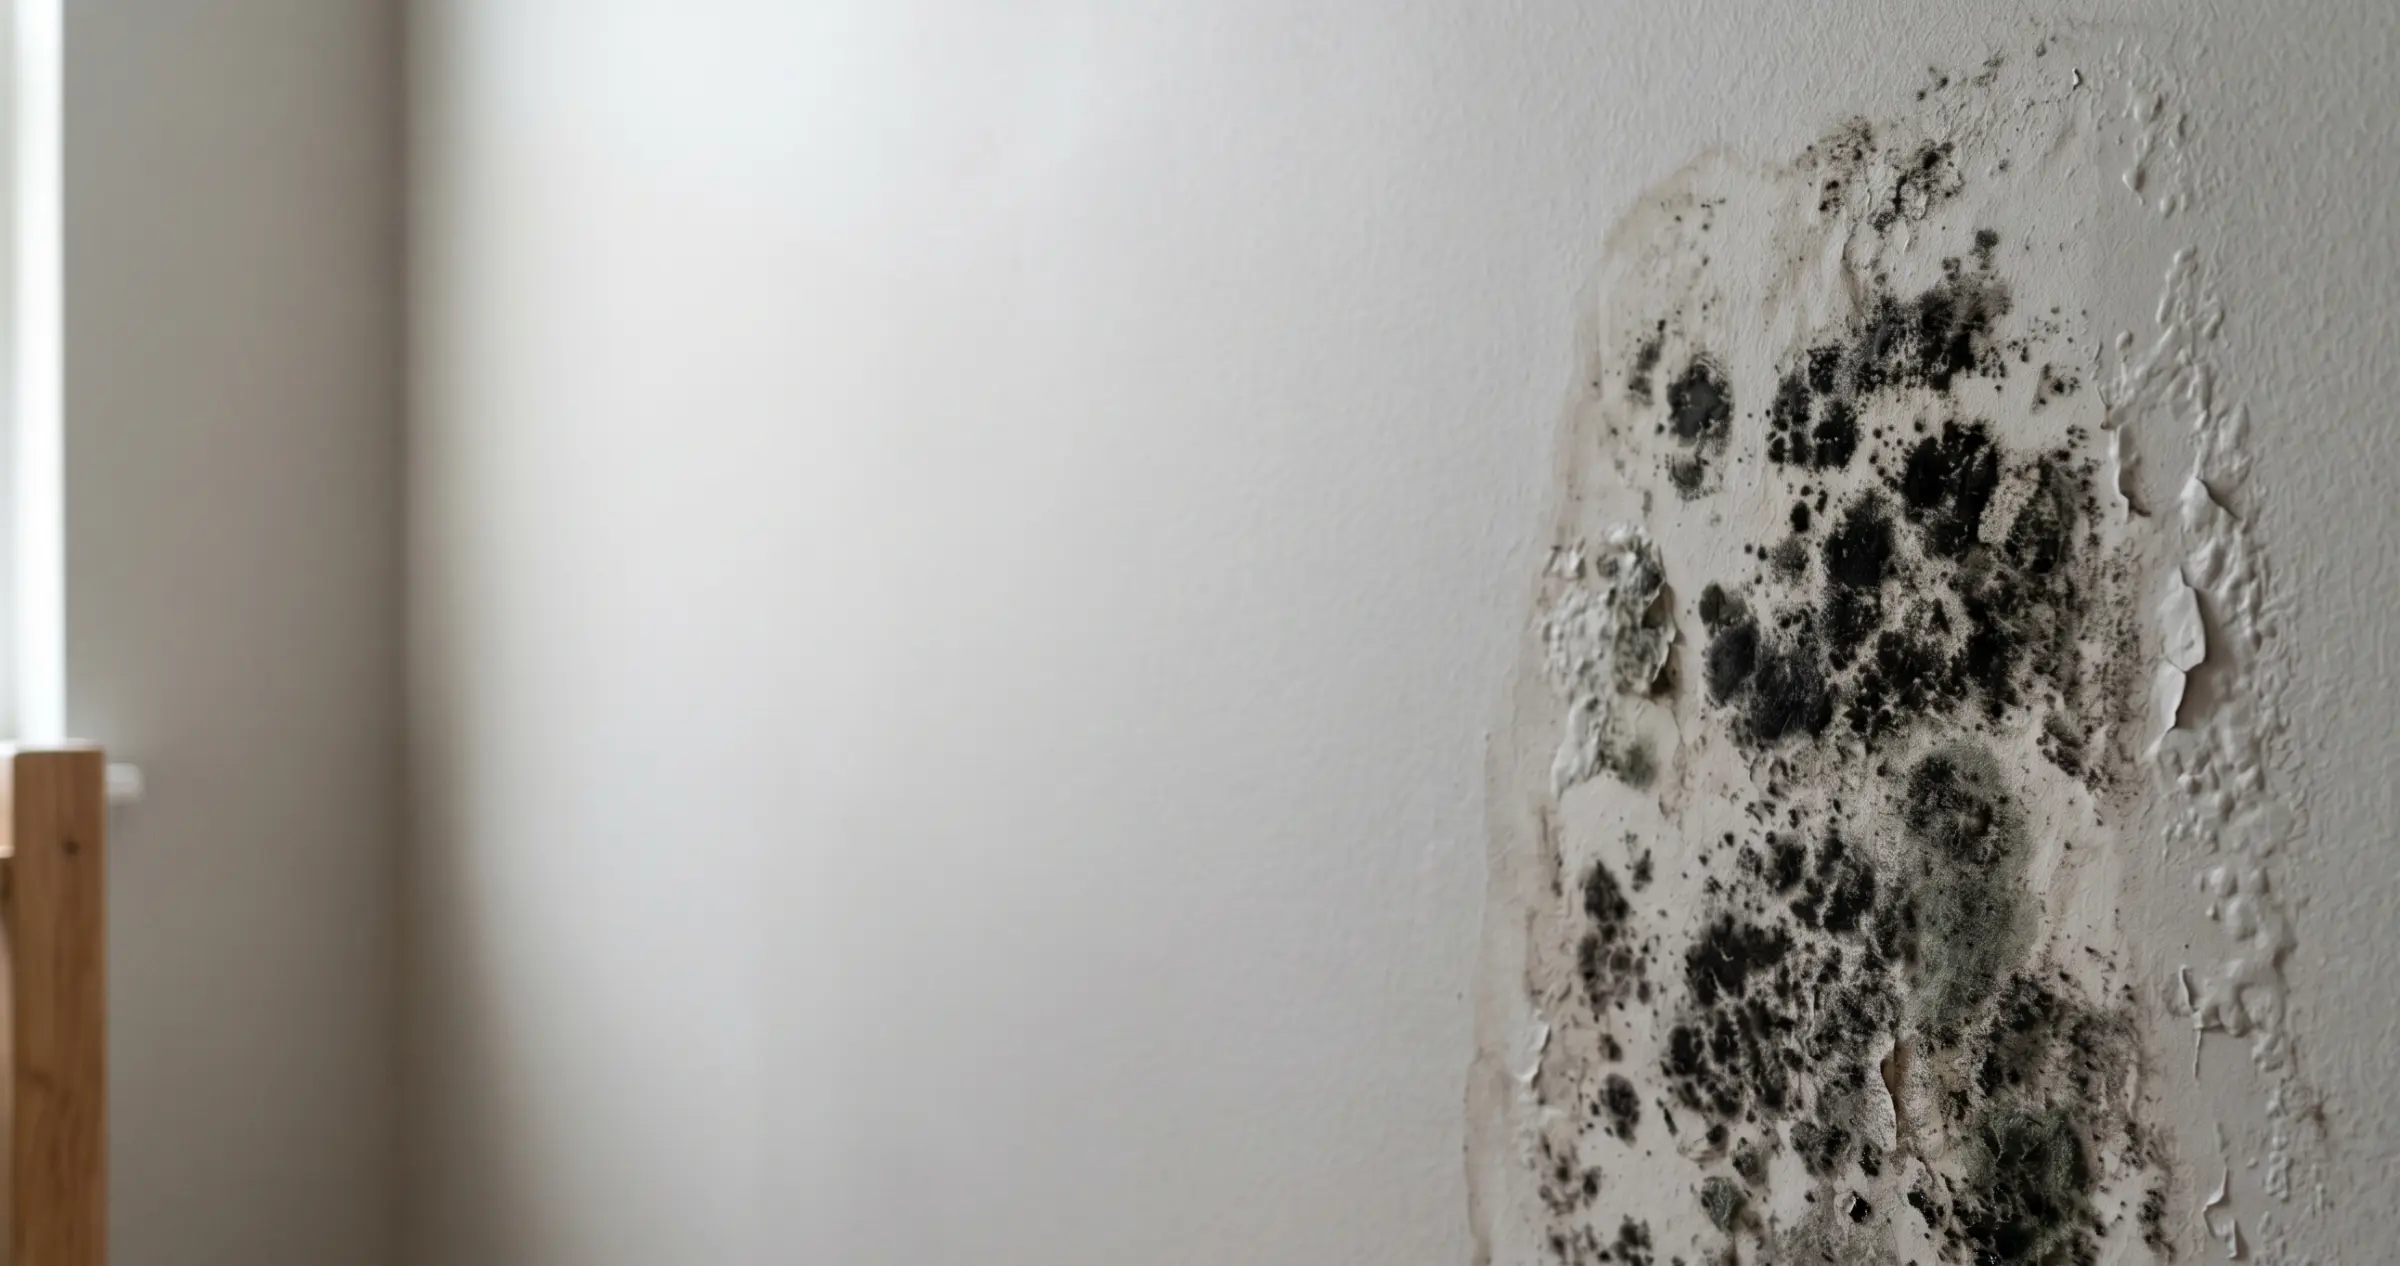
Mold on drywall appears as discoloration or surface texture changes, often accompanied by a musty odor. The visual presentation depends on which species is present, how long the moisture has been active, and whether the drywall is painted or bare.
Common visual patterns include dark circular or irregular staining in black, gray, green, or brown tones; expanding water-stain rings that discolor even after the surface has dried; fuzzy or powdery growth at corners, seams, or low on walls near baseboards; and peeling or bubbling paint that indicates moisture trapped behind the finish layer. On unpainted drywall, mold often appears as a diffuse gray or greenish discoloration across the paper face, sometimes spreading in a pattern that follows the paper grain.
The odor is frequently the first indicator homeowners notice. A persistent musty smell with no visible growth often means mold is present inside the wall cavity or on the back face of the drywall panel. Other hidden indicators include drywall that feels soft or spongy when pressed, discoloration at seams or corners that worsens despite drying, and health symptoms such as nasal congestion or respiratory irritation that improve when the occupant leaves the home. Those symptoms signal ongoing exposure, and mold is significantly more dangerous for children, elderly residents, and anyone with a compromised immune system.
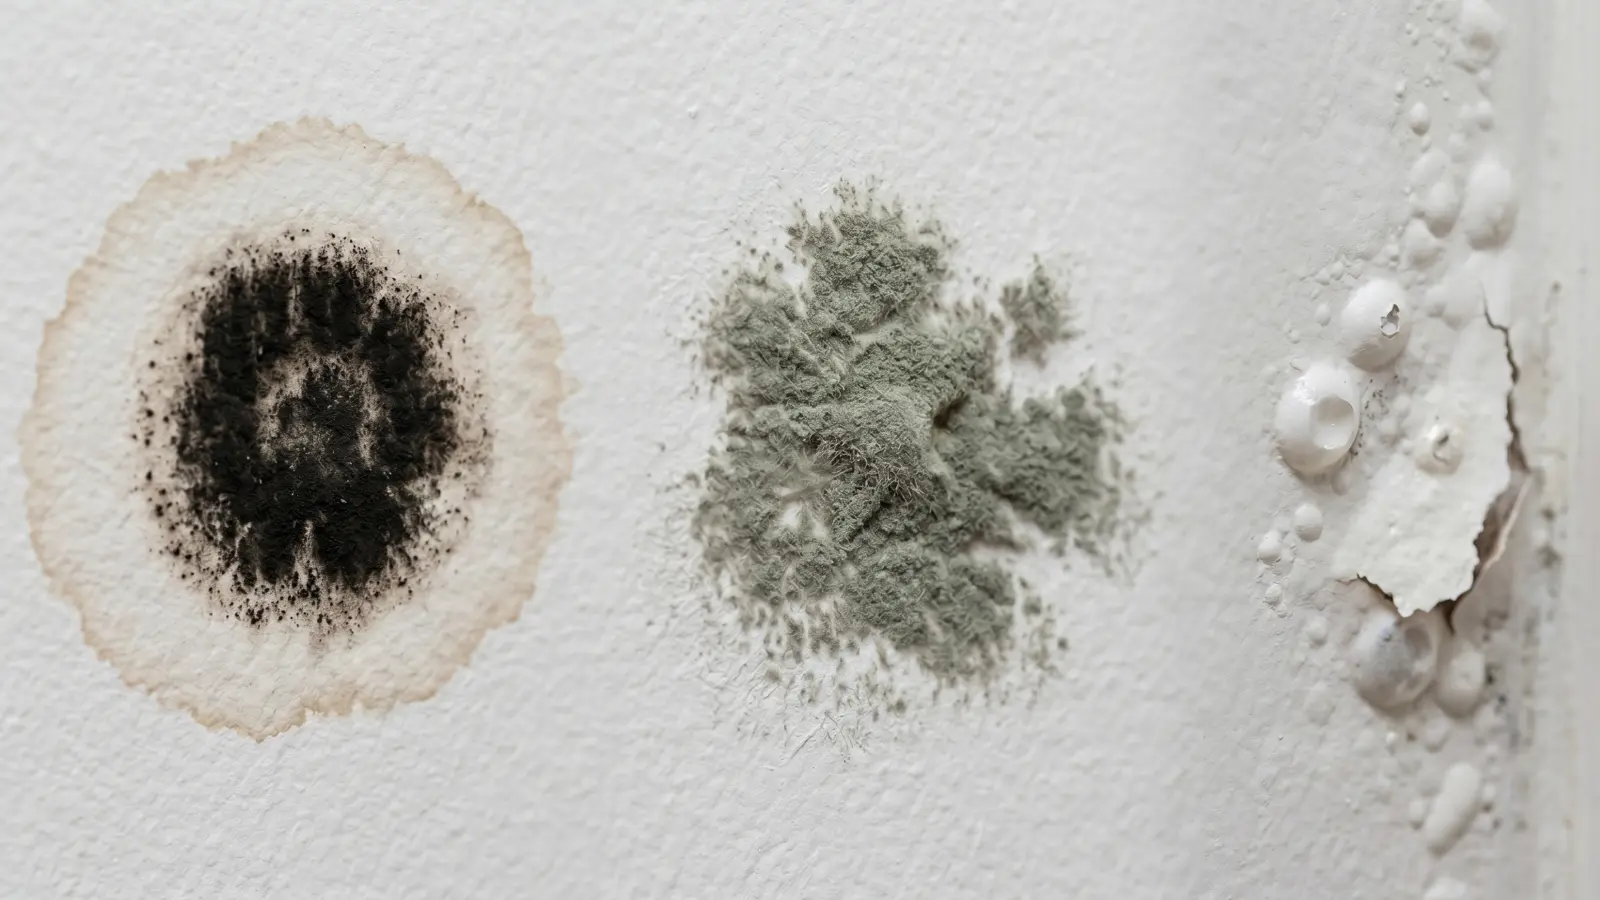
Several mold species commonly colonize drywall. Cladosporium typically presents as olive-green to black powdery growth and is the most common species found on paper-faced building materials. Aspergillus and Penicillium are often blue-green or white with a powdery texture and grow readily in moderate humidity without active water intrusion. Stachybotrys chartarum, commonly called black mold, is a dark greenish-black slimy growth that requires sustained wetness rather than just high humidity, and is more common in drywall that has experienced flood damage or a long-running hidden leak. Knowing which species you are dealing with matters because signs of mold differ by location, odor intensity, and whether the growth is fuzzy, slimy, or powdery.
How deep mold penetrates drywall
Mold penetrates drywall in a predictable sequence tied to how long moisture exposure lasts and whether the drywall is painted or bare.
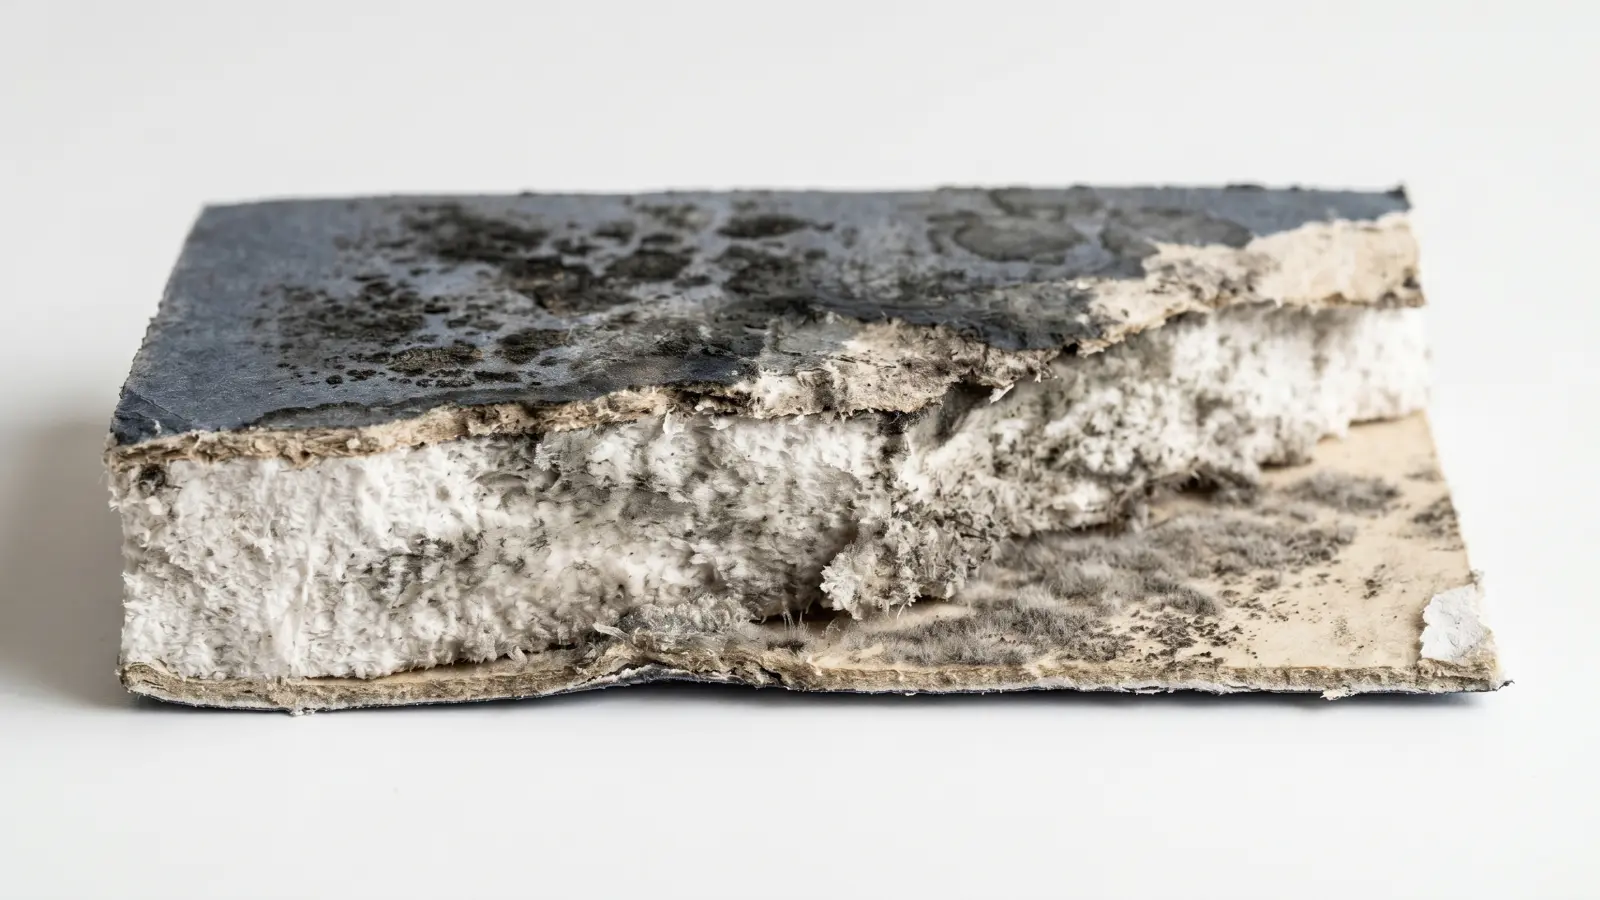
Standard drywall is composed of three layers: a front face paper (the painted surface you see), a gypsum mineral core, and a back face paper on the wall-cavity side. All three are vulnerable, but the paper layers are the primary food source because they contain cellulose. The gypsum core itself is inorganic and does not feed mold, but it absorbs and holds moisture, which keeps conditions wet long after the original water event has passed.
Stage 1: Face paper colonization. Mold first establishes on the front face paper. At this stage, the damage may appear as surface discoloration only. On painted drywall, the paint layer provides a partial barrier, which is why surface cleaning can sometimes succeed if the problem is caught early and the drywall is structurally sound.
Stage 2: Gypsum core saturation. As moisture penetrates deeper, spores and hyphae work through the face paper into the gypsum core. The core holds water like a sponge, and once saturated, it supports hidden fungal growth even after the visible surface appears dry. At this stage, the panel will feel soft when pressed, and surface cleaning will not reach the active colony.
Stage 3: Back face and cavity colonization. In cases of extended water exposure, typically from a slow hidden leak or flooding, mold migrates through the entire panel and begins colonizing the back face paper. From there it spreads to wall cavity insulation and the framing behind it. This is the scenario that produces a minor-looking surface stain with extensive hidden damage. Professional mold inspection uses moisture meters and thermal imaging cameras to map contamination accurately rather than relying on visual inspection alone. IICRC S520 moisture thresholds classify drywall with readings above 17% as requiring action and readings above 28% as indicating likely structural damage.
The critical takeaway: once mold has moved past the face paper into the gypsum core, the material is classified as porous and contaminated under ANSI/IICRC S520, and cleaning is no longer an appropriate response. The panel must be removed.
Common moisture sources behind drywall mold
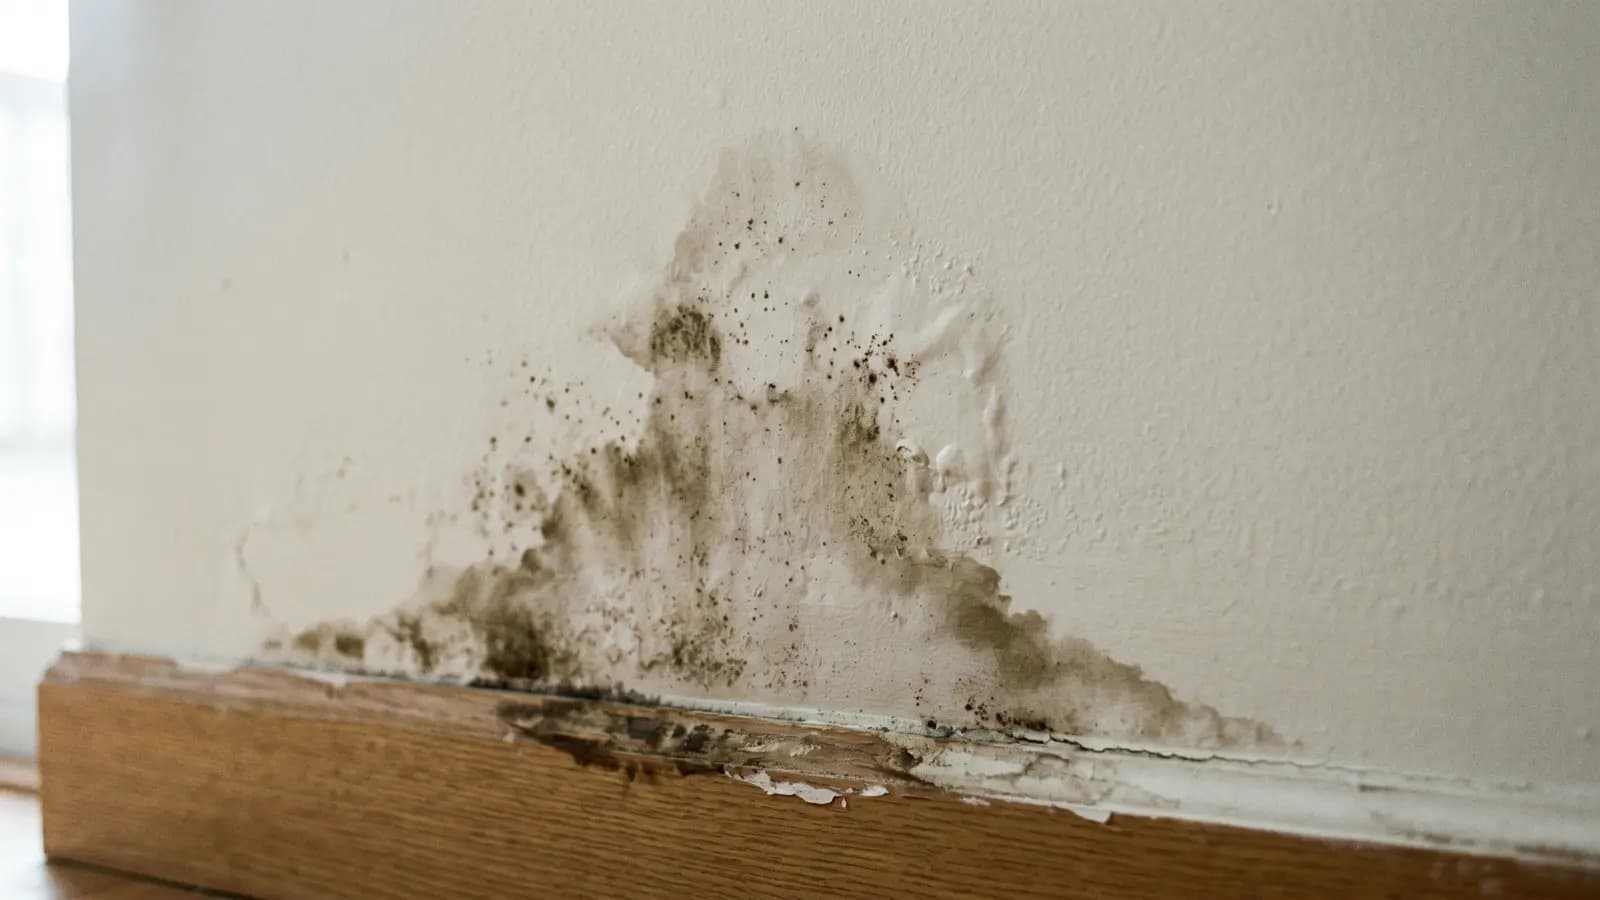
Drywall mold is always a symptom of a moisture problem, not a standalone issue. The six most common sources are plumbing leaks, roof leaks, condensation on cold walls, HVAC condensation, flooding or sewage backup, and chronically high indoor humidity, each producing a distinct staining pattern that helps identify the cause. Identifying the source before any cleaning or removal attempt is the most important step, because remediation without moisture correction guarantees regrowth.
The pattern and location of staining is often the fastest way to identify the source before any professional assessment. Mold that spreads upward from the baseboard points to moisture wicking from below, typically a slab leak, flooding, or ground moisture. Staining that appears in a ring pattern higher on the wall or ceiling typically traces to a roof leak or pipe above. The table below maps each source to its typical location and visual indicator.
| Moisture source | Where mold appears | Key indicator |
|---|---|---|
| Plumbing leak (supply line) | Behind bathroom or kitchen walls | Persistent stain that expands, often at baseboard level |
| Condensation on cold wall | Exterior walls, corners, north-facing rooms | Seasonal pattern, worsens in winter |
| Roof leak | Ceiling drywall, upper wall near roofline | Water stain that corresponds to roof structure above |
| HVAC condensation | Near air handler, duct penetrations | Staining around vent registers |
| Flooding or sewage backup | Low on walls, entire lower sections | Widespread, may affect multiple rooms |
| High indoor humidity (no leak) | Bathrooms, laundry rooms, basements | Diffuse growth, no single origin point |
Condensation is a frequently missed cause, particularly on exterior walls in cold climates or in rooms with poor vapor control. Mold that appears in corners or along the bottom of exterior walls without any visible leak often traces back to warm, humid interior air contacting a cold wall surface, with the condensation point inside the drywall rather than on its face. Flooding introduces a different risk profile entirely: mold after water damage can establish within 24 hours, and sewage-contaminated floodwater requires enhanced PPE and disposal protocols beyond standard remediation.
Should you clean or replace moldy drywall?
Replace moldy drywall if it is unpainted, structurally soft, or has been wet for more than 48 hours. Clean it only if the drywall is painted, the panel feels firm, and the affected area is under 10 square feet.
| Condition | Action |
|---|---|
| Painted drywall, small surface stain under 10 sq ft, panel feels firm | Clean (DIY eligible) |
| Painted drywall, stain under 10 sq ft, panel feels soft or spongy | Replace |
| Unpainted drywall with any visible mold | Replace |
| Any drywall with mold covering more than 10 sq ft | Professional assessment required |
| Drywall wet for more than 48 hours, even if dried now | Replace or professional assessment |
| Drywall adjacent to confirmed Stachybotrys growth | Replace; professional handling required |
| Drywall in active leak area with no moisture source repair yet | Replace after moisture source is fixed |
A simple field test: press firmly on the stained area with your thumb. If the drywall compresses, crumbles, or feels spongy rather than hard and rigid, the gypsum core has been structurally compromised and cleaning will not save it. Similarly, if the paint is bubbling or peeling, moisture was trapped behind the finish long enough to expose the paper backer regardless of how the surface looks now.
DIY mold removal on drywall (surface only)
DIY cleanup applies only to sealed, painted drywall with surface mold under 10 square feet in a well-ventilated area, on a panel that is structurally firm, and after the moisture source has been permanently fixed. The EPA 10-square-foot threshold is the standard boundary, and when mold remediation is required by a professional is determined by contamination level, affected material type, and household health factors beyond size alone. For larger or more complex jobs, the complete supply kit and containment protocol in the diy mold removal process still applies, but professional oversight is required.
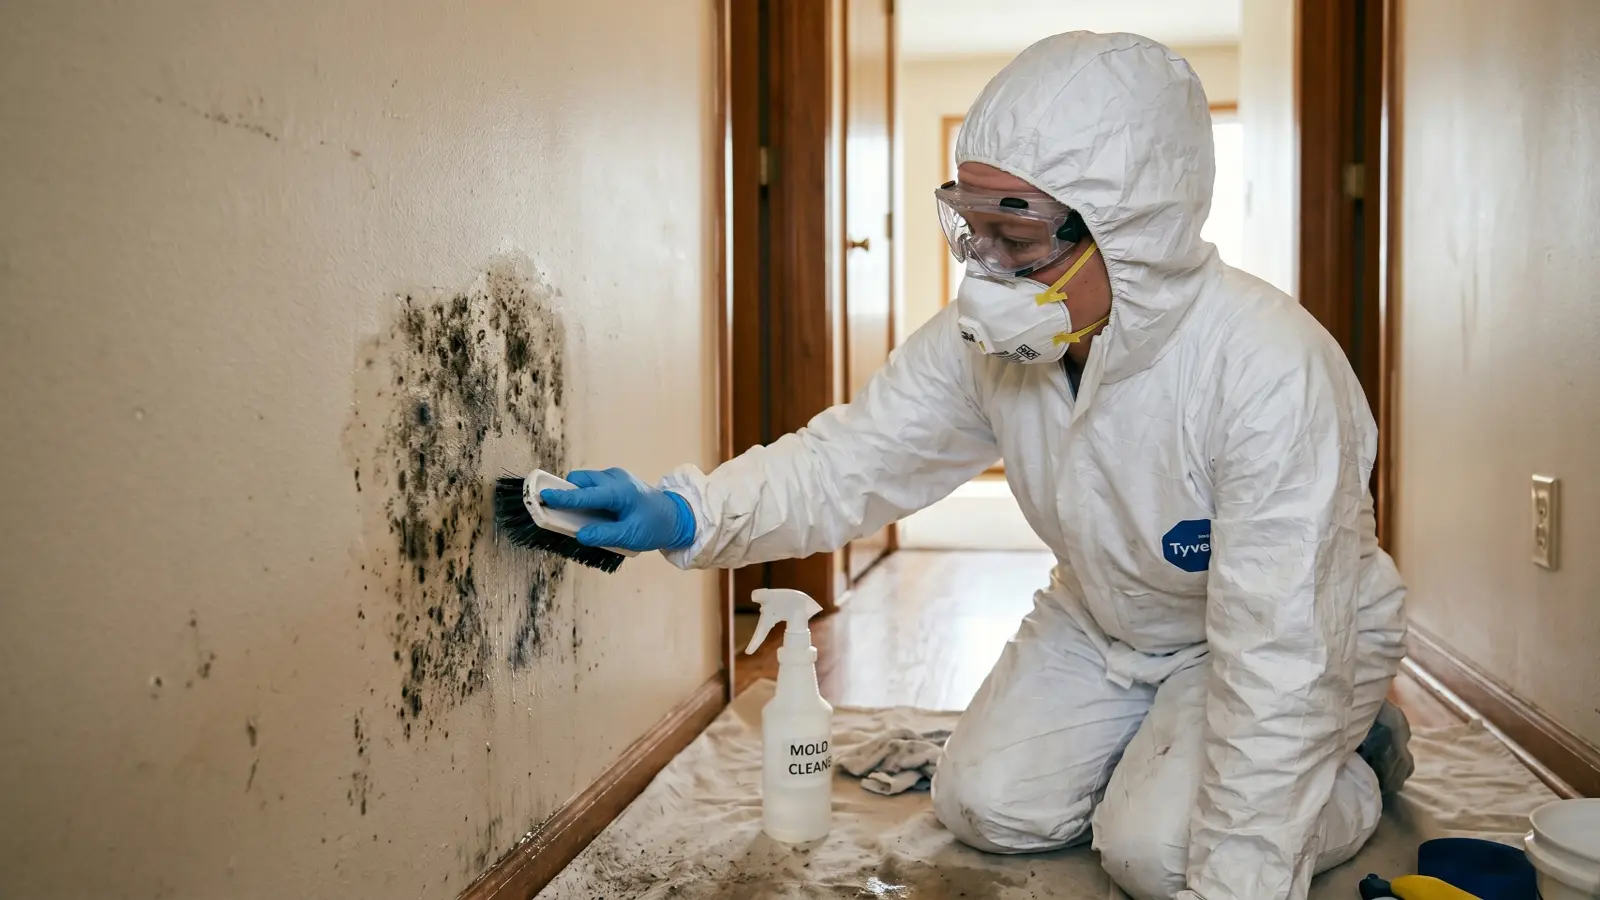
Equipment required: N95 or P100 respirator, nitrile gloves, safety goggles, disposable Tyvek suit, plastic sheeting for HVAC vents, stiff-bristle brush, HEPA-filtered vacuum, spray bottle, fans and dehumidifier for drying.
Cleaning products: The EPA recommends a detergent-and-water solution as the primary cleaning agent for mold on non-porous and semi-porous surfaces. Hydrogen peroxide (3%) can help break down surface mold on drywall, though it adds moisture and must be followed by thorough drying. Bleach is not effective on porous materials because it does not penetrate below the surface, and its liquid base adds more moisture to an already wet substrate. Per ANSI/IICRC S520, bleach should not be used on porous building materials.
1. Fix the moisture source first
Repair the leak, improve ventilation, or install a dehumidifier before doing anything else. No cleaning will last if the moisture continues.
2. Set up containment and PPE
Seal HVAC vents in the work area with plastic and tape. Put on all PPE before disturbing the surface.
3. Mist lightly before scrubbing
Dampen the affected area lightly to suppress airborne spores. Do not saturate the drywall.
4. Scrub with detergent solution
Use 1 tablespoon of dish detergent per quart of water. Scrub firmly with a stiff brush. The mechanical action matters more than the chemical.
5. HEPA vacuum
Remove all loosened debris with a HEPA-filtered vacuum. Standard vacuums will spread spores.
6. Dry completely within 24 hours
Use fans aimed at the wall and a dehumidifier in the room. Drywall must return to below 17% moisture content before repainting.
7. Apply mold-inhibiting primer before repainting
Once fully dry, prime with a mold-inhibiting primer. This is not optional. Standard primer will not prevent regrowth.
If the mold returns within a few weeks of cleaning, it means either the moisture source was not fully resolved or the mold had already penetrated past the face paper. At that point, professional assessment and likely panel replacement are required.
Professional drywall mold remediation
Professional drywall mold remediation is the appropriate response whenever the affected area exceeds 10 square feet, the drywall is unpainted or structurally compromised, the growth is confirmed or suspected to include Stachybotrys chartarum, or any health symptoms in the household suggest ongoing exposure. Confirmed black mold removal requires enhanced containment, full-face respirators, and special waste handling that go beyond standard remediation protocols.
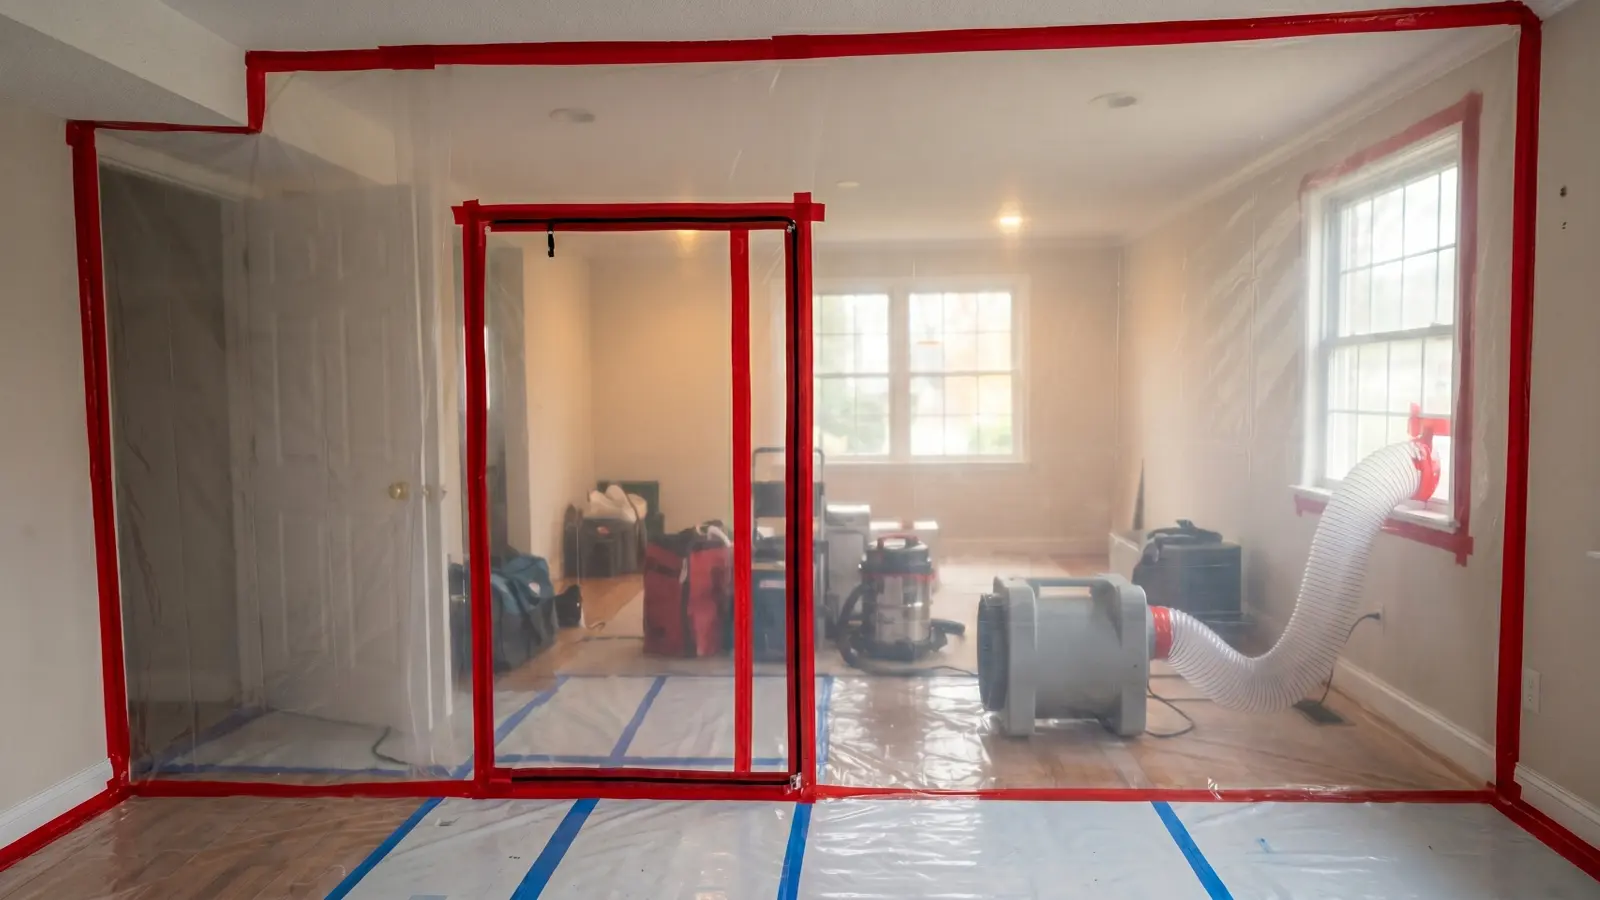
Certified remediators follow the ANSI/IICRC S520 Standard for Professional Mold Remediation, which defines the required containment levels, personal protective equipment, air filtration, and clearance testing protocols by contamination level. A remediation company handling drywall should hold the IICRC Applied Microbial Remediation Technician (AMRT) credential, and the firm itself should be an IICRC Certified Firm.
1. Assessment and moisture mapping
A certified inspector or remediation professional uses moisture meters and thermal imaging to determine how far contamination extends. This step determines whether 2 panels need removal or 20.
2. Containment setup
The work area is isolated with 6-mil polyethylene sheeting, sealed with tape, and placed under negative air pressure using an air scrubber exhausting outside. This prevents cross-contamination to adjacent rooms.
3. Air filtration
HEPA air scrubbers run continuously throughout the project, capturing airborne spores released during demolition. Air changes per hour (ACH) follow IICRC S520 guidelines for the containment zone size.
4. Removal of contaminated drywall
Porous contaminated materials, including drywall, insulation, and paper-backed products, are cut out in a controlled manner, misted to suppress spores, bagged in 6-mil poly bags, sealed, and disposed of per local requirements. Contaminated framing behind the drywall is assessed for structural integrity.
5. Treatment of framing and adjacent surfaces
Wood framing that is not structurally compromised but shows surface mold is cleaned with HEPA vacuuming and antimicrobial treatment per IICRC S520. Structural wood with deep mold penetration may require replacement.
6. Drying and verification
The opened wall cavity is dried to below target moisture levels using desiccant or refrigerant dehumidifiers before any new material is installed. Moisture readings must confirm the cavity is dry.
7. Post-remediation clearance testing
An independent third-party inspector, separate from the remediation company, conducts air and surface sampling to verify spore counts have returned to normal background levels before reconstruction begins. Passing mold testing clearance is the only objective confirmation that remediation succeeded and the wall cavity is safe to close.
For guidance on vetting contractors before hiring, look for the IICRC Applied Microbial Remediation Technician (AMRT) credential, as mold remediation certifications vary by state and some states require a separate contractor license on top of IICRC credentials.
Drywall mold remediation costs
Drywall mold remediation costs vary based on the size of the affected area, how deeply mold has penetrated, whether insulation and framing are also involved, and the location within the home. The figures below represent 2026 professional rates and do not include the cost of the original moisture source repair.
| Scenario | Typical cost | Notes |
|---|---|---|
| Surface cleaning, under 10 sq ft, painted wall | $200–$700 | Spot treatment, minimal containment |
| Small area remediation, 10–50 sq ft | $500–$2,000 | Limited containment, drywall removal and replacement |
| Medium area, 50–150 sq ft, single room | $1,500–$4,000 | Full containment, air scrubbing, clearance testing |
| Large area or multiple rooms | $4,000–$10,000+ | Extensive containment, insulation replacement likely |
| Hidden mold behind finished walls, unknown extent | $2,000–$8,000 | Includes exploratory demolition and reassessment |
| Stachybotrys (black mold) requiring enhanced protocol | Adds 15%–25% to base cost | Full-face respirators, special waste handling |
Additional line-item costs to budget for:
- Drywall replacement material and reinstallation: $1.50–$3.50 per square foot
- Insulation replacement: $1.00–$4.50 per square foot
- Mold-inhibiting primer and paint: $1.00–$3.00 per square foot
- Post-remediation clearance testing: $300–$600
- Moisture source repair (plumbing, roofing): varies by scope

Insurance coverage depends heavily on the moisture source: sudden water damage from a burst pipe is typically covered, while gradual leaks and humidity-related damage are usually excluded. For the full national breakdown, mold remediation cost varies significantly by infestation size, mold type, and home location beyond these drywall-specific scenarios.
Mold-resistant drywall for replacement
When replacing mold-damaged drywall, standard drywall should not be reinstalled in any location that was wet or that remains at elevated moisture risk. Mold-resistant drywall uses a fiberglass-mat facing instead of paper, which eliminates the primary food source mold exploits in conventional panels.
| Product type | Facing material | Mold resistance | Best for |
|---|---|---|---|
| Standard drywall | Paper (cellulose) | None | Dry interior areas only |
| Green board (moisture-resistant) | Wax-coated paper | Low (paper still organic) | Not recommended for replacement in mold areas |
| Mold-resistant drywall (Type X) | Fiberglass mat | High (ASTM D3273 score of 10) | Bathrooms, basements, any remediated area |
| DensArmor Plus (Georgia-Pacific) | Fiberglass mat | Highest rated | High-humidity and flood-risk areas |
| USG Sheetrock Mold Tough | Fiberglass-reinforced face | High (ASTM D3273 score of 10) | General mold-resistant replacement |
Mold-resistant drywall typically costs 30%–50% more per sheet than standard drywall, but in any area that experienced mold, the cost difference is small relative to the remediation cost of a repeat problem. Install with corrosion-resistant screws every 8–12 inches along each stud, apply fiberglass mesh joint tape (not paper tape) at seams, and prime with a mold-inhibiting primer before painting.

The ASTM D3273 standard is the industry benchmark for mold resistance in interior coatings and building panels. A score of 10 means no mold growth was observed under test conditions. Require ASTM D3273 documentation from any mold-resistant drywall supplier before purchasing for a remediation replacement project.
Preventing mold on drywall
Preventing mold on drywall is fundamentally a moisture control problem. Drywall kept below 17% moisture content will not support mold colonization regardless of ambient spore levels.
| Prevention action | Target | Why it works |
|---|---|---|
| Maintain indoor humidity at 30%–50% RH | All rooms | Drywall above 17% moisture content becomes mold-susceptible |
| Repair plumbing leaks within 24 hours | Kitchens, bathrooms, laundry | 24–48 hour window prevents mold establishment |
| Vent bathroom exhaust fans to exterior | Bathrooms | Prevents humidity from saturating drywall around shower and tub |
| Insulate exterior walls adequately | Cold-climate homes | Prevents condensation forming inside wall cavity on drywall paper |
| Use mold-inhibiting paint in high-humidity rooms | Bathrooms, basements | Slows surface colonization if brief humidity spikes occur |
| Inspect under sinks and around appliances quarterly | Kitchens, laundry | Catches slow leaks before saturation occurs |
| Install a whole-home or room dehumidifier in basements | Basements | Chronic basement humidity is a primary driver of drywall mold |
A hygrometer placed in rooms prone to humidity issues provides real-time readings and costs $15–$30. Setting it to alert above 55% RH gives a practical warning threshold before conditions reach the 17% drywall moisture threshold. Broader mold prevention strategies, including dehumidifier sizing, exhaust fan CFM specs, and mold-resistant material choices for renovations, extend the same moisture control logic to the whole home.
Frequently asked questions
Can I encapsulate or paint over mold on drywall instead of removing it?
No. Encapsulating active mold with paint, primer, or sealant is not an approved remediation method. The IICRC S520 explicitly prohibits it. Paint traps moisture and organic material behind the surface, which accelerates hidden colony growth. The only approved approach for active mold on porous drywall is physical removal of the contaminated material.
How do I know if there is mold behind my drywall?
Mold behind drywall often shows up as a persistent musty odor with no visible growth, moisture meter readings above 17% on the wall surface, drywall that feels soft or sounds hollow when tapped, or warped and bubbling paint that is not explained by other causes. Health symptoms that consistently improve when you leave the home are another strong signal. A certified mold inspector with thermal imaging can confirm cavity-side growth without demolition.
Does mold go all the way through drywall?
Yes, with extended moisture exposure. Mold begins on the face paper, migrates through the gypsum core (which holds moisture without feeding mold), and can colonize the back face paper and wall cavity. Once mold reaches the gypsum core, surface cleaning is not effective. The entire panel must come out. This is why IICRC S520 classifies drywall as a porous material requiring removal rather than cleaning in most remediation scenarios.
Does homeowners insurance cover mold on drywall?
Coverage depends on the moisture source. Sudden water damage from a burst pipe or appliance failure is generally covered under dwelling protection. Gradual leaks, long-term humidity, and maintenance-related moisture are typically excluded as homeowner negligence. Document the damage with photos immediately, report the claim promptly, and ask your adjuster specifically whether the moisture source qualifies as a sudden and accidental loss before authorizing remediation work.
Is it safe to stay in the house during drywall mold remediation?
For small surface treatments under 10 square feet, staying in the home is generally feasible if the work area is contained. For any project requiring drywall removal, negative air pressure containment, or air scrubbing, temporary relocation is recommended, especially for children, elderly residents, pregnant women, or anyone with respiratory conditions. Displacement duration, noise levels, and what access restrictions to expect are all covered under what to expect during mold remediation.
How long does drywall mold remediation take?
Surface spot treatment takes a single day. A single-room remediation with containment, drywall removal, drying, and clearance testing typically takes 3 to 5 days of active work plus an additional 1 to 3 days for the wall cavity to dry to target moisture levels before reconstruction. Clearance test results from a lab add 24 to 72 hours. Full reconstruction (new drywall, taping, priming, painting) follows after clearance.
- EPA: Mold Remediation in Schools and Commercial Buildings
- EPA: A Brief Guide to Mold, Moisture, and Your Home
- CDC: Basic Facts About Mold
- IICRC S520: Standard for Professional Mold Remediation
- NIOSH: Dampness and Mold in Buildings (Publication 2019-115)
- ASTM D3273: Standard Test Method for Mold Resistance of Interior Coatings
Sam Hickerson is the founder of RestoreAdvisor and writes consumer guides on mold remediation, inspection, testing, and home recovery. His work focuses on helping homeowners understand costs, risks, and when to call a professional. He draws on guidance from the EPA, CDC, IICRC, and other authoritative sources to make complex home issues easier to navigate.