
Professional mold remediation follows a defined sequence. Every legitimate contractor works from the same framework, derived from the ANSI/IICRC S520 Standard for Professional Mold Remediation, the industry's governing document for how mold work should be scoped, contained, removed, and verified. Understanding that sequence gives you a way to evaluate the crew walking through your door and know whether what they're doing is right.
This covers every step in that sequence, what happens at each phase, how long it takes, and the specific signs that separate thorough work from a shortcut job.
Key insights
- The full process has 8 steps. From initial inspection through post-remediation verification, each phase builds on the last. Skipping or compressing any step increases the chance of mold returning.
- Moisture correction is non-negotiable. The EPA is clear: the key to mold control is moisture control. Remediation that begins without fixing the water source is remediation that will need to be repeated.
- Physical removal is the primary method. The S520 standard is explicit: source removal of mold contamination should always be the primary means of remediation. Chemical treatments are supplemental, not a substitute for removing contaminated material.
- Most jobs take 1–5 days. Small contained areas may wrap in a single day. Larger structural jobs or multi-room contamination typically run 3–7 days.
Before remediation starts: what you need to do
Before the crew arrives, homeowners should complete three tasks: document all visible damage with photographs before any materials are disturbed, move salvageable belongings out of the work area before containment goes up, and determine whether temporary relocation is necessary based on job scope and household health.
Document everything first. Walk through the affected area and photograph or video all visible mold growth, water stains, and damaged materials before any work begins. This documentation matters for insurance claims and gives you a baseline if there are disputes later. If you plan to file an insurance claim, get it started before remediation begins. Your insurer will want to see the damage before work is done, not after. The mold remediation cost section covers what insurance typically covers and what it doesn't.
Move salvageable belongings out of the work area. Furniture, clothing, electronics, and personal items in or adjacent to the affected zone should be relocated before containment goes up. Some contractors offer contents pack-out as part of the job, but it's faster and cheaper to handle it yourself in advance.
Identify whether you need to relocate. For small jobs limited to one room with minimal demolition, staying elsewhere in the home is usually fine. For jobs involving extensive drywall removal, multiple affected areas, or occupants with health conditions that make mold exposure higher risk, temporary relocation is the right call. Your contractor should give you a clear recommendation based on the scope. If they don't raise this question, ask directly.
Step 1: Inspection and scope assessment
Inspection and scope assessment is the process by which professionals use moisture meters, infrared cameras, and hygrometers to map the full extent of mold contamination, including hidden growth inside walls, under flooring, and in ceiling cavities, and assign each affected area a condition level under the ANSI/IICRC S520 framework before any work begins. This goes well beyond the visible mold you reported.
 The condition level assigned during this step, not the visible mold alone, is what determines whether a room needs full remediation or just source correction.
The assessment establishes the contamination condition level under the S520 framework:
| IICRC Condition | What it means | Typical response |
|---|---|---|
| Condition 1 | Normal fungal ecology, no active growth | No remediation needed |
| Condition 2 | Settled spores or growth from another area, no active colonization at this location | Cleaning and source correction |
| Condition 3 | Actual mold growth present, active colonization | Full remediation protocol |
The scope assessment determines which areas fall under each condition, what materials need to be removed versus cleaned, whether HVAC is involved, and whether a separate mold inspection by an independent industrial hygienist is warranted before work begins. For jobs under 10 square feet on non-porous surfaces, DIY mold removal can help you assess whether professional remediation is necessary.
Red flag: A contractor who skips moisture testing and scopes the job based on visual inspection alone will miss hidden growth. The job will appear complete, and the mold will return.
Step 2: Moisture source correction
Moisture source correction means identifying and repairing the water intrusion that caused the mold before any removal work begins. This is the step many companies rush or defer to a separate contractor, and it's the most common reason mold comes back after a completed job.
The EPA states explicitly that the key to mold control is moisture control. Removing the mold without eliminating what caused it leaves the substrate ready for regrowth the moment conditions are right.
Common moisture sources the crew will look for:
- Active plumbing leaks, dripping pipes, or failed supply lines
- Roof leaks reaching attic or wall cavities
- Foundation water intrusion in basements or crawl spaces
- HVAC condensation or drain pan overflow
- Inadequate ventilation creating chronic high humidity
- Exterior grading or gutter failures directing water toward the structure
If the moisture source requires a plumber, roofer, or foundation contractor, that work needs to happen before or concurrently with remediation, not after. A legitimate remediation contractor will make this clear in writing before starting. For active water events where mold risk is immediate, emergency mold removal covers the first-response protocol.
Step 3: Containment and air filtration
Containment in mold remediation means physically sealing the work area from the rest of the home to prevent spores disturbed during removal from spreading to clean areas.
 This AFD runs as a negative air machine during demolition and switches to air scrubber mode once cleaning begins, two different jobs from the same unit.
Once the scope is defined and the moisture source addressed, the work area gets sealed off. The purpose of containment is to prevent spores disturbed during removal from traveling to clean areas of the home. Disturbing mold colonies releases enormous numbers of spores into the air, which is why the sealed work environment matters more during active demolition than at any other point.
Containment levels vary by job size:
| Containment type | When it applies | What it involves |
|---|---|---|
| Limited containment | Less than 100 sq ft of affected material | Single layer of polyethylene sheeting over doorways, HVAC vents sealed |
| Full containment | Greater than 100 sq ft, or HVAC involvement | Double-layer polyethylene with airlock entry, decontamination chamber, negative air pressure |
| Negative air pressure | Required for all full containment jobs | Air filtration device (AFD) exhausts filtered air outside, keeping containment zone under lower pressure than surrounding spaces |
The AFD (also called a negative air machine or air scrubber) serves two roles depending on the project phase. During demolition, it runs as a negative air machine, drawing contaminated air outside through a HEPA-filtered exhaust. During the post-removal cleaning phase, it switches to an air scrubbing role, cycling the contained air through HEPA filtration to capture residual spores.
All HVAC supply and return vents in the affected area are sealed to prevent spore-laden air from entering the duct system.
Red flag: A crew that skips the AFD entirely, or runs it only as an air scrubber during demolition, is missing a critical step. Negative air pressure during removal is what keeps spores from migrating outside the containment zone.
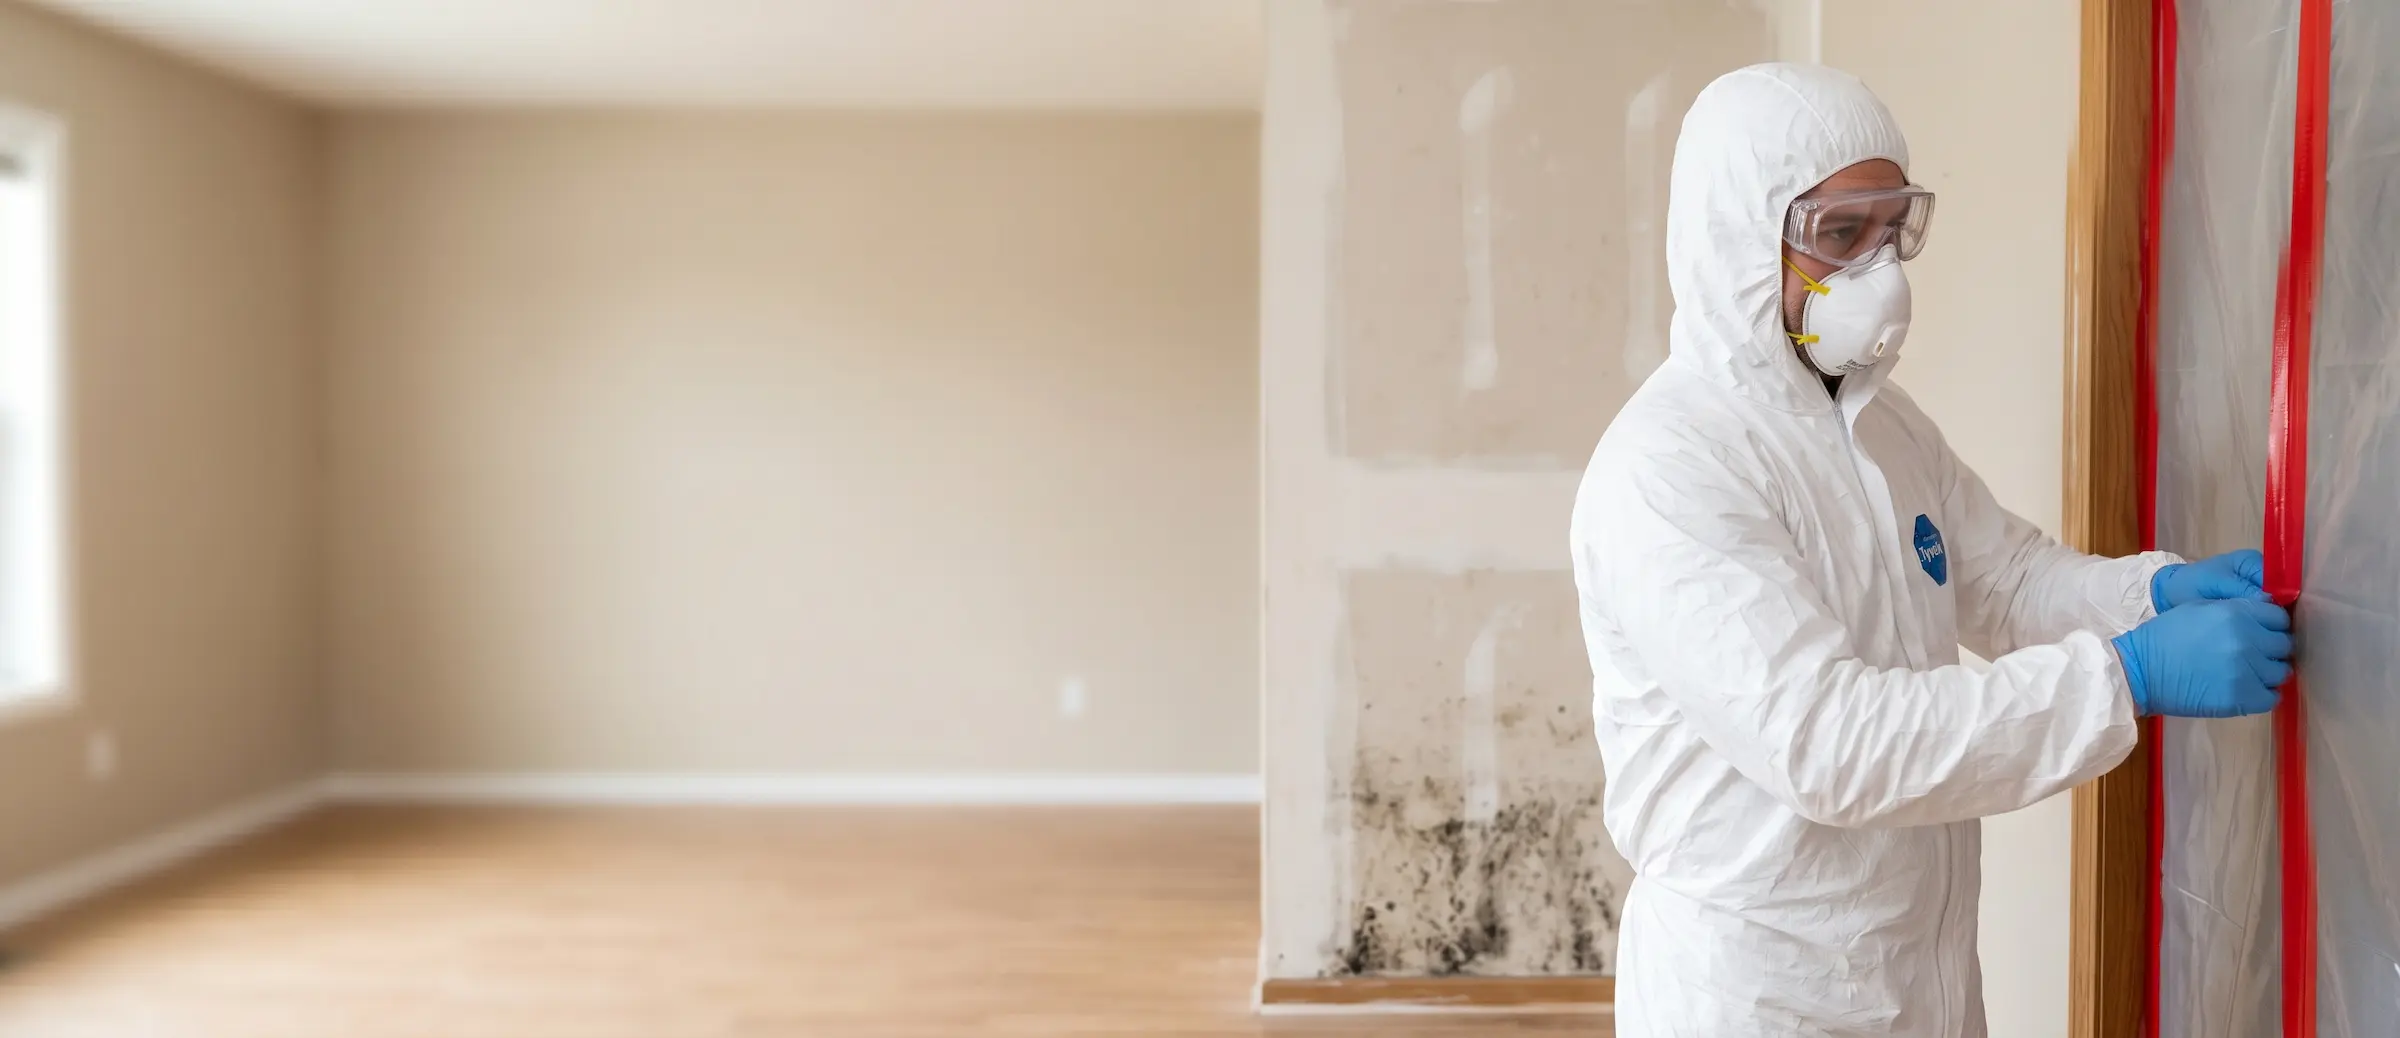
Step 4: Removal of contaminated materials
Physical removal of mold-contaminated materials is the primary method of remediation under the IICRC S520. Chemical treatments are explicitly secondary. The standard is clear: source removal of mold contamination should always be the primary means of remediation.
 Drywall with mold penetrating the paper face like this gets removed, not cleaned, since S520 treats physical removal as the primary method and chemical treatment as supplemental.
What gets removed versus what gets cleaned depends on whether the material is porous or non-porous:
| Material type | Examples | Approach |
|---|---|---|
| Porous | Drywall, insulation, ceiling tiles, carpet, carpet pad | Remove and dispose |
| Semi-porous | Wood framing, structural lumber | Clean via HEPA vacuum, damp wipe, wire brush or media blast |
| Non-porous | Metal, glass, hard plastic, tile | Clean and treat in place |
Drywall is almost always removed when mold has penetrated the paper face. The EPA guidance notes that absorbent or porous materials may have to be disposed of because mold grows into the empty spaces of these materials and cannot be fully removed by cleaning. Black mold removal covers what makes those jobs different in terms of containment protocols and cost.
How removal is done properly:
- Lightly mist materials before cutting or pulling to suppress dust and reduce airborne spore release
- Cut drywall in manageable sections rather than ripping in large sheets
- Double-bag removed materials in 6-mil polyethylene bags, twist and tape closed, and wipe the outside of each bag before it exits the containment zone
- The AFD runs continuously throughout removal on negative air mode
Red flag: A contractor who proposes to encapsulate or paint over mold-affected drywall rather than remove it is not following the S520. Coatings applied over active or inadequately cleaned growth trap moisture and allow mold to continue growing beneath the surface.
Step 5: Cleaning and antifungal treatment
Cleaning and antifungal treatment is a three-pass process applied to every remaining surface inside the containment zone: HEPA vacuum, damp wipe with detergent solution, then a second HEPA vacuum pass before any chemical treatment is applied. The sequence is fixed and cleaning always precedes treatment, never the reverse.
 This vacuum pass is the first of three; a damp wipe and second vacuum pass still follow before any antifungal treatment is applied.
The cleaning process involves three passes on structural surfaces:
- HEPA vacuum all surfaces including pipes, wire runs, duct exteriors, door frames, baseboards, and window frames to capture loose spores and debris
- Damp wipe all surfaces with a detergent solution to suspend and remove residual contamination and break the bond of any sticky mycotoxins
- Second HEPA vacuum or wipe pass to capture what the damp wipe released
Antifungal or antimicrobial agents are applied after cleaning, not instead of it. The S520 explicitly discourages indiscriminate use of antimicrobials and biocides, noting they are supplemental to physical removal. If a contractor's proposal relies heavily on chemical fogging or antimicrobial spray as the primary removal method, that is a red flag.
On semi-porous materials like wood framing that were cleaned rather than removed, an additional step may be used: wire brushing, hand sanding, or media blasting (soda blasting or dry ice blasting) to remove embedded surface growth before the cleaning passes.
The AFD switches to air scrubber mode during this phase, now cycling and filtering the air inside the containment zone rather than exhausting to the exterior.
Step 6: Drying and humidity control
Drying and humidity control is the phase where industrial dehumidifiers and high-velocity air movers bring structural materials to target moisture content before any restoration begins. The ANSI/IICRC S520 requires materials to reach acceptable dryness levels before new drywall or flooring is installed, because restoration over wet materials traps moisture and guarantees mold regrowth.
 Restoration can't begin until daily moisture readings from equipment like this confirm the framing has hit target dryness, typically a minimum of two to three days.
Professionals use industrial-grade equipment for this phase:
- Dehumidifiers: High-capacity commercial units capable of extracting significantly more moisture per day than consumer units. Target indoor relative humidity is below 50%, ideally 30%–50% in living spaces.
- Air movers: High-velocity fans positioned to accelerate evaporation from wall cavities, subfloor, and framing surfaces.
- Moisture meters and data loggers: Daily readings confirm progress toward target moisture content in affected materials.
Drying typically runs for 2–3 days minimum after removal is complete. The crew checks readings daily. Restoration does not begin until moisture content in structural materials meets the targets specified in the remediation protocol.
Step 7: Structural restoration
Structural restoration is the rebuild phase that follows successful drying, replacing materials removed during remediation such as drywall, insulation, flooring, and trim. This phase varies significantly based on how much material was removed.
Common restoration tasks:
- Installing new drywall, taping, mudding, and priming
- Replacing insulation with appropriate vapor barrier installation
- Reinstalling flooring, baseboards, and trim
- Repainting using mold-resistant primer and paint in areas that had moisture exposure
- Replacing HVAC components if ductwork or air handlers were affected
Restoration may be handled by the same remediation contractor or by a separate general contractor, depending on scope and licensing in your state. Get clarity on this before work begins, because the handoff between remediation completion and restoration start is where scheduling gaps tend to open up.
Step 8: Post-remediation verification
Post-remediation verification (PRV) is the final step and the only objective confirmation that the job succeeded. This is not a walk-through by the same crew that did the work. For any job involving full containment, independent PRV by a certified industrial hygienist or independent mold inspector is the appropriate standard.
 Air sampling like this confirms the air, not the surfaces; a contractor skipping surface swabs on previously affected framing is leaving a real gap in verification.
What PRV involves:
- Visual inspection of all remediated areas for any remaining visible mold or moisture damage
- Moisture readings throughout the affected zone confirming materials have reached acceptable dryness
- Air sampling and/or surface sampling sent to an accredited laboratory
- Comparison of indoor spore counts to outdoor baseline samples
The goal is to confirm the space has returned to Condition 1, meaning normal fungal ecology comparable to what's present outdoors and in unaffected areas of the home. A clearance report documents this finding and provides a paper record of successful remediation.
Important: Air sampling tests the air, not surfaces. A cleaned surface may show acceptable air sample results while still harboring surface contamination. For thorough verification, surface tape sampling or swab sampling should be included alongside air sampling, particularly on previously affected wood framing.
Re-entry is typically safe 24–48 hours after PRV is complete and clearance is confirmed. Mold testing covers how to read clearance test results and what spore count thresholds indicate successful remediation.
Red flag: A contractor who offers to perform their own final inspection and clearance testing has a conflict of interest. Independent PRV is worth the additional cost for any job beyond a very small contained area.
How long each step takes: timeline by project size
Most residential mold remediation projects take 1–5 days, but timeline varies significantly based on the size of the affected area and whether structural materials need to be removed.
| Project scope | Affected area | Typical timeline | Re-entry |
|---|---|---|---|
| Small / limited | Under 10 sq ft, single surface | 1–2 days | Same day or next day |
| Medium | 10–100 sq ft, single room | 2–4 days | 24–48 hrs after clearance |
| Large | 100–300 sq ft, multiple areas | 4–7 days | 24–48 hrs after clearance |
| Extensive | 300+ sq ft, structural, HVAC, or multiple rooms | 1–2+ weeks | 48–72 hrs after clearance |
These timelines reflect active work time only. The 24–48 hour re-entry wait comes after the crew finishes, so factor that into your planning. A 3-day job means you're back in the remediated space on day 4 or 5 at the earliest.
These timelines assume the moisture source was corrected before work began and that no hidden mold is discovered during demolition that expands the original scope. Both of those factors can extend a job, and a good contractor will communicate timeline changes promptly when they occur.
For a deeper look at what affects project length, including mold type, material involvement, and humidity conditions, when mold remediation is required covers the full decision framework.
Red flags at each step
Red flags during mold remediation are specific shortcuts at each phase that indicate a contractor is cutting corners in ways that will cause mold to return. The most consequential are skipping moisture testing during assessment, starting removal before the moisture source is fixed, and having the same crew perform final clearance testing rather than an independent inspector.
During assessment: Scope determined by visual inspection only, no moisture meter or IR camera. No written scope of work provided before work begins.
During moisture correction: The crew proposes to begin remediation before the moisture source is identified or repaired.
During containment: No AFD or negative air machine installed. Single-layer plastic sheeting with no airlock for full containment jobs.
During removal: Drywall ripped out dry in large sections without misting to suppress spores. Waste bags exit the containment zone without being wiped down. Encapsulant or paint proposed over mold-affected material in lieu of removal.
During cleaning: Antifungal spray applied as the first step without a prior HEPA vacuum and damp wipe pass.
During drying: Restoration begins before moisture readings confirm the structural materials have reached target dryness.
During PRV: Clearance inspection performed by the same crew that did the work, with no independent testing. No written clearance report provided.
For guidance on vetting a contractor before hiring, signs of mold covers what a thorough assessment should uncover and what early indicators professionals look for.
Frequently asked questions
How long does the mold remediation process take?
Most residential projects take 1–5 days. Small contained areas may be done in a single day. Larger jobs involving structural materials like drywall and framing, or infestations in multiple rooms, typically run 3–7 days. HVAC mold or severe basement contamination can extend to two weeks.
Do I have to leave my home during mold remediation?
Sometimes, depending on job scope and household health. For limited containment jobs in a single room, you may be able to stay in unaffected areas of the home. Full containment jobs with negative air pressure and significant demolition generally require you to leave the work area entirely. Whether you need to fully relocate depends on scope and the health status of people in the household. Your contractor should give you a specific recommendation, and if they don't, ask directly.
What is post-remediation verification?
Post-remediation verification (PRV) is the final clearance inspection confirming that remediation succeeded. It includes a visual check for remaining mold, moisture readings throughout the affected area, and air or surface sampling sent to a certified laboratory. The goal is to confirm the space has returned to Condition 1, meaning normal fungal ecology, before occupants return.
What does containment mean in mold remediation?
Containment means physically isolating the mold work area from the rest of the home using polyethylene sheeting, sealed doorways, and negative air pressure maintained by an air filtration device. This prevents spores disturbed during removal from traveling to clean areas. Limited containment uses a single barrier; full containment uses an airlock entry system with a decontamination chamber.
Can mold come back after remediation?
Mold can return if the moisture source that caused it was not fully corrected. Remediation removes the existing growth, but the conditions that allowed it must also be resolved or mold will regrow. This is why fixing the moisture source is the required first step, not an afterthought.
What is the IICRC S520 standard?
The ANSI/IICRC S520 is the industry standard for professional mold remediation, maintained by the Institute of Inspection, Cleaning and Restoration Certification. It establishes protocols for assessment, containment, source removal, PPE, and post-remediation verification. Contractors who follow S520 and hold IICRC certification have agreed to work within this defined standard of care.
Sam Hickerson is the founder of RestoreAdvisor and writes consumer guides on mold remediation, water damage restoration, inspection, testing, and home recovery. His work focuses on helping homeowners understand costs, risks, and when to call a professional. He draws on guidance from the EPA, CDC, IICRC, and other authoritative sources to make complex home issues easier to navigate.