
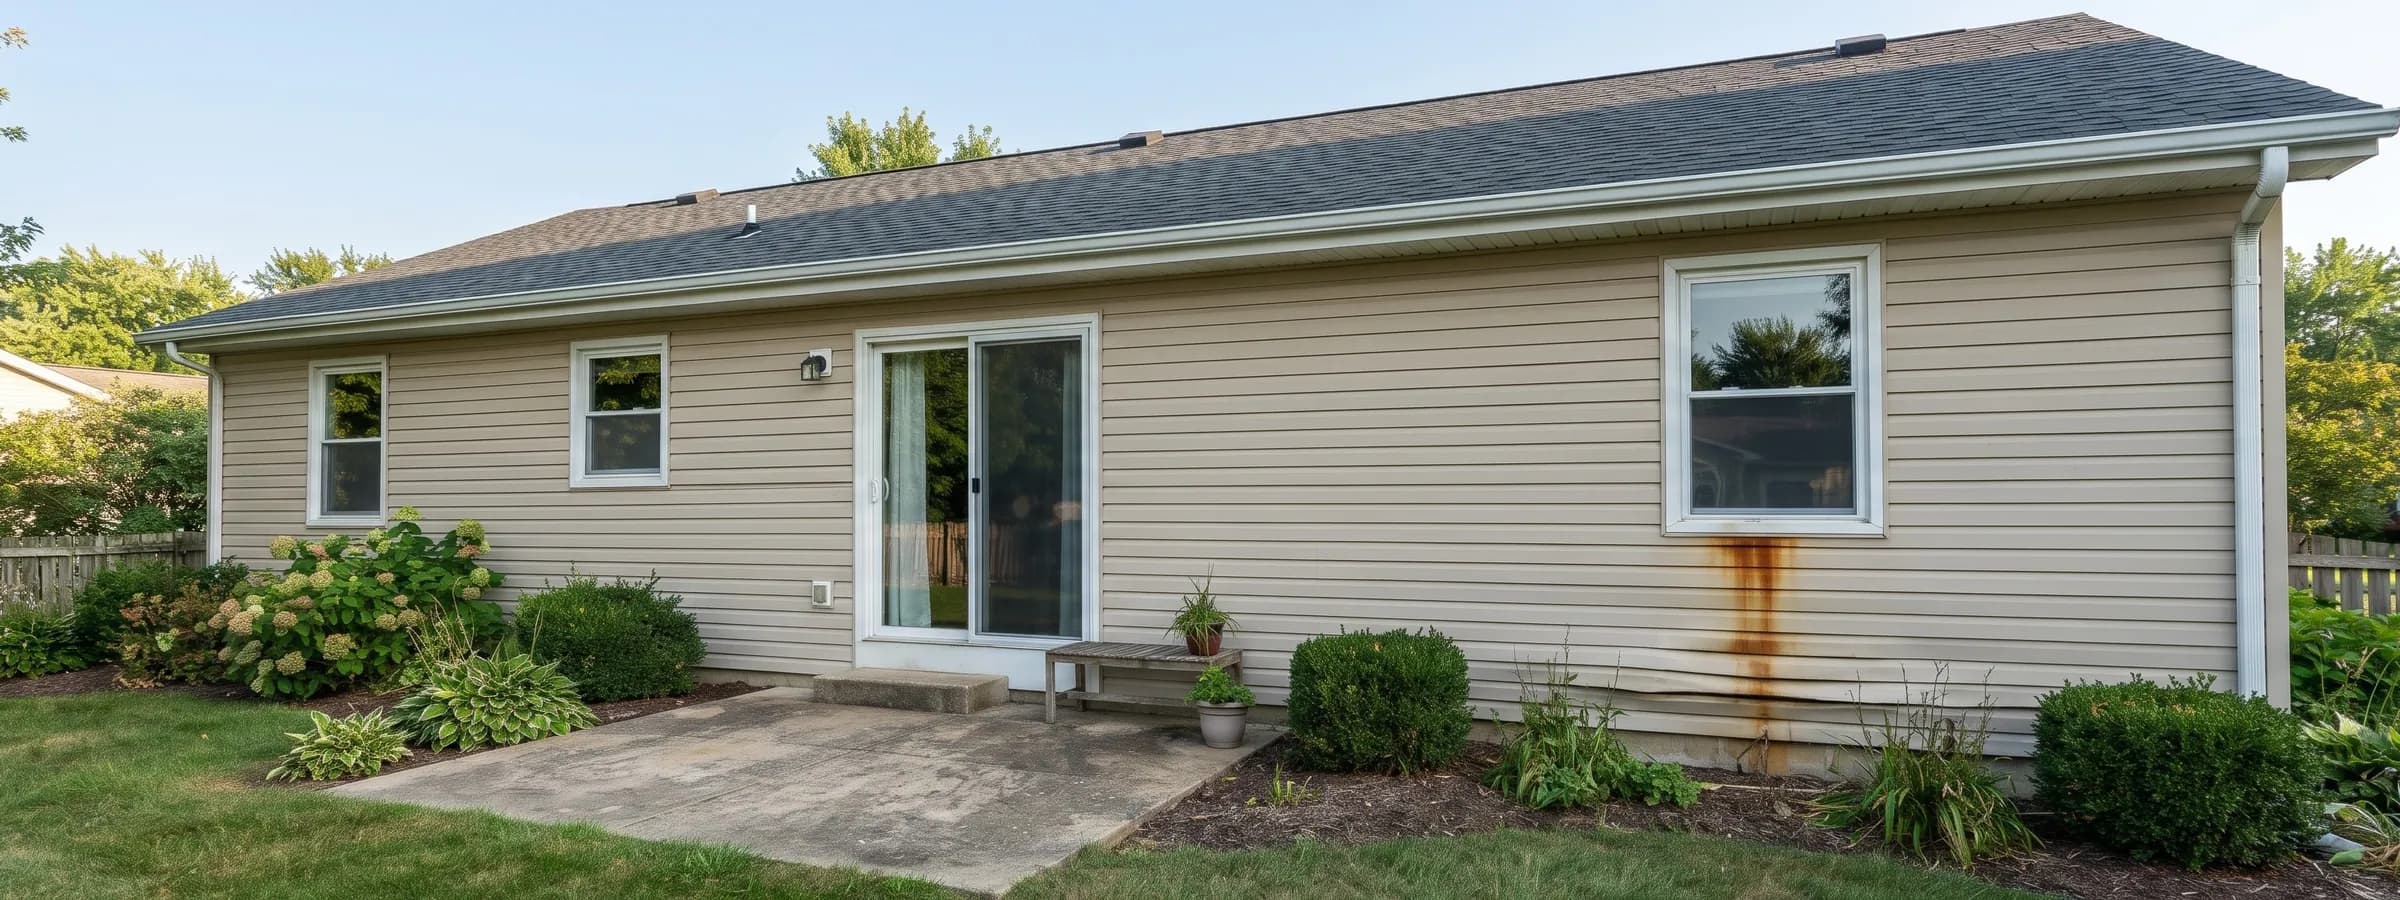

A panel that has gone wavy, a dark stain running down from a window corner, or a spot near the bottom of the wall that gives under your thumb usually means water has already gotten behind the siding. The damage you can see is the smaller part of the problem, because water that passes the cladding wets the sheathing, framing, and insulation behind it, and a repair that lasts depends on finding where the water entered before anyone swaps panels or caulks a seam. A small mark outside can turn into a water damage restoration job inside the house.
Siding water damage is moisture that gets behind the exterior cladding and wets the water-resistive barrier, sheathing, framing, and insulation, and it falls under ANSI/IICRC S500, the standard for professional water damage restoration. Siding sheds most rain but is not the wall's waterproofing layer, so damage starts where flashing, the barrier, or the drainage path fails: at openings, roof joints, penetrations, and the base of the wall.
Key insights
- Water behind siding is expected, and damage starts when it cannot drain or dry. The Vinyl Siding Institute says vinyl siding is cladding, not a water-resistive barrier, so the barrier and flashing behind it have to move the water back out.
- Surface signs understate the damage. A stain, a warped board, or a loose panel often sits in front of wet sheathing, and the water can surface several feet from where it entered.
- A moisture reading in the sheathing is the direct check. Wood stays protected from decay below about 20% moisture content, and decay becomes likely once it passes the fiber saturation point of roughly 26% to 29%.
- Caulk and paint over a wet wall make it worse. They trap water behind the repair and can block the drainage openings the wall depends on.
- A typical siding water damage repair costs $500 to $4,000 in total. A 100 square foot section costs $200–$400 in vinyl and $400–$1,300 in wood or fiber cement, a section with sheathing and housewrap costs $1,000–$3,600, and a 400 square foot wall rebuild costs $4,000–$14,400.
- Insurance usually covers sudden damage, not wear. Hail or wind that tears panels loose may qualify, while rot from years of failed caulk or flashing is usually excluded as maintenance.
Signs of water behind siding
Water behind siding shows up as stains that return after cleaning, peeling or bubbling paint, swollen or warped boards, soft spots near trim and the bottom of the wall, and loose panels whose fasteners will not hold. A stain, a musty smell, or soft drywall on the inside of an exterior wall is the clearest sign that the water has crossed the wall and reached the interior.
 Trim that gives under a thumb has lost its strength, and rot at a window corner is a sign the wall behind it needs a moisture test before any repair.
Where a sign appears narrows down the source. Damage under a window points toward flashing and sealant, damage at the bottom of the wall points toward splashback, soil, and gutter overflow, and damage below a roof edge points toward a roof to wall joint. Water also runs sideways along the barrier and sheathing before it surfaces, so the entry point is often higher or farther along the wall than the stain, and wind driven rain from storm damage can open a path that old caulk was covering.
| Sign | What it points to | Urgency |
|---|---|---|
| Stain that returns after cleaning | Repeated wetting from a leak or trapped moisture | Test within weeks |
| Peeling or bubbling paint | Moisture pushing out through wood or fiber cement | Test within weeks |
| Swollen, warped, or cupped boards | Wood or engineered siding that has absorbed water | Test within weeks |
| Soft or spongy spot when pressed | Rot in the siding, trim, or sheathing | Test within days |
| Loose panels or fasteners that will not hold | Sheathing that has softened behind the panel | Test within days |
| Dark streaks at corners and seams | Water following the same path with each rain | Recheck after rain |
| Rot at window corners or the bottom edge | Water collecting where flashing or drainage fails | Test within days |
| Stain or musty smell inside an exterior wall | Moisture that has crossed the full wall | Test within days |
Soft spots deserve the fastest response because they mark wood that has already started to decay. Press along the bottom course, under windows, and at corner trim with a thumb or the handle of a screwdriver, and compare each spot with the board next to it. A firm surface at one spot does not clear the rest of the board.
Water damage or something else?
Heat and fastener movement, mildew, sprinkler overspray, impact damage, and plumbing leaks inside the wall can look like siding water damage without meaning the wall is wet. A mark that returns after cleaning, grows after rain, or comes with softness or a stain indoors belongs in the water damage category, while a mark that washes off or follows a pattern unrelated to weather probably does not.
 Irrigation spray leaves a chalky mineral band that looks like a leak stain, so aim the heads away from the wall and see whether the mark returns before testing the wall.
Vinyl is the usual source of confusion. The Vinyl Siding Institute installation manual says vinyl expands and contracts with outdoor temperature and that fasteners driven tight against the panel cause distortion and buckling, so a panel can ripple with no water involved. Panels are meant to slide freely side to side, with about the thickness of a dime between the fastener head and the panel.
| Lookalike | How it differs | Check |
|---|---|---|
| Heat and fastener movement | Regular ripples in vinyl with no stain or softness | Panels slide freely side to side |
| Mildew and algae | Green or black film on shaded siding that washes off | Scrub with soap and water and a soft brush |
| Sprinkler overspray | Mineral staining at the same height on one side | Run each zone and watch the wall |
| Impact damage | Dents, cracks, or holes with clean edges and no staining | Look for damage on the side facing the weather |
| Plumbing inside the wall | Stain that follows water use rather than rain | Compare against a water meter test |
A stain that follows water use rather than the weather may come from supply or drain lines, and a leak inside the wall needs a different fix than failed flashing. Tracking a stain through a few rain events and a few days of dry weather separates the two, and a stain that appears with no rain at all points inside the house.
What to do right now
Photograph and mark the damage, stop water from reaching the wall, check the inside face, cover any open gap, and book a moisture test before anyone caulks or paints. These steps limit the water and preserve the evidence while the source and the extent of the damage are confirmed by a test. Anything that touches the wall in the meantime, including a pressure washer, a caulk gun, or a coat of paint, can push water deeper or hide the evidence an inspector needs.
 Dated pencil outlines show whether a stain grows after the next rain, which tells an inspector or adjuster whether the leak is still active.
Active water coming through an interior wall, a section of siding hanging loose, or wet outlets on an exterior wall turn this into an emergency water damage situation. Shut off power to any affected outlet at the breaker and call a restoration company the same day, then deal with the cladding once the wall is safe.
1. Mark and photograph the damage
Take wide and close photos of every stain, warped board, and soft spot, and outline each stain with a pencil and the date so you can see whether it grows after the next rain.
2. Stop water reaching the wall
Clear any overflowing gutter, turn off sprinklers that hit the siding, and pull mulch or soil back from the base so rain and irrigation stop adding to the problem.
3. Check the inside of the wall
Press the drywall below windows and along the exterior wall, note any softness or musty smell, and move furniture and belongings away from that wall.
4. Cover an open gap
If a missing panel or open joint lets rain in, tape polyethylene sheeting over it and leave the rest of the wall uncovered so it can dry.
5. Hold off on caulk and paint
Leave vinyl lap joints uncaulked and keep any weep openings clear, and hold off on sealing other seams until the wall is tested, because caulk and paint over a wet wall trap the water.
6. Book a moisture test
Call a contractor or inspector who reads moisture in the sheathing, and wait for the readings to show where the wet areas end before any repair is priced.
How water gets behind siding
Water gets behind siding at openings, roof joints, penetrations, damaged panels, and the base of the wall, usually where flashing, sealant, or the barrier has failed or was never installed correctly. Once it is behind the cladding, gravity moves it down the barrier until it finds sheathing, a wood sill, or an interior wall. Failures usually concentrate at one detail, such as a single window head or roof edge, so the damage clusters in one area of the wall.
 Roof runoff that lands on the wall instead of being turned away by kick-out flashing soaks the same few courses every rain, so a stain below that spot marks where to look for rot.
A small amount of wind driven rain behind the panels is normal. The Vinyl Siding Institute installation manual says vinyl siding works as a supplemental rainscreen that reduces how much water reaches the water-resistive barrier, and that the barrier is there to stop water that has penetrated the cladding from moving farther into the wall. The International Residential Code makes this a requirement: Section R703.2 calls for at least one layer of water-resistive barrier over the studs or sheathing of exterior walls, and Section R703.4 calls for corrosion-resistant flashing applied shingle-fashion to keep water out of the wall cavity. Damage follows when the barrier is torn, lapped the wrong way, or not connected to the flashing, or when water arrives faster than the wall can dry.
| Entry point | What fails | Where it shows |
|---|---|---|
| Overflowing gutter | Water pours down the wall instead of the downspout | Streaks and staining under the gutter run |
| Splashback and ground contact | Soil, mulch, or pooled water at the base keeps the bottom course wet | Rot and staining at the lowest boards |
| Window and door flashing | Head flashing or sill pan missing, torn, or lapped the wrong way | Stain below the opening or inside at the sill |
| Roof to wall joint | Missing kick out flashing sends roof runoff behind the siding | Stain below the roof edge |
| Hose bibs, vents, and light fixtures | Gaps around the penetration let water behind the mounting block | Stain below the fitting |
| Damaged or missing panels | Cracks and gaps expose the barrier directly | Staining below the damaged spot |
| Sprinklers aimed at the wall | Repeated spray wets the siding and the joints | Mineral staining and rot on one side |
Windows and doors are common trouble spots because the sill, jambs, head flashing, barrier, sealant, and trim all meet at one opening. A window or door leak often traces to the head flashing or sill pan hidden behind the siding, which new caulk or trim does not reach. Water also reaches the wall from above, so an overflowing gutter that runs down the siding for years can rot the lower boards before any panel shows a stain.
How to confirm moisture behind it
A moisture test confirms water behind siding by reading the sheathing and framing directly, usually with a pin meter at the trim and lower courses, and then opening a small section to look at the barrier, flashing, and wood. A stain or a firm surface alone cannot show whether the wood behind it is wet, which is why a wall that looks sound can still fail a moisture test.
 A thermal camera shows temperature differences, so a cool patch marks a place to probe and cannot confirm wet wood on its own.
Inspectors read several spots, including a dry area on the same wall for comparison, because meter values mean more when compared from one spot to another. Each reading should be recorded with its location and the date, which lets a second inspector repeat it later and shows whether the wall is drying or still taking on water. Readings on wood are judged against the normal moisture meter readings for each material, with 20% as the long recognized limit for wood in a wall.
| Method | What it shows | Limits |
|---|---|---|
| Press and visual check | Soft spots, stains, and loose panels | Cannot see the sheathing |
| Pin moisture meter | Moisture content of trim, siding, or sheathing at each point | Needs small holes that are sealed afterward |
| Pinless surface meter | Shallow moisture near the surface | Reads only near the surface and cannot confirm the sheathing |
| Infrared camera | Temperature patterns that may mark wet areas | A clue only, and it misses wet wood with no temperature difference |
| Panel lift or small opening | The barrier, flashing, and sheathing in view | Needs a panel removed and reinstalled |
| Interior wall reading | Whether moisture has crossed the wall | Shows the result, not the entry point |
Meters and cameras give clues, and a small exploratory opening is often the only way to confirm the condition of the flashing, barrier, and sheathing. Starting the search above and beside the visible stain finds the entry point faster. An independent building envelope inspector has no repair to sell, which keeps the scope honest, and a written map of wet and dry readings is the document an adjuster or a second contractor will want.
What the water does inside the wall
Water behind siding wets the barrier, sheathing, framing, and insulation in turn, and each layer fails in its own way, from swollen sheathing to saturated insulation to rotted studs. Wood stays protected from decay below about 20% moisture content, the long recognized limit described by Home Innovation Research Labs, and decay becomes likely once moisture content passes the fiber saturation point of roughly 26% to 29%.
 Sheathing is stained and swollen along its bottom edge first, because water runs down the barrier and collects at the base of the wall before it shows outside.
The damage builds slowly, because a wall that dries between rains can stay below the threshold for long periods, while a wall that stays wet for months crosses it and starts to rot. Before a wall is closed, sheathing and framing should read below 20% moisture content, and a wall that still reads higher needs more drying or has a leak that is still active.
| Layer | Role | When wet |
|---|---|---|
| Siding and trim | Sheds most rain | Stains, warps, and rots if it is wood |
| Water-resistive barrier | Drains water that gets past the siding | Tears or backward laps send water to the sheathing |
| Sheathing | Backing that holds fasteners and stiffens the wall | Swells, softens, and loses its grip on fasteners |
| Framing | Studs, plates, and headers | Rots and loses strength |
| Insulation | Thermal layer in the cavity | Holds water against framing and loses its value |
| Interior drywall | Finished wall surface | Stains, softens, and grows mold |
Sheathing that no longer holds fasteners explains why a panel that keeps coming loose often points to damaged wood behind it. Wet insulation in the wall stays damp inside a closed cavity long after the leak stops, and it slows the drying of the framing beside it. When studs or plates have softened, the repair moves from cladding work to framing work, and a contractor may need to support or replace framing before the wall is closed.
Water damage by siding type
Water damage looks different on each siding material, and the wall behind decides how far it has gone. Vinyl and aluminum do not rot but pass water to the wall behind them, while wood and engineered wood swell and decay. Aluminum dents and corrodes where it is damaged, and engineered wood swells at its edges and joints once the coating fails.
 Boards near the ground stay wet longest, so wood siding rots from the bottom up, and curled boards with peeling paint mean the sheathing behind them needs a moisture check.
Vinyl siding water damage usually hides behind an intact surface. The Vinyl Siding Institute describes vinyl siding as cladding designed to let the materials behind it breathe, so a wall can be wet with panels that look normal, and the first visible sign is often a loose panel, a stain at a seam, or damage at the trim. Wood siding shows the problem sooner, with cupped boards, peeling paint, and soft lower edges.
| Siding | Water damage | Repair |
|---|---|---|
| Vinyl | No rot in the panel, but wet sheathing behind it and loose, stained, or cracked panels | Replace panels, repair the wall, and restore the barrier |
| Aluminum | Dents and corrosion at damaged spots, with the same hidden damage behind | Replace panels and repair what is behind them |
| Wood and clapboard | Cupping, rot, peeling paint, and soft lower boards | Cut out and replace rotted boards, then prime and paint |
| Engineered wood | Swelling at edges and joints once the coating fails | Replace swollen boards and reseal cut edges |
| Fiber cement | Staining and damaged edges, with the wall behind exposed | Replace damaged boards and restore the flashing |
Stucco and brick veneer follow different rules, and stucco water damage involves lath and a base drainage screed that siding does not have. Brick veneer sits in front of its own drainage cavity with weep holes, so the wall behind it is judged differently from the wall behind siding. Whatever the siding material, the repair works from the wall outward: find the source, open the wall, dry it, and rebuild the barrier and flashing before any new siding goes on.
Rotted siding repair or replacement
Replace rotted siding boards and any sheathing or framing that has softened, and patch only small rot confined to a trim edge that has sound wood behind it. A repair that leaves wet or soft wood behind the new siding fails, because the wood keeps decaying under a surface that looks new. Filler and paint over soft wood cover the surface and leave the wet wood behind it in place.
 Rotted boards are cut out back to sound wood and replaced with primed boards, and any soft sheathing behind the opening is replaced first.
The depth of the damage sets the repair. A few damaged panels over dry sheathing is a siding job, soft sheathing means opening the wall to replace it and the barrier, and soft framing means structural water damage that a carpenter has to repair. Boards that no longer match because the profile was discontinued can push the decision toward residing the full wall.
| Option | Fits when | What it involves |
|---|---|---|
| Reseal and reflash | The wall is dry and the flashing or seal has failed | Fix the flashing, then reseal the seam |
| Replace panels or boards | The damage stops at the siding and the sheathing is dry | Remove the damaged pieces and fit new ones |
| Cut out and patch trim | Rot is limited to a trim edge and the wood behind is sound | Cut back to sound wood, patch, prime, and paint |
| Replace a section and sheathing | Sheathing is soft or wet behind the damage | Remove siding, replace sheathing and barrier, and reinstall |
| Rebuild the wall | Framing is soft or the sheathing is wet across most of the wall | Open the wall, repair framing, and re-side it |
Older homes add two hazards when siding comes off. EPA says homes built before 1978 may have lead-based paint, and its RRP rule requires contractors paid to disturb painted surfaces in those homes to use lead-safe work practices. The Vinyl Siding Institute calls asbestos siding a regulated material to raise with the environmental agency or building official before re-siding over it.
Who to call for the repair
Call a siding contractor for panels, flashing, and the barrier, a carpenter or remodeler when sheathing or framing is rotted, and a water damage restoration company when water has reached insulation or drywall inside. An independent inspector scopes the damage without a repair to sell, and a roofer fixes flashing where the roof meets the wall. Most jobs need more than one trade, so ask who will coordinate, and ask for a written scope that lists moisture testing, removal, sheathing repair, barrier, flashing, and the new siding so the quotes stay comparable.
| Who | Handles | Call when |
|---|---|---|
| Siding contractor | Panels, trim, flashing, and housewrap | The damage is in the cladding and its flashing |
| Carpenter or remodeler | Rotted sheathing, studs, and trim | The wood behind the siding is soft |
| Roofer | Kick out and step flashing at the roof edge | The stain sits below a roof to wall joint |
| Restoration company | Wet insulation, drywall, drying, and mold | Water has reached the inside of the wall |
| Independent inspector | Moisture mapping and written scope | You want the extent confirmed first |
A roof leak that runs down inside the wall needs the roof fixed before the siding is touched, since new panels over a leaking roof joint fail the same way the old ones did. A siding contractor should be able to show a license where the state requires one and proof of insurance, and a carpenter doing structural repair should carry the same.
DIY or professional repair
Clearing gutters, re-aiming sprinklers, and swapping a few vinyl panels over dry sheathing are reasonable DIY jobs, while replacing sheathing, flashing a window, and any work on an older home are better left to a professional. The line falls where the wall has to be opened, because that is where wet wood, flashing details, and lead or asbestos hazards show up.
 Mulch and soil piled against the base of a wall hold moisture against the bottom course, so pulling it back is one of the few repairs that needs no moisture test first.
Most of the safe DIY work happens outside the wall, at the gutters, sprinklers, soil line, and sealant at trim. Checking the sheathing with a moisture meter before any panel goes back on decides whether a cladding repair is enough, and a panel that unlocks easily over firm, dry sheathing is the only siding repair that suits a first time DIYer.
| Task | DIY? | Why |
|---|---|---|
| Clearing gutters and aiming sprinklers away | Yes | Low risk, and it stops the source |
| Replacing a few vinyl panels | Often | Works when a moisture check shows dry sheathing and you use a zip tool made for unlocking panels |
| Cutting out rotted trim | Sometimes | Needs a clean cut to sound wood and a sealed edge |
| Replacing sheathing and barrier | No | Must be shingled with flashing, and the framing needs inspection |
| Flashing a window or door | No | A hidden detail that affects the whole opening |
| Disturbing paint on a pre-1978 home | Use caution | Lead dust is a hazard even where the rule does not apply |
| Wet insulation and interior drying | No | Needs drying equipment and moisture mapping |
The EPA says its lead RRP rule does not generally apply to homeowners working on their own pre-1978 homes, but lead dust is still a hazard for anyone nearby, especially children. The agency's lead renovation rule applies if you rent out part of the home or work on houses for profit. Hold off on removing old painted siding yourself until the paint has been tested.
Siding water damage repair cost
Published ranges for siding leak and water damage repairs put a typical repair at $500 to $4,000 in total, but the price depends on the siding material and on whether the barrier, sheathing, or framing behind it is damaged. A section of vinyl costs $2–$4 per square foot, wood costs $4–$13, and adding the sheathing, housewrap, and removal brings the all-in rate for a wood or fiber cement section to about $10–$36 per square foot.
 Ask whether a quote prices work above the first floor separately, since ladder or scaffold time can raise the labor line on a repair that is small.
Each rate applies to a different area. Material rates cover the square feet of siding that are replaced, and the all-in rates cover the square feet of wall that are opened, which is usually larger than the visible stain. Ask whether the quote includes moisture testing before the wall is opened, flashing, a new barrier, and who pays for extra work if the sheathing turns out to be wet.
| Scenario | Area | Estimates per sq ft | Estimates |
|---|---|---|---|
| Replace a vinyl section | 100 sq ft | $2–$4 | $200–$400 |
| Flashing repair at an opening | One opening | Flat fee | $200–$500 |
| Replace an aluminum section | 100 sq ft | $3–$6 | $300–$600 |
| Replace a wood or fiber cement section | 100 sq ft | $4–$13 | $400–$1,300 |
| Dry rot repair at trim or a window | Small area | Flat fee | $100–$2,000 |
| Wood section plus sheathing and housewrap | 100 sq ft | $10–$36 | $1,000–$3,600 |
| Interior drying and repairs | Affected rooms | $3–$7.50 | $1,500–$7,000 |
| Wall rebuild, siding and sheathing | 400 sq ft | $10–$36 | $4,000–$14,400 |
Worked through, 100 square feet of wood at $4 to $13 costs $400 to $1,300, the same 100 square feet with sheathing and housewrap at $10 to $36 costs $1,000 to $3,600, and a 400 square foot wall at $10 to $36 costs $4,000 to $14,400. The all-in rate assumes the sheathing under the whole opened area is replaced, which is why it runs well above the material rate, and a section with dry sheathing costs closer to the material figure. Material rates cover only the damaged section, so multiplying the all-in rate by a whole house of 1,500 to 2,200 square feet of wall would give a number that no repair of a single section reaches.
Drying the wet insulation and drywall inside the house is priced separately from the cladding work, and mitigation falls within the national range in water damage restoration cost. Height adds labor because a second story wall needs ladders, scaffolding, or lifts, and pre-1978 homes can add lead-safe work practices or an asbestos test before any siding comes off.
Does insurance cover it?
Homeowners insurance usually covers sudden and accidental damage and excludes wear, rot, and poor maintenance, so siding that rots after years of leaking flashing or caulk is often denied, while siding torn loose by wind or hail may be covered. According to NAIC, these exclusions are written into the policy itself, so the wording of each policy decides whether a given loss counts as sudden or as maintenance.
 Hail leaves scattered round dents across the whole side that faced the storm, including on gutters and downspouts, which an adjuster treats as sudden storm damage that a policy is more likely to cover.
The cause on the adjuster's report decides the outcome. Storm damage that tore panels loose and let rain in may qualify, while the same rot traced to a clogged gutter is usually treated as maintenance, and interior damage from a covered event can be handled separately from the cost of replacing the cladding. A repair at the low end of the cost range may also fall below the policy deductible, in which case there is nothing to claim.
Read the exclusions before assuming either answer, because homeowners insurance covers water damage only from the causes the policy names. Photograph the damage before anything is removed, keep removed boards and flashing until the adjuster has seen them, and ask an inspector for a written moisture map that shows where the water entered and how far it spread.
Mold behind siding
Mold can grow behind siding that stays wet. The EPA's brief guide to mold, moisture, and your home says moisture control is the key to mold control and that damp materials should be dried within 24 to 48 hours, which is rarely possible for a wall that is closed and still leaking. Musty odors inside the house and dark growth on the sheathing or barrier behind removed siding are the usual signs.
Mold on the sheathing, insulation, or drywall means the wall has stayed wet long enough to need opening. The EPA says a moldy area under about 10 square feet can usually be handled by the homeowner, mold over 10 square feet or after a lot of water damage calls for its guidance on larger remediation projects, and porous materials may have to be thrown away if they become moldy.
Mold treated only on the surface returns if the water keeps coming. The wet material is cut out and the leak fixed first, and moldy interior drywall is usually cut out rather than scrubbed, so removing mold from drywall depends on how much of the board is affected. Water damage restoration dries the wall, and a separate mold specialist handles growth that has already taken hold.
Prevention
Clearing gutters, keeping soil and sprinklers off the wall, checking flashing and seals, walking the walls after storms, and replacing damaged panels promptly reduce the risk of siding water damage. Each task either keeps water from reaching the wall or keeps the drainage path open for the water that does, and a walk around the house after any storm with wind driven rain catches a failure while it is still a stain.
 A seam that has pulled away from the frame is easiest to fix before water has reached the sheathing, so check every window, door, and vent once a year.
Clear gutters and extend downspouts
A gutter and downspout overflow pours water down the siding and soaks the lower boards, so clean the gutters each fall and spring. Extend downspouts so they discharge several feet from the house.
Pull soil, mulch, and sprinklers back from the wall
Soil and mulch piled against siding hold moisture against the bottom course, and sprinklers that hit the wall wet the joints. Keep a gap between the ground and the siding, and aim sprinkler heads away from the wall.
Check flashing and seals at every opening
Inspect sealant and flashing around windows, doors, vents, and fittings each year, and repair them when they crack or pull away. Leave vinyl lap joints uncaulked, since the Vinyl Siding Institute installation manual says not to caulk the overlap joints.
Walk the walls after storms and each spring
Look for new stains, loose panels, cracks, and soft spots, and press along the bottom course and around windows. Catching a stain early keeps the repair at the panel level.
Replace cracked or missing panels promptly
A cracked or missing panel exposes the barrier directly to rain and sun. Replace damaged pieces before the next storm and check the sheathing behind them for moisture.
Frequently asked questions
Is siding damage covered by homeowners insurance?
Sometimes, depending on the cause. Homeowners insurance usually covers sudden and accidental damage, such as hail or wind that tore panels loose, and excludes wear, rot, and poor maintenance, so siding that rots after years of failed caulk or flashing is usually denied. Read the policy exclusions before assuming coverage.
What happens if water gets behind siding?
It wets the barrier, sheathing, framing, and insulation behind the siding. Wood decay becomes likely once its moisture content passes about 26% to 29%, with 20% as the long recognized safe limit, and mold can grow when damp materials are not dried within 24 to 48 hours.
When should siding be replaced because of water damage?
Replace siding when the boards are rotted, the sheathing behind it stays wet or soft after drying, or panels are cracked or missing and let rain behind the wall. Sound siding over a dry wall can stay and be repaired in place, and a few damaged boards are usually replaced one at a time unless the profile has been discontinued.
How can you tell if water damage is permanent?
Wood that is soft, crumbling, or still wet after the wall has dried has been permanently damaged. Siding that is stained or warped but dry and firm can often stay, while wood that stays above 20% moisture content after drying has lost its margin of safety, and a board that feels spongy or reads above about 26% to 29% is likely decaying and needs to be replaced.
How much does it cost to repair water damaged siding?
A typical repair costs $500 to $4,000 in total. Replacing a 100 square foot section costs $200 to $400 for vinyl and $400 to $1,300 for wood or fiber cement, adding sheathing and housewrap brings that section to $1,000 to $3,600, and rebuilding a 400 square foot wall costs $4,000 to $14,400.
Does vinyl siding protect against water?
It sheds most rain but does not waterproof the wall. The Vinyl Siding Institute installation manual describes vinyl siding as exterior cladding, not a water-resistive barrier, and says it must be installed over one with flashed openings, so a wall without them traps the water that gets behind the panels.
Is rotted siding an emergency?
Usually not, but it needs attention within weeks. Rotted siding is a slow problem unless water is entering the house, a section is hanging loose, or wet wiring sits behind it, and those cases call for a same day response.
Can you put new siding over water damaged siding?
No, not over wet or rotted material. New siding hides the damage while the wet sheathing keeps rotting, and the Vinyl Siding Institute installation manual calls for sheathing that provides a smooth, flat surface. Remove the damaged siding, replace rotted sheathing, restore the barrier and flashing, and let the wall dry first.
Does a builder warranty cover siding water damage?
Possibly, depending on the warranty terms and how long ago the home was built. Check which coverage period applies to water intrusion and exterior cladding, and report a leak in writing as soon as it is found, since a builder warranty may set a deadline for reporting a defect.
Sam Hickerson is the founder of RestoreAdvisor and writes consumer guides on mold remediation, water damage restoration, inspection, testing, and home recovery. His work focuses on helping homeowners understand costs, risks, and when to call a professional. He draws on guidance from the EPA, CDC, IICRC, and other authoritative sources to make complex home issues easier to navigate.