
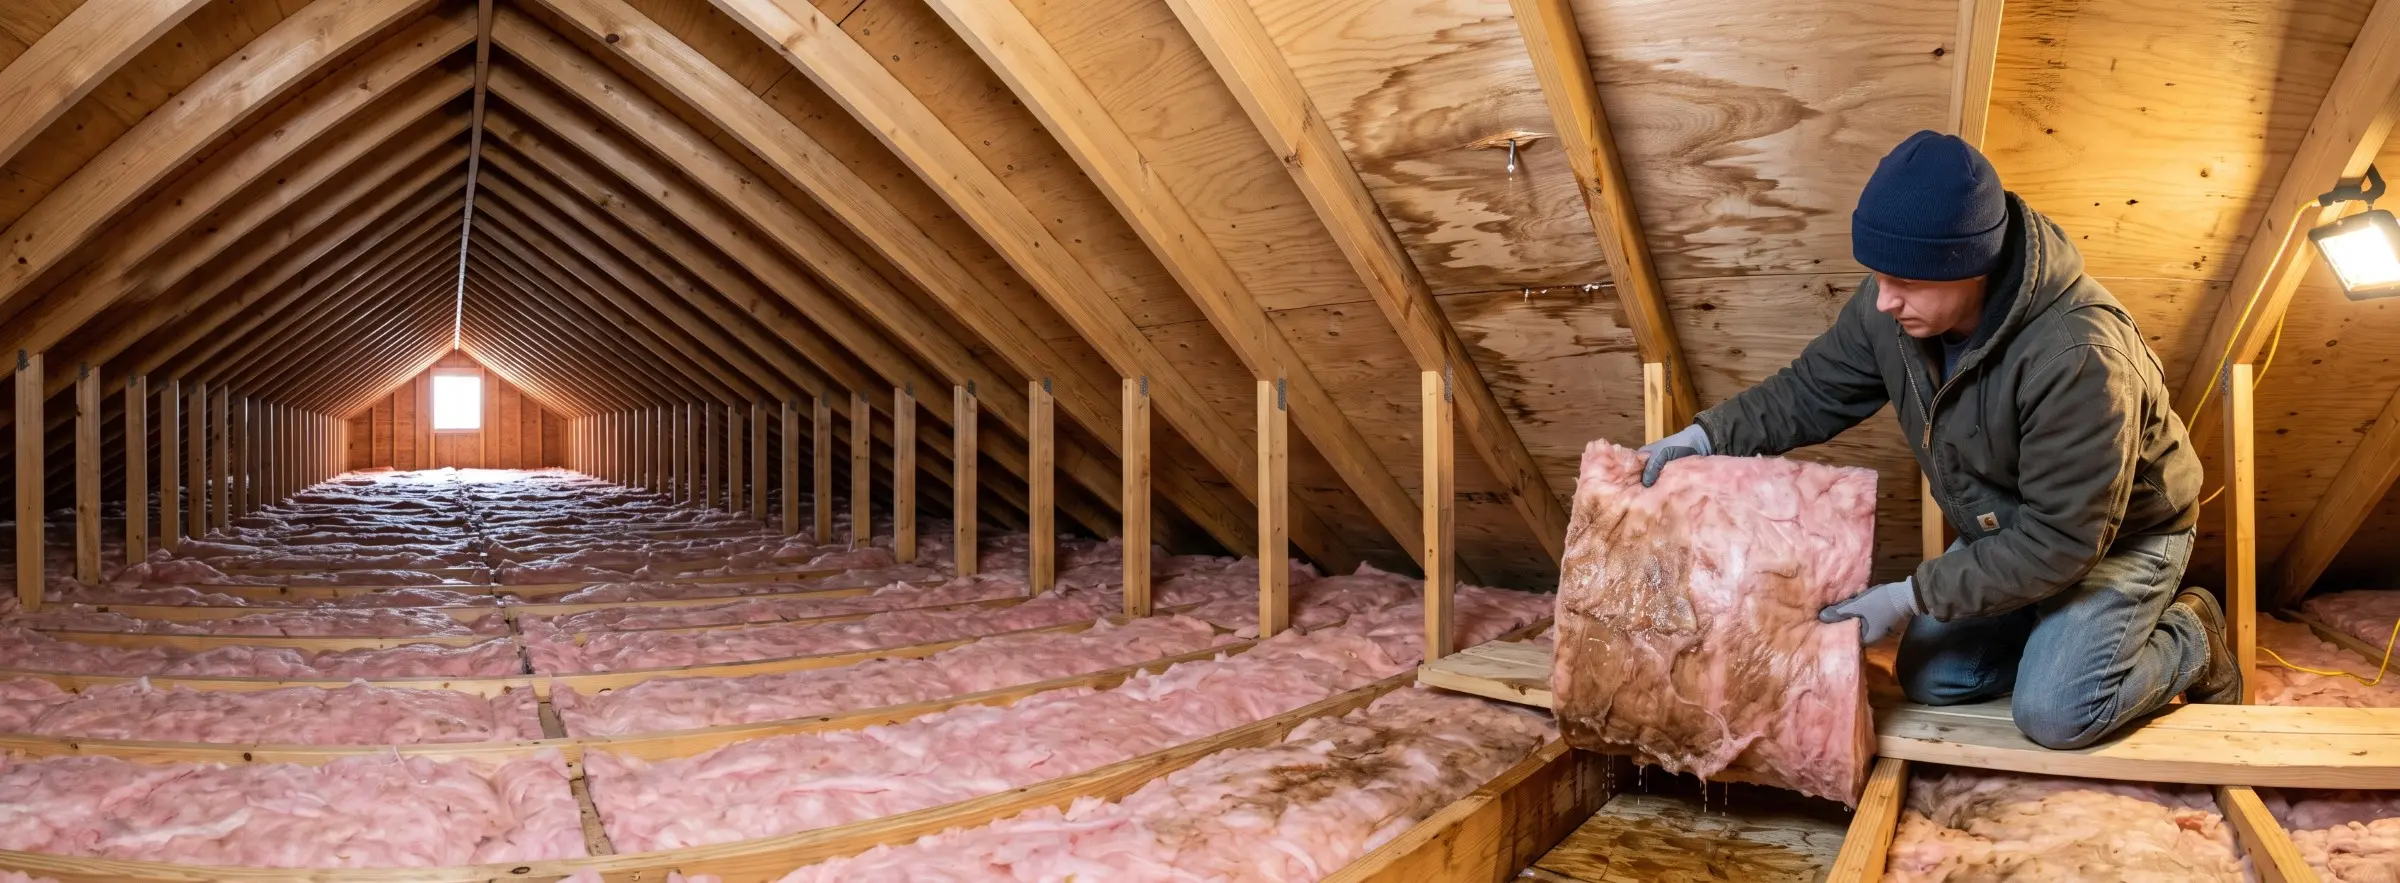

Wet insulation can look fine on top while holding water underneath, which makes the dry-or-replace call hard to make by eye. Three facts settle most cases: the type of insulation, whether the water was clean, and how many hours it has been wet.
Water damaged insulation is any insulation that has absorbed liquid water or stayed damp long enough to lose its insulating value, and ANSI/IICRC S500, the standard that governs professional water damage restoration, treats it as a porous material that gets dried only when it can be cleaned and dried quickly and removed when it can't. That distinction decides almost every call, because the same wet batt can be a quick fix or a total loss depending on the water source and how long it sat.
Replacing insulation that could have been saved usually costs a few hundred dollars, while leaving wet insulation that should have come out can cost thousands in drywall, framing, and mold cleanup. The EPA recommends drying wet porous materials within 24–48 hours, and that deadline is why most wet insulation gets replaced rather than saved.
Key insights
- Time sets the deadline. The EPA says wet porous materials need to dry within 24–48 hours to avoid mold growth, so insulation that is still wet after two days should be treated as a replacement.
- Contaminated water means replacement. Insulation reached by Category 2 or Category 3 water, including flood water and sewage, is removed and discarded under ANSI/IICRC S500.
- Wall cavities favor replacement. Insulation sealed behind drywall dries slowest, and Massachusetts public health guidance is to discard wet insulation in a wall cavity and let the cavity dry before rebuilding.
- Cellulose rarely survives. Blown-in cellulose is made primarily from recycled newsprint, holds water for a long time, and is replaced in nearly every case beyond minor dampness.
- Closed-cell foam is the exception. Closed-cell spray foam and rigid foam board resist water and are often cleaned and left in place, but the framing behind them still needs a moisture reading.
- Replacement typically costs $2–$6 per square foot. That range includes removing the old insulation, and moldy or water damaged material can raise the removal rate to $4.50–$6 per square foot on its own.
Dry wet insulation or replace it?
Replace wet insulation unless it is fiberglass or mineral wool, was soaked by clean water, sits in an open space such as an attic, and can be dried within 24–48 hours. In every other case replacement is the safer call, because insulation that stays wet holds moisture against framing and loses the trapped air that gives it its R-value.
 A reading of 14.2% on the joist is under the roughly 15% dry mark, so the wood can stay, but the matted batt against it is still replaced because insulation itself cannot be metered.
The default leans toward replacement because insulation is inexpensive compared with the drywall, framing, and mold cleanup it can cause when it stays damp. A batt that looks salvageable on top can still be soaked underneath, and compressed fibers rarely regain their original loft once they have been saturated.
| Situation | Usual call | Why |
|---|---|---|
| Fiberglass batts in an open attic, clean water, wet under 24 hours | Dry in place | Air moves freely, and batts can be lifted and checked underneath |
| Fiberglass batts in an open attic, wet longer than 48 hours | Replace | Mold risk rises past the EPA window, and the fibers stay matted |
| Any insulation inside a wall cavity | Replace | The cavity dries slowly, and wet insulation keeps the drywall and studs wet |
| Blown-in cellulose, more than slightly damp | Replace | Paper fibers hold water and settle into a dense, slow-drying mass |
| Closed-cell spray foam or rigid foam board, clean water | Often clean and keep | Closed cells resist water, but the framing behind them needs a reading |
| Any insulation touched by Category 2 or 3 water | Replace | Porous material cannot be cleaned of contamination |
| Insulation with visible mold or a musty smell | Replace | Colonized porous material cannot be cleaned |
| Faced batts with torn or soaked paper facing | Replace | The facing holds moisture against the framing |
What to do in the first hour
In the first hour after insulation gets wet, stop the water source, cut power to the affected area, and stay out from under any bulging ceiling. These steps protect you from electrical hazards and keep the damage from growing. Once water is spreading beyond the insulation, the job becomes emergency water damage restoration, and these first steps limit how far the damage goes.
 A bulge like this means the insulation above is holding water, so shut off the source and cut power to the area before anyone goes into the attic.
1. Stop the source
Shut off the water at the fixture or main valve, or tarp the roof if it is safe to reach. Water that keeps arriving rewets anything you dry.
2. Cut power to the area
Turn off the breakers for wet ceilings, walls, and attic circuits before you touch wet insulation near wiring or light fixtures. Do not stand in water or touch wet fixtures while the power is on.
3. Stay out from under bulging ceilings
A sagging or bulging ceiling is holding water above it and can release it all at once. Keep people and pets away, and do not poke it.
4. Write down when and where it started
Note when the material got wet and where the water came from, because the 24–48 hour window and the water category both depend on it. A quick note on your phone with the date, time, and source is enough.
Why wet insulation stops working
Wet insulation stops working because water fills the air pockets that slow heat flow, so the material no longer resists heat loss in winter or heat gain in summer. Saturated fibers also mat down and press water against the studs, joists, and drywall they touch, which keeps those materials wet and invites mold and rot.
Fibers that stay compressed after drying trap less air than they did before, which is why dried fiberglass often performs worse than new. Mold can grow on wet paper facing and cellulose, and a leak that seemed minor can turn into mold after water damage that is only found weeks later, when a musty smell reaches the living space. Wood framing that stays above roughly 20% moisture content is also at risk of decay over time.
How each insulation type handles water
Insulation type decides how much water the material holds and how quickly it can dry, so the same leak can ruin cellulose and leave closed-cell foam untouched. Fiberglass fibers do not absorb water, but a batt traps it between the fibers and in the paper facing, while cellulose soaks it up like a sponge.
 Cellulose and fiberglass hold water in their fibers, while mineral wool sheds most of it and foam board absorbs very little, so those two are the ones most often kept after clean water.
Spray foam and rigid foam board sit at the other end of the range because their closed cells resist moisture. Mineral wool falls in between, since its fibers repel liquid water better than fiberglass does.
| Insulation type | Holds water | Dry in place? | Usual call |
|---|---|---|---|
| Fiberglass batts | Between fibers and in the facing | Sometimes, in open spaces | Replace if matted, torn, or wet over 48 hours |
| Blown-in fiberglass | Between fibers | Sometimes, in open attics | Dry if slightly damp, replace if saturated |
| Blown-in cellulose | Throughout the fibers | Rarely | Replace |
| Mineral wool | Little, drains well | Often, if caught fast | Dry and reuse if clean and intact |
| Open-cell spray foam | Absorbs water | Rarely | Cut out and replace if soaked |
| Closed-cell spray foam | Very little | Yes | Clean, dry, and keep |
| Rigid foam board | Very little | Yes | Clean, dry, and keep if bonded and intact |
Fiberglass batts and blown-in fiberglass
Fiberglass holds water between its fibers and in any kraft paper facing, and it recovers only if it is lifted, aired out, and dry within about two days. Batts that have matted down, torn at the facing, or stayed damp in a closed cavity are replaced because compressed fibers trap less air and the facing stays damp. Blown-in fiberglass spread across an attic floor dries more easily than batts packed into a wall.
Blown-in cellulose
Blown-in cellulose is made primarily from recycled newsprint, so it absorbs water readily and holds it for a long time. Wet cellulose clumps, settles, and sits against the ceiling drywall below, which makes replacement the standard call unless only a thin surface layer got damp.
Mineral wool
Mineral wool is generally water repellent, so water tends to drain through it instead of soaking in. After clean water that was caught quickly, intact mineral wool batts can often be dried and reinstalled, while pieces that are dirty, compressed, or moldy get replaced.
Spray foam
Closed-cell spray foam has a higher R-value than other common types and stronger resistance to moisture, according to the U.S. Department of Energy, so it is often wiped, dried, and left in place after clean water. Open-cell foam is lighter and spongier, and the same source says it should not be used below ground level where it could absorb water.
Open-cell foam that soaked through is cut out and replaced. Closed-cell foam still needs a moisture reading on the framing and sheathing behind it, because water that got behind the foam has nowhere to go.
Rigid foam board
Rigid foam board such as XPS, EPS, and polyiso absorbs little water, so a board that was splashed or briefly submerged can be wiped down and left in place. Check the seams, tape, and the wall or sill behind each panel, and replace boards that have delaminated or pulled away from the surface. Boards are common on basement and crawl space walls, where crawl space water damage often starts with groundwater or a plumbing leak rather than the foam itself.
How water category changes the answer
The water category decides whether insulation can be saved at all, because ANSI/IICRC S500 allows drying in place only for clean Category 1 water and treats contaminated water as grounds for removal. Category 1 comes from a sanitary source such as a supply line, Category 2 carries chemical or biological contamination, and Category 3 is grossly contaminated.
 ANSI/IICRC S500 assigns Category 1, 2, or 3 by how contaminated the water is, and clean water can move up a category as it sits and picks up debris.
Insulation near a burst supply line or a fresh roof leak usually starts as Category 1, but the classification can worsen with time and contact with dirt, dust, and building materials. The water damage categories that restoration technicians assign are based on the source and on how long the water has been in the structure.
| Category | Typical sources | Insulation verdict |
|---|---|---|
| 1 | Supply line leak, fresh rain through a roof, water heater leak, heating system leak without antifreeze | Dry in place only if it is open, fiberglass or mineral wool, and wet under 48 hours; otherwise replace |
| 2 | Dishwasher or washing machine overflow, sump pump failure, toilet overflow with urine only | Replace all porous insulation |
| 3 | Sewage, toilet backflow with feces, rising flood water, surface water, heating system water containing antifreeze | Replace all fibrous insulation; closed-cell foam is assessed case by case |
Water that starts as Category 1 can slide into Category 2 as it sits and picks up dust, rodent droppings, and construction debris, and attic insulation is especially prone to this. A roof leak that has run through a dirty attic for several days should be treated as contaminated even though rain itself is clean.
Flood water is Category 3 under ANSI/IICRC S500 regardless of how clear it looks, so insulation reached by water from flooding comes out even when it dried quickly. The EPA lists fiberglass and cellulose insulation among the porous materials that may have to be discarded after flood or mold exposure.
How long insulation can stay wet
Wet insulation should be dried within 24–48 hours of getting wet, a limit the EPA recommends for porous materials because mold growth becomes possible after that window. Insulation that has stayed wet for more than 48 hours is replaced rather than dried.
The clock starts when the material gets wet, not when you find it. A slow roof leak that soaked attic insulation over several days is already past the window the day you discover it, so count from the first likely wet date, such as the storm or the day a fixture failed.
| Time wet | Typical condition | What to do |
|---|---|---|
| Under 24 hours | Surface wet, fibers not yet compressed or colonized | Dry in place if the water was clean and the space is open; remove if it is inside a wall |
| 24–48 hours | At the edge of the drying window | Dry only with active airflow, dehumidification, and moisture readings; replace in wall cavities |
| 48–72 hours | Past the drying window | Replace, and check the framing and nearby drywall for growth |
| Over 3 days, or any musty odor | Mold is likely on the facing, insulation, or framing | Replace, treat the framing, and call for mold remediation if growth exceeds about 10 square feet |
The Massachusetts Department of Public Health says to discard wet insulation found in a wall cavity and let the cavity dry before reconstructing the wall. It also advises cutting out wallboard that was not sufficiently dried within 48 hours.
Attic, wall, and crawl space insulation
Attic insulation can often be dried in place, wall cavity insulation is usually removed, and crawl space insulation is replaced when saturated because the area stays damp and is hard to dry. Location changes the answer because it controls airflow and access.
 Batts that have pulled away from the subfloor no longer insulate and leave the wood above them damp, so they come out and the subfloor gets a moisture reading before new insulation goes in.
Crawl space and basement wall insulation face a third problem, which is constant contact with damp foundation surfaces and soil moisture. These areas are also the hardest to dry once the insulation is saturated.
Attic floors and rafters
Attic insulation is the best candidate for drying in place because the batts or loose fill can be lifted, spread out, and checked on both sides. The same open layout makes it easy to miss how far water traveled, so check the decking, joists, and the ceiling below, because attic water damage often travels well past the wet batts.
Ceilings and floor cavities
Insulation above a ceiling collects water from a roof leak or an upstairs plumbing leak, and the wet batts press down on the drywall until it stains, sags, or bulges. Saturated insulation is heavy, so treat a sagging ceiling as a sign that it is holding a lot of water. Stay off the attic floor above it, avoid poking the drywall because it can release that water all at once, and have the insulation removed in sections.
Insulation between floor joists over a basement or crawl space is wet for a different reason, usually a supply line leak from the room above. Water runs along the subfloor and soaks the batts, which then sag away from the wood and keep it damp. Either cavity has to be opened from below or above to remove the insulation and check the framing.
Wall cavities
Insulation inside a wall holds water against both the drywall and the studs, with almost no airflow to carry it away. A cavity that cannot be dried from the inside has to be opened, usually by cutting the drywall at least a foot above the highest wet reading.
Finding where the water entered comes first, and a water leak in a wall often shows itself as a stain, bubbling paint, or a musty smell well away from the actual leak. Exterior walls near windows, doors, and plumbing runs are the most common locations.
Crawl spaces and basement walls
Insulation between crawl space floor joists often absorbs moisture from above, from plumbing leaks and from the humid air below, and it tends to sag away from the subfloor when wet. Wall insulation in basements and crawl spaces is more likely to be rigid foam or closed-cell spray foam, which can usually stay if the surface is cleaned and the wall behind it reads dry.
Common ways insulation gets wet
Insulation most often gets wet from roof leaks, plumbing failures, condensation, window and door leaks, and flood or sewage water. The source decides the water category, and the category decides whether the insulation can be saved.
 Water often travels along a pipe or rafter before it drips, so the wet insulation can sit several feet from the roof penetration where the leak starts.
Roof leaks and ice dams
A roof leak lets rain run through the deck into attic insulation, and ice dams force meltwater under shingles during winter thaws. Damage often spreads for days before a stain shows on the ceiling below.
Condensation and HVAC drain failures
Sweating ducts, a clogged condensate line, or poor attic ventilation can soak insulation with no obvious leak. This slow wetting is common and often goes unnoticed until a musty smell appears.
Plumbing leaks and burst pipes
A burst pipe or failed supply line inside a wall can saturate a cavity in minutes. Supply line water is clean at first, so removing the wet insulation quickly keeps the cavity from staying wet.
Window and door leaks
Failed flashing, caulk, or seals send water into the wall cavity beside the opening. The insulation near sills and headers is usually the first to get wet and the last to dry.
Flood and sewage water
Water from flooding, surface runoff, and sewage backups carries contamination that soaks into fibrous insulation. Insulation reached by these sources is discarded.
How to tell if insulation is wet
Wet insulation is identified by looking and feeling for clumped, flattened, or darkened material, and by taking moisture readings on the framing and drywall next to it. Insulation behind drywall cannot be seen, so staining, odor, and meter readings on the surrounding surfaces are the main clues.
 A cool patch on a thermal image shows where water may be, not how much, so it is confirmed with a pin meter reading at an inspection opening.
A single sign can have other causes, but two or three together point to wet insulation. Photograph anything you find before moving it, since the position and condition of the insulation matter for both the repair scope and the claim.
| Sign | Where you notice it | What it points to |
|---|---|---|
| Damp, clumped, or flattened insulation | Attic or open cavities | Absorbed water and compressed fibers |
| Ceiling stain or sag below an attic | Ceilings | Saturated insulation holding water above the drywall |
| Musty odor | Rooms near the leak | Microbial growth in the damp area |
| Dark spots on the facing or back of drywall | Opened cavities | Fungal growth on paper and framing |
| Soft, bubbling, or discolored drywall | Walls | Wet insulation or a leak behind the surface |
| Rising heating or cooling costs | Utility bills | Lost R-value from wet or matted insulation |
A moisture meter reads wood and drywall, not insulation, so the framing and drywall beside the insulation serve as the reference. Wood framing under about 15% moisture content is dry and readings above about 17% are elevated, while drywall and concrete have their own moisture meter readings for what counts as dry.
A thermal imaging camera can show cool, damp patches behind a wall before any cutting is done. It points to where to open the wall rather than confirming moisture on its own, so follow it with a pin meter reading at the opening.
How to dry insulation that can be saved
Most wet insulation is replaced, not dried. Only slightly damp fiberglass or mineral wool in an open attic, soaked by clean water, can be dried in place in a few days with moving air and a dehumidifier. Saturated batts take longer than the mold window allows, and cellulose or anything soaked by contaminated water goes in the trash.
Insulation that qualifies is dried until it springs back to full thickness and the framing around it reads dry. Professionals apply the same principles of structural drying with industrial equipment and monitoring. If the insulation is not clearly improving after a day, replace it.
1. Stop the source
Fix or shut off the leak and confirm nothing is still dripping. Drying insulation under an active leak only wets it again.
2. Lift and separate
Lift batts out of the joist bays and lay them across the joists so both sides get air. Spread loose fill thinly, and move heavy batts to a dry, ventilated area if the attic cannot be ventilated.
3. Move air and remove humidity
Aim fans across the surface and run a dehumidifier in the space or in the room below. Keep attic vents open so humid air has somewhere to go.
4. Check underneath
Inspect the decking, joists, and ceiling drywall for moisture, and discard any batt with odor, discoloration, mold, or matted fibers. Insulation that fails any of these checks is not worth saving.
5. Confirm dry before reinstalling
Wait until the framing reads dry and the insulation has returned to full loft, then lay it back in place. Insulation put back damp can trap moisture against the wood and start the problem over.
How to remove and replace wet insulation
Removing wet insulation takes seven steps: stop the water, document the damage, protect yourself, remove the material, bag it, dry the cavity, and re-insulate only after readings confirm dry. The order matters because photos have to come before removal and new insulation has to wait until the framing is dry.
 Laying batts across the joists lets air reach both faces, and they go back only after they spring to full loft and the framing reads dry. Any batt with odor, staining, or matted fibers is replaced instead.
1. Stop the water and cut power
Fix or shut off the water source, then turn off the breaker for the area before touching wet insulation near wiring, outlets, or light fixtures. Wet insulation around live wiring creates a shock hazard.
2. Photograph the insulation before touching it
Take wide and close photos and a short video of the wet insulation, the stains around it, and the leak source before anything is removed. Good documentation for insurance is hard to recreate once the material has been thrown away.
3. Put on protective gear
Wear an N95 respirator, gloves, goggles, and long sleeves, since wet fiberglass irritates skin and eyes and moldy insulation releases spores. Keep children, pets, and other people out of the work area.
4. Open the area and remove the wet insulation
In an attic, lift batts or scoop loose fill into bags. In a wall, cut the drywall above the highest wet reading, remove the wet insulation, and keep cutting until the exposed material is dry.
5. Bag and dispose of it
Double bag the removed material in 6 mil polyethylene bags and seal them before carrying them out, as described in the EPA's mold remediation course. Most local waste services accept it as construction debris.
6. Dry the cavity and framing
Run fans and a dehumidifier until the framing reads below about 15% moisture content. Clean any surface staining on the studs or joists and let it dry completely.
7. Re-insulate and close up after readings confirm dry
Install new insulation only after the framing and nearby drywall read dry. Close the wall or restore the attic floor once the new material is in and any repairs to the leak source are finished.
DIY or professional replacement
A homeowner can replace a small area of wet attic insulation after clean water, but a professional should handle large areas, contaminated water, or any insulation hidden in a wall. The decision turns on how much material is wet, where it is, what the water was, and who lives in the house.
 Insulation inside a closed wall cannot be judged from the surface, so a small inspection cut and moisture readings come before deciding how much drywall to remove. This is the point where a wall job moves from DIY to professional.
Professional crews bring extraction equipment, containment, and moisture monitoring that make a wall or ceiling dry faster and more reliably. They also document the work in the form insurers expect, which is difficult to reproduce after a DIY job.
| Factor | DIY is reasonable | Call a professional |
|---|---|---|
| Area affected | A small, contained area under about 100 sq ft | Larger areas or more than one room |
| Water category | Clean Category 1 water | Category 2 or 3 water |
| Location | Open attic floor with a dry ceiling below | Sealed wall, sagging ceiling, or crawl space |
| Time wet | Under 48 hours | Over 48 hours, or any odor or visible mold |
| Household | Healthy adults with no breathing problems | Children, older adults, or anyone with asthma or a weakened immune system |
Hiring the right firm matters when the job is large or the water was contaminated, because a firm that follows ANSI/IICRC S500 and shows written moisture readings protects you from a rushed tear-out that misses wet framing. Ask for a written scope that lists what will be removed, what will be dried in place, and how final readings will be documented.
What replacing wet insulation costs
Replacing wet attic insulation typically costs $2–$6 per square foot including removal of the old material. Removing clean, dry insulation alone runs $1–$2 per square foot, while moldy or water damaged material can raise the removal rate to $4.50–$6 per square foot, plus $1,225–$6,000 or more for mold remediation.
 New material is only one line of a replacement quote, alongside removal, disposal, protective gear, and finishing. Ask for each item priced separately so bids can be compared fairly.
Many contractors also charge a $1,500–$3,000 minimum for sanitation work on contaminated attics, which can outweigh the per square foot rate on a small job. Opening a wall adds drywall repair, texture, and paint on top of the insulation itself, which often makes the finishing work the larger part of the bill.
| Scenario | Typical cost | What drives it |
|---|---|---|
| Remove clean, dry attic insulation only, 1,000 sq ft | $1,000–$2,000 | $1–$2 per sq ft, with blown-in cheaper to vacuum than batts |
| Remove and replace, 500 sq ft attic | $1,000–$3,000 | $2–$6 per sq ft including new material |
| Remove and replace, 1,000 sq ft attic | $2,000–$6,000 | $2–$6 per sq ft including new material |
| Whole attic floor, 1,600–1,800 sq ft | $3,200–$10,800 | $2–$6 per sq ft, with batts and rigid foam costing more than blown-in |
| Moldy or water damaged attic insulation | $4.50–$6 per sq ft to remove, plus $1,225–$6,000+ for remediation | Mold extent, containment, and disposal |
| One wall cavity opened, dried, re-insulated, and patched (estimate) | $800–$3,500 | Drywall finish, paint match, and framing drying time |
For a 250 sq ft attic area, removal at $1–$2 per square foot runs $250–$500, and new fiberglass or blown-in insulation at $1.50–$4 per square foot adds $375–$1,000, for a total of about $625–$1,500 before any contractor minimum. If a clean water roof leak is caught within a day and the batts are only damp, drying in place with fans and a dehumidifier avoids that cost, but batts that are still matted or wet after a day should be replaced, because a failed dry-out adds equipment time on top of the same replacement bill.
These are typical market ranges, and the wider water damage restoration cost depends on the water category, the damage class, and whether framing or drywall also need work. Local labor rates, access, and disposal fees move the final number, so treat these ranges as a way to compare quotes rather than to predict one.
Does insurance cover wet insulation?
Homeowners insurance usually covers wet insulation when the water came from a sudden and accidental event such as a burst pipe or storm damaged roof, and denies it when the damage developed from a long, ongoing leak. The cause of the water decides the outcome.
Insulation inside walls and attics counts as part of the dwelling, so replacement is claimed alongside the drywall and framing rather than as personal property. Whether homeowners insurance covers water damage in your situation depends on your policy form, and payment follows its replacement cost or actual cash value terms after the deductible.
A claim moves faster when the adjuster can see the insulation before it is discarded, so keep photos, the moisture readings, and the repair invoices together. If any insulation is thrown away before the adjuster visits, the photos and a sealed sample of one wet batt are the evidence.
Insurers deny claims for gradual leaks as maintenance issues, and the NAIC explains how those exclusions work in a standard homeowners policy. A slow roof leak or a long running condensation problem is the usual example.
Choosing moisture-resistant insulation
New insulation should match the moisture conditions of the space, and fixing the leak source comes before anything goes back in. In damp basements and crawl spaces, closed-cell spray foam or rigid foam board holds up better than paper faced batts.
 Rigid foam board does not absorb water the way paper faced batts do, which is why it suits basement walls that can see damp or occasional seepage. It still goes over dry concrete, with the moisture source fixed first.
Replacing like for like is fine in a dry attic or exterior wall once the leak is repaired and the framing reads dry. In spaces that stay damp, a more water tolerant material avoids a repeat of the same loss.
| Location | Better choice | Why |
|---|---|---|
| Attic floor | Blown-in fiberglass or mineral wool | Open space dries well, and mineral wool repels water |
| Exterior walls | Fiberglass or mineral wool batts, or closed-cell foam | Batts are inexpensive, and foam resists moisture if leaks are a risk |
| Basement walls | Closed-cell spray foam or rigid foam board | Closed cells resist water, and open-cell foam should not go below ground |
| Crawl space walls | Rigid foam board or closed-cell spray foam | Resists soil moisture and does not wick water |
Confirm the framing reads dry before closing any cavity, and add ventilation or a dehumidifier in spaces that run humid. Insulation placed over damp wood traps that moisture against the framing.
Frequently asked questions
Can you put new insulation over wet insulation?
No. New insulation placed over wet material traps the moisture against the framing and drywall, so the wet layer stays wet and keeps feeding mold. Remove the wet insulation, dry the cavity or joist bay, and confirm moisture readings before adding anything.
How long does wet insulation take to dry?
A few days for slightly damp fiberglass or mineral wool in an open attic with steady airflow and a dehumidifier, but saturated batts and anything inside a closed wall cavity usually do not dry fast enough to beat the 24–48 hour window. Cellulose and insulation soaked by contaminated water should be replaced rather than dried, so count on removal unless the material is clearly improving after a day.
Should you remove wet insulation if the drywall looks dry?
Yes. Insulation holds water longer than the drywall in front of it, so a dry looking wall can hide a wet cavity. Check with a moisture meter or an inspection opening, and cut into the wall if the insulation is wet.
Is wet insulation dangerous to touch or breathe?
Yes, in some cases. Fiberglass irritates skin, eyes, and throat, and insulation with mold growth releases spores when disturbed, which matters most for children, older adults, and people with asthma or weakened immune systems, according to CDC: Basic Facts About Mold. Wear gloves, goggles, long sleeves, and an N95 respirator, and keep other people out of the area while you work.
Will wet insulation raise your energy bills?
Yes. Water takes the place of the trapped air that slows heat flow, so wet insulation lets more heat through and your heating or cooling system runs longer. The effect can continue after the material feels dry if the fibers stayed matted.
Does a musty smell mean the insulation has mold?
Usually yes. A musty odor means microbial growth somewhere in the damp area, and insulation is a common location because it stays wet longest. Check the facing, the back of nearby drywall, and the framing, since the growth may be on those surfaces rather than in the insulation itself.
Can moldy insulation be cleaned or does it have to be thrown out?
Throw it out. Mold grows deep in the fibers where no cleaner reaches, and scrubbing or spraying it can spread spores through the space. Bag the insulation in sealed polyethylene bags, then clean and dry the framing behind it, and call a mold remediation professional when the growth covers more than the insulation itself.
Is mineral wool better than fiberglass when water is a concern?
Generally yes. Mineral wool repels liquid water better than fiberglass and tends to dry faster after clean water, though it costs more per square foot and is still replaced after contaminated water. Fiberglass remains a reasonable choice in dry, ventilated attics.
Who removes wet insulation, a restoration company or an insulation contractor?
Either can, but they do different jobs. A restoration company extracts water, dries the structure, and removes wet material, so choosing a water damage restoration company matters most when the job involves more than the insulation, while an insulation contractor installs new insulation once moisture readings confirm the area is dry. For a small attic area, one insulation contractor can often handle both parts.
Sam Hickerson is the founder of RestoreAdvisor and writes consumer guides on mold remediation, water damage restoration, inspection, testing, and home recovery. His work focuses on helping homeowners understand costs, risks, and when to call a professional. He draws on guidance from the EPA, CDC, IICRC, and other authoritative sources to make complex home issues easier to navigate.